The Hyacinth Dress Sewing Pattern Guide

Hello and welcome to The Hyacinth Dress Sewing Guide!

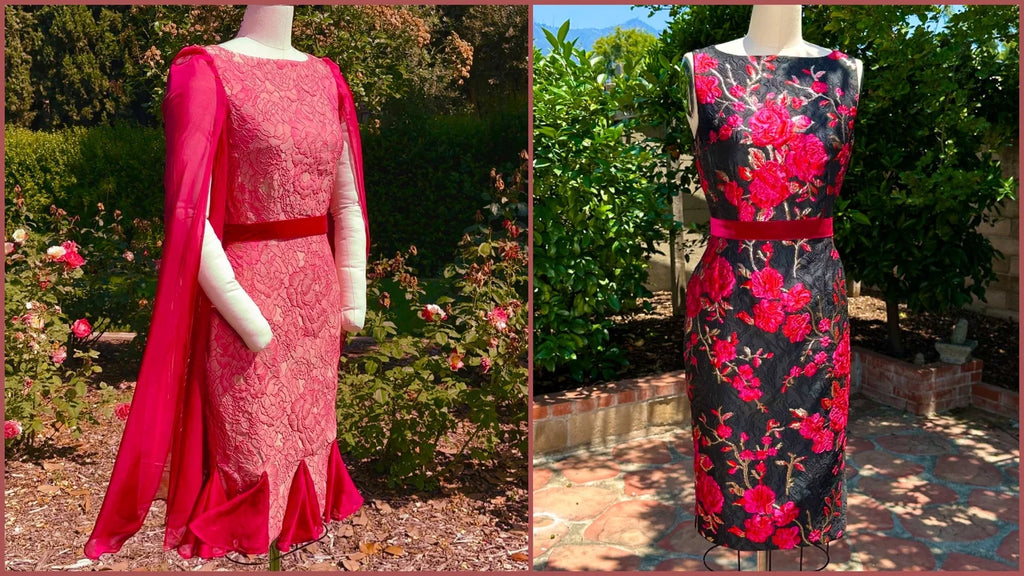
Inspired by the classic whimsy of the 1960’s, The Hyacinth dress is designed to be a staple in your wardrobe. This dress can be created with or without the cape sleeves, and with or without the godets at the hem. This simple but classic silhouette is great on so many body types, and will take on a personality of it’s own depending on the fabric you choose to create it with! The instructions are below!


Before You Get Started

Please take note that the seam allowances on this pattern is 1/2” unless otherwise stated.

The Pattern will have all notions and cutting layout you will need.

This guide will assume you’re creating both the Outer Shell and the Lining at the same time! Just know to repeat everything for the lining even if it doesn’t say specifically to do so.

Difficulty: Beginner to Intermediate

Dress without sleeves or godets = beginner friendly. Dress with sleeves and godets= intermediate

Fabrics: does well with brocades or heavier fabrics. This dress works well with a wide variety of fabrics as long as it has a little bit of structure. The cape sleeves and godets do well with light flowy fabric.

Sharing: If you created something with a Gunnar Deatherage pattern, PLEASE give us a review, and post a photo! Gunnar loves to see your creations, and your reviews really help our little shop grow!


Glossary

RSF = Right Side Facing

RSO = Right Side Out

WSO = Wrong Side Out

Pleating = To fold fabric doubling material over itself. Here’s a tutorial if you need help. https://www.patreon.com/posts/50184974

Flatline = To secure two pieces of fabric together into one single section.

Gathering = process of bunching fabric into a pre-measured length creating fullness. Here’s a tutorial if you need help. https://www.patreon.com/posts/50168324

Zipper Tutorial = https://www.patreon.com/posts/50029964

Rolled Hem Tutorial = https://www.patreon.com/posts/new-tutorial-hem-78784340


Assembling The Bodice with Sleeves


You’ll need Front Bodice (A), Side Bodice (B) and Back Bodice (C) to start. All the darts on these pieces will light up with the darts on the skirt.


1. On the Front Bodice (A) mark the darts using tracing paper and stitching the darts. Repeat on lining pieces.

2. Pin Side Front (B) to Front Bodice (A) with RSF to both sides, using notches as guide, and stitch. Press nice and flat. Cut SA to alleviate some tension if needed.

3. Mark then stitch the darts on Back Bodice (C).  

4. SLEEVE VERSION: attach the Front Bodice and Back Bodice at the shoulder and side seams.

5. Pin and attach the lining at the neck hole. Trim away the neck and arm holes SA. Clip any seam allowance on a curve if needed to help with tension. Then turn RSO. Press that seam nice and flat.


This is a good place to see if the bodice needs adjusting. Just remember that whatever you do to the Outer Shell you’ll have to do to the Lining. If your adjustment moves a dart or seam make sure you make the adjustment on the skirt later.


GUNNAR TIP: if you are using a lightweight fabric for the sleeve change your needle. If you’ve ever noticed when sewing into lightweight fabric that it shreds the fabric or causes it to pucker that might be why!


6. SLEEVE: with sleeve folded in half. Use the instructions on the pattern piece “Stitch Sleeve Slit Closed From Dot To Notch” to accurately pin then stitch.

7. SLEEVE: finish all sides of the sleeves if your fabric type is going to fray with either a rolled hem or bias tape, bias tape will give the sleeve a little extra weight if needed.

8. SLEEVE: Pin the sleeve to both layers (Outer Shell and Lining) with RSF there are notches to help you align the sleeve. Then stitch.


Assembling the Bodice without Sleeves


You’ll need Front Bodice (A), Side Bodice (B) and Back Bodice (C) to start. All the darts on these pieces will light up with the darts on the skirt.


9. On the Front Bodice (A) mark the darts using tracing paper and stitching the darts. Repeat on lining pieces.

10. Pin Side Front (B) to Front Bodice (A) with RSF to both sides, using notches as guide, and stitch. Press nice and flat. Cut SA to alleviate some tension if needed.

11. Mark, then stitch the darts on Back Bodice (C).

12. SLEEVELESS VERSION: attach the Front Bodice and Back Bodice at the shoulder seam only!


This is a good place to see if the bodice needs adjusting. Just remember that whatever you do to the Outer Shell you’ll have to do to the Lining. If your adjustment moves a dart or seam make sure you make the adjustment on the skirt later.


13. Pin and attach the lining (shoulder seams is a good place to start this) then stitch from the arm hole and neck hole. Trim away the neck and arm holes SA. Clip any seam allowance on a curve if needed to help with tension. Then turn RSO. Press seams flat.

14. Pin and stitch the side seams.


Assembling the Skirt with Godets


15. Mark the darts then stitch on both the Back Skirt (F) and Front Skirt (E). Repeat on the lining. Remember these darts will line up with the darts on the bodice.

16. On the bottom of the Back Skirt and Front Skirt there are indicators for the godets. There will be 3 godets on the front/back (one will be the center back seam) and one at each side seam. Mark the godets with tracing paper on both the Outer Shell and Lining.

17. With RSF pin the Front Skirt to the Back Skirt and stitch. On the side seam for the skirt stop at the top of the godet. Press seams open. Repeat for lining.


GUNNAR TIP: If you are using a fabric that is flimsy or light weight execute a Stay Stitch very close to the marked lines for the godets. This will make the godets easier to insert.


18. Cut the marked lines for the godets on the Outer Shell and Lining.

19. For the next step, if you plan on using a bias tape or a tool netting that doesn't need a hem you are going to need to trim away at least ½” of the built in seam allowance on the godets.


For this tutorial, do a rolled hem to finish out your godet.

20. When stitching this next step, when the slit is spread open the apex of the slit isn’t aligned with the edges. This is fine. When you're sewing straight across you're going to catch the very edge of the apex (it will appear you’re sewing at a slight taper) which is what you want. This will give you that nice sharp point at the top.

With RSF pin the godet to the bottom starting at ½” then work your way to the other side. Then sew at ½”. Do all of these besides the center back godet.

21. Onto the Back Skirt (F), fold the skirt in half and pin, then stitch between the “end of zipper” and the beginning godet. Press it open.

22. Treat this next godet just like you did on Step 15!

23. Attaching the lining to the skirt is a bit tedious, so take your time.

Insert your Skirt into the Skirt Lining with the fabrics are RSF. Line up the zipper on the center back. Pin all along the bottom. Then stitch working your way around the bottom.

24. Turn RSO, now would be a good time to press the bottom seam nice and flat, and pull the skirt through. Pin the skirt along the waist band and pin at the zipper stop. And pull the dress inside out. 

25. When getting to the godets you will roll the lining under and the skirt under making a sandwich and a clean edge. Pin together working your way up to the apex of the godet. When you get to the apex of the godet, cut the seam allowance of the godet and shove it into the lining. Do this for all godets. Then hand stitch closed.


Assembling the Skirt without Godets


26. Mark the darts then stitch on both the Back Skirt (F) and Front Skirt (E). Repeat on the lining. Remember these darts will line up with the darts on the bodice.

27. With RSF pin the Front Skirt to the Back Skirt and stitch. Press seams open. Repeat for lining.

28. Onto the Back Skirt (F), fold the skirt in half and pin then stitch from the “end of zipper” to top of the godet starting at the back of the seam. There needs to be a little slit so the skirt can be functional. Press it open.

29. Attaching the lining

Start at the slit in the back center. Pin and stitch.

30. Turn RSO, now would be a good time to press the center back slit nice and flat, and pull the skirt through. Pin the skirt along the waist band and pin at the zipper stop. And pull the dress inside out. 


Assembling the Bodice to the Skirt


31. With RSF attach the Skirt starting at the center back and work your way around. This is just the skirt and not the lining. Stitch.

32. Next, attaching the lining is a little tedious but easy! With RSF pin the lining together connecting them all the away across while making sure everything lines up nicely. Stitch.

33. OPTIONAL: if you want to add a waistband this is the perfect time to do so. Pin this at the center back seam working your way around the waist seam and pin at the other end.. Make sure the waistband is the exact measurement as the waist seam.

34. Insert the invisible zipper to just the Outer Shell. Then attach the Lining to the zipper after by hand stitching it (whip stitch or a hidden stitch would work well here), you’ll roll the seam allowance under creating a nice clean edge. Repeat on other side. Add a hook and eye at the top if you desire.


YOUR DRESS IS READY TO WEAR!


Sleeve Option: attach both the side seam and shoulder seam

Sleeveless Option: Only attach the shoulder seam

Sleeveless Option: what garment should look like after lining has been attached

Sleeve Option

Sleeve Option: bias tape on sleeve

Sleeve Option: Securing the sleeve in arm hole

Godet Option: Marking of godets at the bottom of skirt

Godet Option: Cutting godets open

Godet Option: Slit for godet

Godet Option: the stitching line and how it catches just a bit of the slit apex

Godet Option: Attach the lining to the dress

Godet Option: cutting seam allowance of godet to get a clean look on the outside of garment