The Midsummer Dress Sewing Pattern Guide
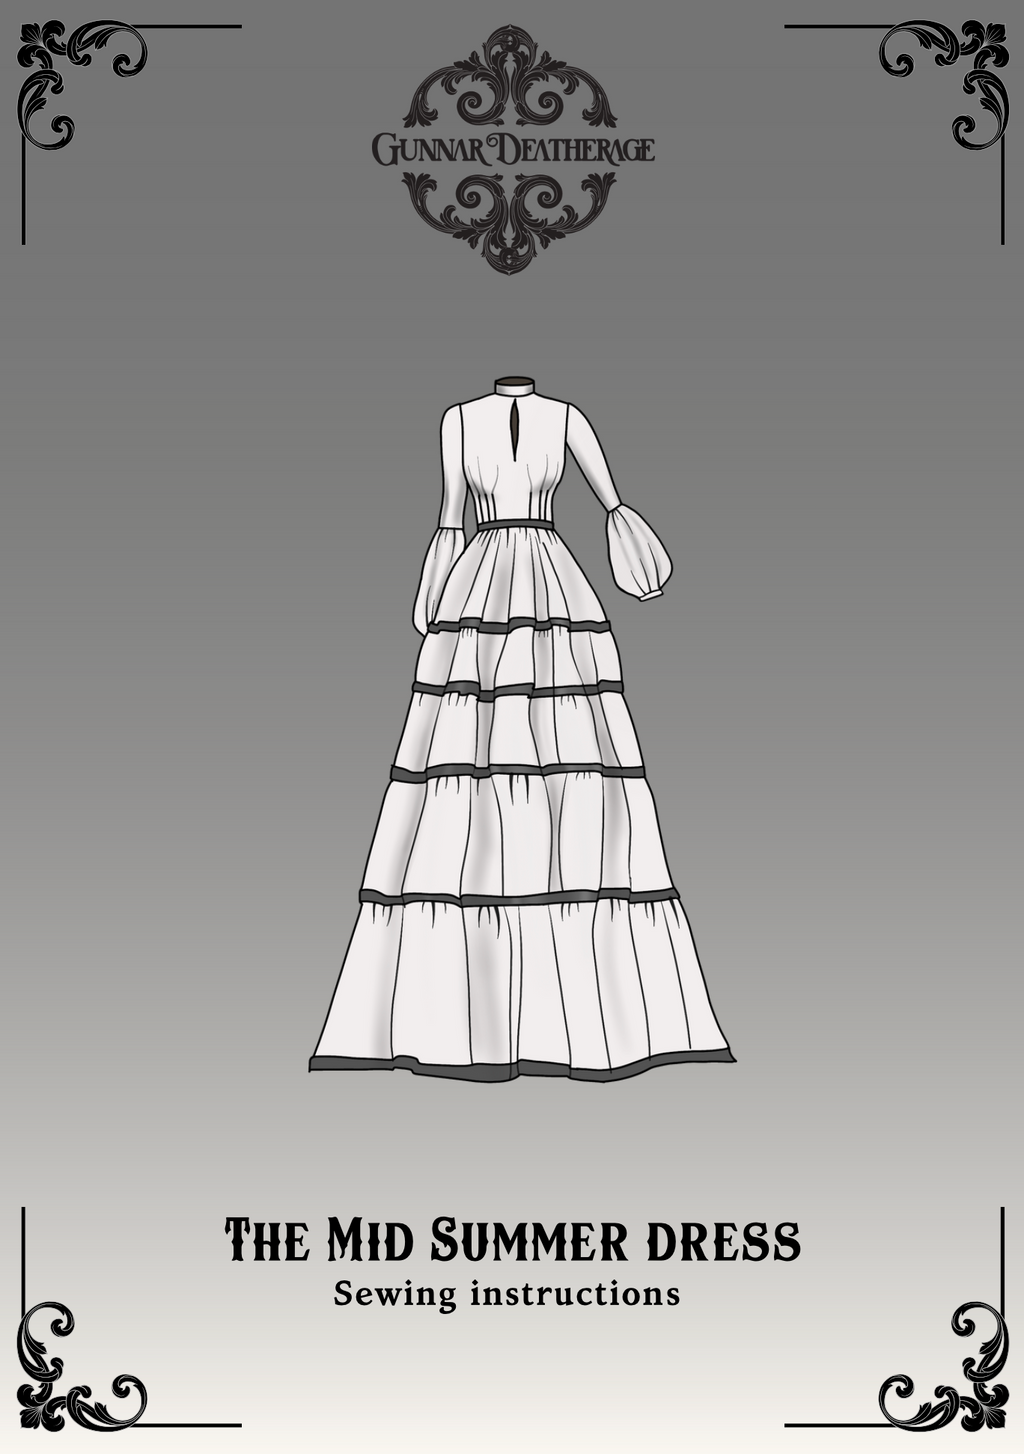
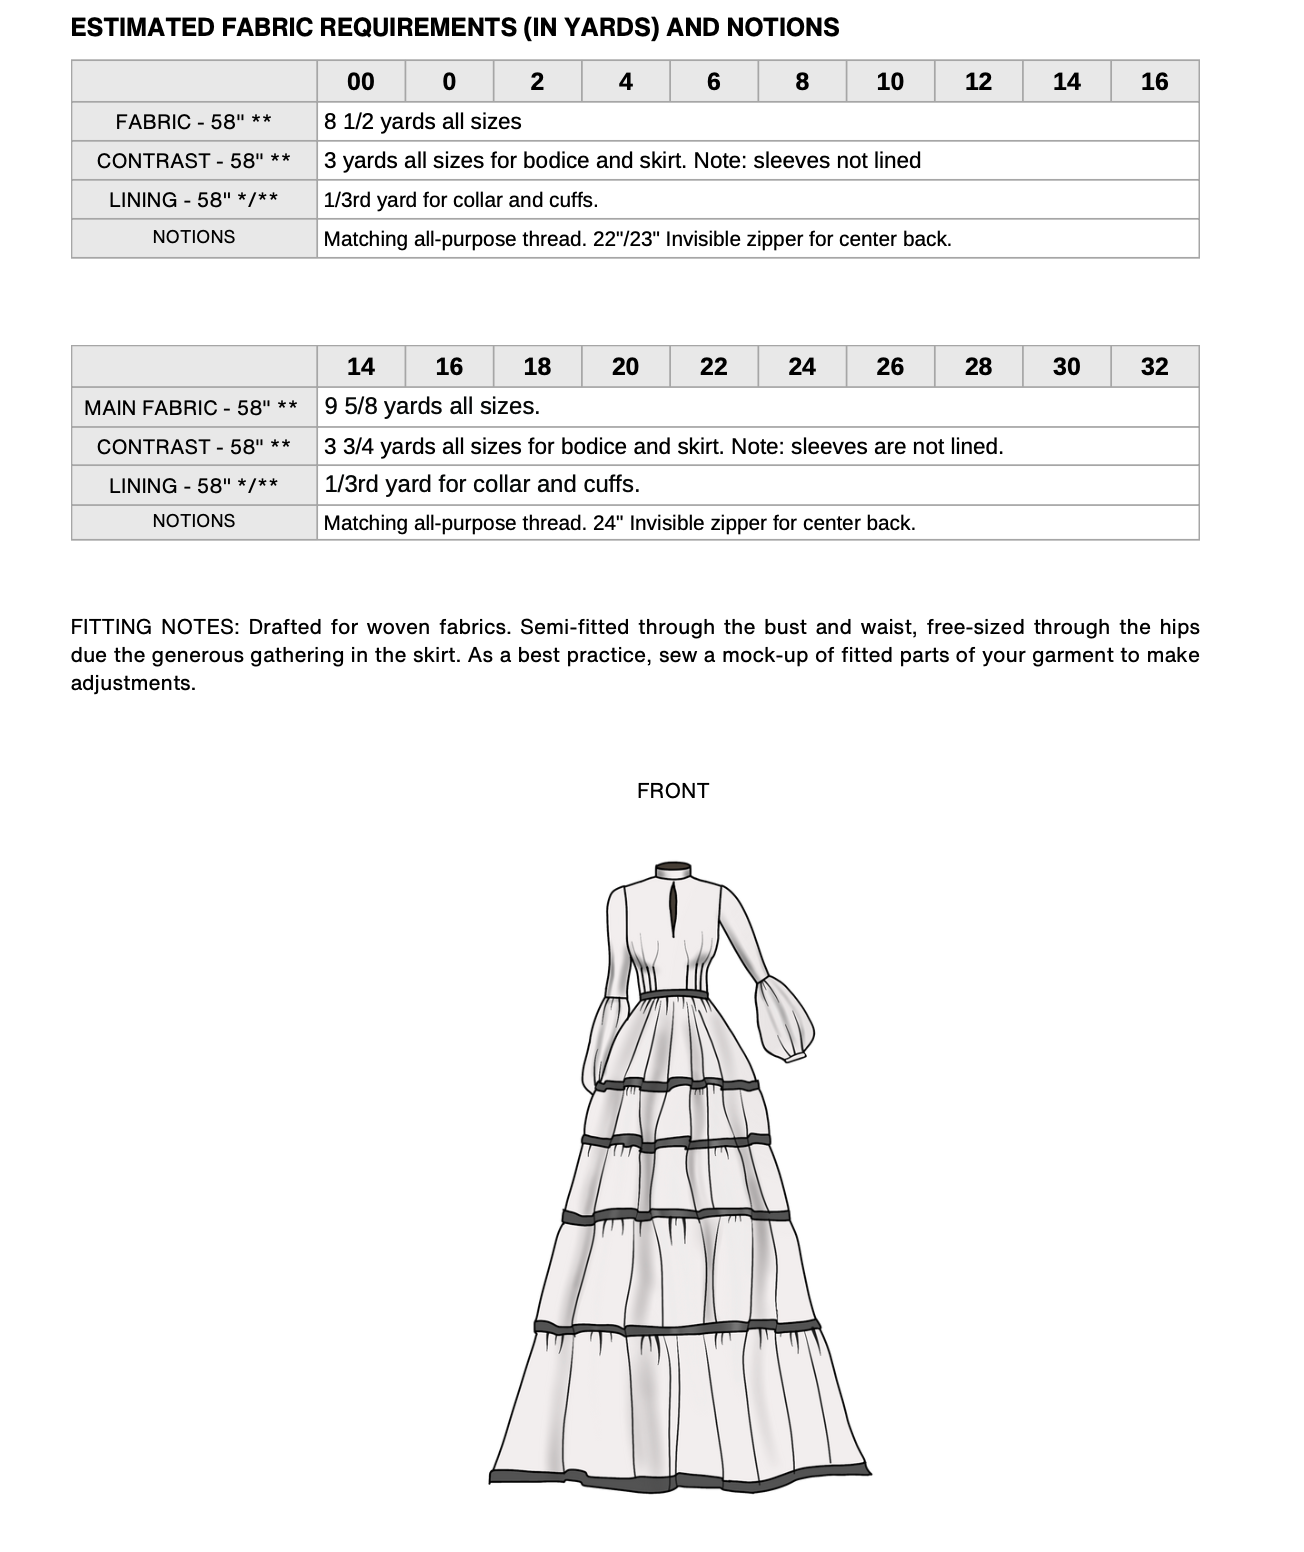
Hello and welcome to The Midsummer Dress Sewing Guide!


Before You Get Started

Please take note that the seam allowances on this pattern is 1/2” unless otherwise stated.

The Pattern will have all notions and cutting layout you will need.

This guide will assume you’re creating both the Outer Shell and the Lining at the same time! Just know to repeat everything for the lining even if it doesn’t say specifically to do so.

Difficulty: Beginner to Intermediate

Fabrics: Woven fabrics

Sharing: If you created something with a Gunnar Deatherage pattern, PLEASE give us a review, and post a photo! Gunnar loves to see your creations, and your reviews really help our little shop grow!


Glossary

RSF = Right Side Facing

RSO = Right Side Out

WSO = Wrong Side Out

Pleating = To fold fabric doubling material over itself. Here’s a tutorial if you need help. https://www.patreon.com/posts/50184974

Flatline = To secure two pieces of fabric together into one single section.

Gathering = process of bunching fabric into a pre-measured length creating fullness. Here’s a tutorial if you need help. https://www.patreon.com/posts/50168324

Zipper Tutorial = https://www.patreon.com/posts/50029964

Rolled Hem Tutorial = https://www.patreon.com/posts/new-tutorial-hem-78784340


Assembling The Bodice


1. On Front Bodice (C) there is dotted line indicating “stitch the keyhole trim” what this means it that you’ll stitch the keyhole directly onto the garment then trim away. If you are using a flimsy fabric take a small piece of interfacing and fuse where you’ll be stitching keyhole. Mark where the keyhole with tracing paper or your preferred method.

2. RSF place your lining with the Front Bodice. Pin around the keyhole. Stitch keyhole (this decides the shape of the keyhole so be accurate).

3. Trim away the seam allowance of the keyhole leaving about ⅛”. Turn RSO

4. Pin all the way around the outside and topstitch ¼”

5. On the pattern piece Front Bodice (C ) there are features called “tuck” (pleat and a dart had a baby). Align the pattern and mark, on both sides, where your tucks will go. Fold the tuck in half and pin. Stitch all tucks (makes an upside down L shape)

6. Grab the Back Bodice (D). Mark your darts and then stitch on outer shell and lining.

7. With RSF line up the side seams and shoulder seams of the Front Bodice and Back Bodice and pin.

8. Flip the garment over and grab the back lining. Do the same same steps in #7. You’re  sandwiching the Front Bodice between the Back Bodice outer shell and lining. 

9. Stitch the side and shoulder seams at ½”. Repeat on the other side.


Constructing The Sleeve


10. You’ll need Upper Sleeve (E) and Lower Sleeve (F). The Lower Sleeve is larger. There is a note on the Lower Sleeve stating you’ll gather the top length to the bottom length of the Upper Sleeve. Do a gather stitch, making sure they’re evenly spaced, on both Lower Sleeve tops.

11. RSF pin Upper and Lower Sleeves together then stitch.

12. Overlock (zigzag or another method you prefer) the gathered edge and both sides of the sleeve.

13. Fold the sleeve in half. Pin all the way down until theres 3” left at the cuff. Stitch leaving that 3” free for the cuff.

14. Topstitch the edge of the cuff down at ¼” when you get to the apex of the cuff go down the other side.

15. On the bottom part Lower Sleeve you’ll place a gather stitch to the length of Cuff Band (G)

16. Add a light/medium weight fusible to the Cuff Band (completely optional). Pin Cuff Band with RSF to the sleeve cuff. Stitch.

17. Fold Cuff Band in half and stitch the sides of the cuff. Cut away some seam allowance. Then turn cuff RSO.

18. Fold seam allowance inwards the inside of the cuff. You can iron it as you go to make it a little easier. Pin. Stitch the seam allowance down by handstitch or topstitch if you dont mind seeing it from the outside.


Adding The Sleeve To The Bodice


At this point the sleeves should be finished and the top should be ready to go


19. Match up sleeve and arm hole seams. Pin working your way around the sleeve hole (treating the lining and outer shell of the bodice as one). Stitch. Repeat on other side.


The Collar Ties

20. Fold Collar Ties (B) in half. Pin one width and the length side leaving one width open. Stitch. Turn RSO. Repeat on the other one.


Assembling The Skirt


21. On Front Upper Tier (H) it says “center front cut on the fold here for center back”. What this means is that you cut one on the fold. In order to that you dont need the seam allowance where it says “place on fold of fabric”. Then you’ll cut two back pieces with the seam allowance.

22. Line the back pieces to the front upper tier. Pin all the way down side seams and stitch.


Note: No matter whether you’re going to use the trim detail, which is optional, or not the top of Skirt Tier (I) will always be gathered and the bottom of what that tier is being sewn onto will not be. If you are going to be utilizing the trim it will need to be stitched onto the bottom layer that will not be gathered.


23. Optional Trim: Start by stitching the trim onto the bottom of the first tier. You’ll be stitching it on the top and bottom. You want to keep the trim as close to the edge as you can.


Note: On Skirt Tier (I) it will tell you how many pieces to cut out to create that tier. There will be a bunch of fabric lying around. Sit the fabric aside and label each tier to help lessen the confusion. 

24. To create the tiers take the needed amount of pieces then place with RSF, pin the side seams, and stitch. Overlock or finish the edges. Do this for all 5 tiers.

25. Optional Trim: Add the trim to the bottom on all 5 tiers exactly like you did in Step 23.

26. Place a gather stitch on the top of tier, starting at tier 2, and gather it evenly to the length of the previous tier. With RSF pin the tier to the previous tier. Stitch together. Repeat this step for the rest of the tiers that you have.

27. Much like tier 1 Front Skirt Lining (J) also has a “place on the fold of fabric line”. You’ll cut the front piece with the seam allowance folded on the pattern piece. Then cut two back pieces without the seam allowance folded.

28. Lay the back pieces of the lining to the front with RSF. Pin side seams. Stitch.


Attaching The Skirt To The Bodice


29. Pin around the edge of the outer shell and lining of the bodice. Then attach the two with a security stitch at ⅛”.

30. Optional Waistline Trim: use Step 23 to stitch the trim to the bottom of the bodice.

31. Place a gather stitch at the top of the skirt and gather evenly to the bottom of the bodice length.

32. With RSF pin the Skirt to the bodice. With RSF pin the lining of the skirt to the lining of the bodice. You’re sandwiching the bodice between the skirt and the skirt lining. Stitch. Overlock or zigzag or reinforce this stitch line.

33. The center line on the Collar (A) will align with where the keyhole is. Use your preferred method to mark this center point. Pin the collar with RSF and stitch the top edge. Clip the curve to relieve some tension. Then turn RSO.

34. Pin the bodice with RSF to the collar. Start by pinning the keyhole and work your way to the center back of the dress. Repeat to the other side. The keyhole will be touching. Stitch.


The Collar


35. Push the seam allowance up and fold the collar seam allowance under and pin while you work your way around the collar. Then handstitch the collar to the lining. You could use a topstitch if you desire just know you’ll see it from the outside.

36. Optional Neck Ties: take the raw edge of the neck tie, place it facing in toward the dress, and line it up with the collar on the back then pin. Repeat for other side. Stitch ⅛”.

37. Optional Overlock: Overlock (finish out the seam in your desired method) the center back seam from the collar all the way to the end of the skirt. This will also join the skirt and skirt lining. You can pin these together before hand.

38. Sew in the invisible zipper.

39. To close the sleeve sew in a hook/eye or snaps


CONGRATULATIONS