
The Fleur Coat
Sewing Pattern Guide


Introducing "Fleur," a sewing pattern that brings the ethereal charm of a fairy world into the realm of fashion. This midi coat, with its blend of elegance and whimsy, is a testament to the enchanting allure of nature's most mystical beings.
Designed for those who appreciate a touch of magic in their wardrobe,Fleur features a sleek mandarin collar, offering a hint of sophistication to its playful design.
The coat's standout feature, a gracefully draped cape, evokes the delicate wings of a fairy, fluttering gently with every movement. Adding to the whimsical theme, the Flounces at the wrists and side seamsmimic the gentle curves of flower petals dancing in a serene breeze.
Size Charts


Fabric Requirements: All Sizes

Difficulty: Medium- Experienced Sewists
Fabric Suggestions:
For the Fleur coat, with its whimsical fairy-inspired design, selecting the right fabrics is crucial to achieve both the desired look and functionality. Here are some options:
Organza (as Contrast Fabric): For the draped cape and flounces, organza is a stellar choice. Its sheer, lightweight nature adds a fairy-like, ethereal quality to the coat, enhancing the whimsical inspiration.
Velvet: For a touch of luxury and depth, velvet is an excellent choice. Its plush texture and sheencan elevate the coat’s elegance, making it perfect for evening wear.
Brocade: This richly decorative woven fabric, often featuring raised designs, can add an opulent and whimsical touch.
Wool or Wool Blends: Ideal for the main body of the coat, wool offers warmth, durability, and aluxurious feel.
Sharing: If you created something with a Gunnar Deatherage pattern, PLEASE give us a review, and post a photo! Gunnar loves to see your creations, and your reviews really help our little shop grow!
Glossary

Finish Seam = overlock, trim away, zigzag, pinking shear them, or however you finish out seams.
Flatline = To secure two pieces of fabric together into one single section.
Rolled Hem Tutorial: CLICK HERE<—
Zipper Tutorial = CLICK HERE<—
Assembling The Fleur Coat
Step 1. Sewing The Back Pieces
Start by preparing your pieces. Lay out the Back Bodice and Side Back Bodice pieces, ensuring the right sides of the fabric are facing each other.
Next, align and pin the pieces. Carefully match the edges of the Back Bodice with the Side Back Bodice, paying close attention to the notches. Once they're aligned, use sewing pins to secure the pieces together along the edge that will be sewn
Now, move on to sewing the pieces together. Start at the top of the pinned pieces and sew with a consistent 1/2" seam allowance.
After sewing, it's time to press the seams. Use an iron to press the seam towards the sides.
Finally, repeat the same process with the lining.

Step#1
Step 2: Sewing the Right Front Bodice
As you observed, the Front pieces are slightly different. Take the Right Front piece and align it with the Side Front piece, right sides together. Repeat with the Left Front piece and align it with the Side Front piece.
Now, just like we did with the Back pieces, carefully align the edges of the Front and Side Front piece. The key here is to match the notches accurately. Once aligned, secure the pieces with sewing pins along the edge that will be sewn.
Proceed to sewing the pieces together. Using your sewing machine, maintain a 1/2" seam allowance from the edge of the fabric as you stitch.
Lay the sewn pieces on your ironing board and press the seam towards the side of the Side Front piece.
Repeat the same process with the Front lining pieces.

Step #2 Illustrated Above
Step 3: Sewing the Lower Side Pieces
Take the Front and Back Lower Side pieces. Lay them out ensuring that the right sides of the fabric are facing each other.
Next, focus on aligning the side seams of both pieces. It’s important to carefully match the notches found on the fabric, and pin in place.
Sew maintaining a consistent 1/2" seam allowance from the edge of the fabric.
After sewing, press the seam open, ensuring that the seam allowances are flat and smooth on each side.
Finally, repeat the entire process with the other set of side pieces and the corresponding lining pieces.

Step #3 Illustrated Above
Step 4: Assembling the Front and Back Bodice
Align the Front and Back pieces of your coat with the right sides facing each other. Carefully pin along the sides and shoulders to hold the pieces in place.
Next, proceed to stitch along the areas you've pinned. Use a 1/2" seam allowance for sewing both the sides and shoulders of the garment.
After stitching, it's time to press all the seams open.
Finally, repeat the entire process with the lining piece.

Step #4 Illustrated Above
Step 5: Hemming the Side Flounce
Trim the hem of the Side Flounce pieces to ensure it's even all around. Press a small fold (about ¼ inch) of the fabric to the wrong side around the hem.
Roll this folded edge over again to encase the raw edge. This creates a narrow, rolled effect.
Pin this rolled hem in place, especially on curves or corners.
Sew close to the inner fold to secure the rolled hem. Use a straight stitch and go slowly to
maintain an even width all around.
Give the hem a final press for a neat finish.

Step#5 Illustrated Above
Step 6: Attaching the Side Flounce
Take the Side Flounce piece and lay it on top of the Lower Side piece. It's important to ensure that the wrong side of the Flounce is facing the right side of the Lower Side piece.
Focus next on alignment. Carefully align the center front top edge of the Flounce with the side seam edge of the Lower Side piece. This alignment is key to ensure that the Flounce drapes correctly and maintains the garment's intended design.
Once you have them aligned, begin pinning them together. Start from the top and work your way down on both sides, securing the Flounce to the Lower Side piece.

Step #6 Illustrated Above
Step 7: Attaching the Lower Side Piece to the Coat
Prepare the Lower Side piece and the Lower side edges of the coat. Lay them out and ensure the right sides of both the coat and the Lower Side piece are facing each other.
Carefully align the outer edges of the Lower Side piece with the Lower side edges of the coat. Pay special attention to matching the notches on both pieces. These notches are crucial guides for proper alignment and fit. Once aligned, start pinning them together. As you pin, ensure that the Flounce piece is sandwiched between the coat and the Lower Side piece.
Proceed to sewing the pinned pieces together. Use a 1/2" seam allowance, starting at the Front bottom edge. Sew all the way around the curve of the coat, finishing at the Back bottom edge. It’s important to note that the Lower Side piece is intentionally longer than the Coat front and back. This is by design and should not be a cause for concern. (a)
Once the seam is sewn, address the curved areas. Carefully clip into the seam allowance at
these curved sections. This step is crucial as it releases the tension in the fabric, allowing the seam to lie flat and smooth along the curves. Be sure to clip just up to the stitching line but not through it. (b)
After clipping, move on to finishing the seam. Use an overlock stitch to clean finish the seam allowance. Finally, press the seam with an iron.
Repeat the steps with the Lining pieces.

Step #7 Illustrated Above
Step 8: Sewing the Sleeves
Take with the sleeves and focus on the sleeve cap area. Locate the dots on the sleeve cap – these are your guidelines for where to place the ease stitching.
Sew a gathering stitch between these dots. Use a long stitch length for this step, as it makes
gathering the fabric easier. Do not backstitch at the beginning or end, and leave long thread tails for pulling. (a)
Next, fold the sleeve in half lengthwise with the right sides facing each other. Ensure that the edges of the sleeve are aligned precisely.
Pin the aligned edges of the sleeve to secure them in place. Then, sew along the pinned edge, forming the sleeve seam. After sewing, press the sleeve seam open or to one side. (b)
Attach the sleeve to the armhole now. Start with the right sides of the sleeve and the bodice facing each other. Line up the side seam of the sleeve with the side seam of the armhole and pin them together. Pin the sleeve around the armhole, stopping at the points where the gather stitches begin on both sides.
Next, gently pull the threads of the gather stitch to ease the cap of the sleeve into the armhole, adjusting until it fits the armhole's measurement. Once adjusted, pin the sleeve cap in place.
Now, sew around the armhole to attach the sleeve. After sewing, finish the seam in your
preferred method, and press with an iron. (c)
Repeat with the Sleeve lining and the Coat lining.
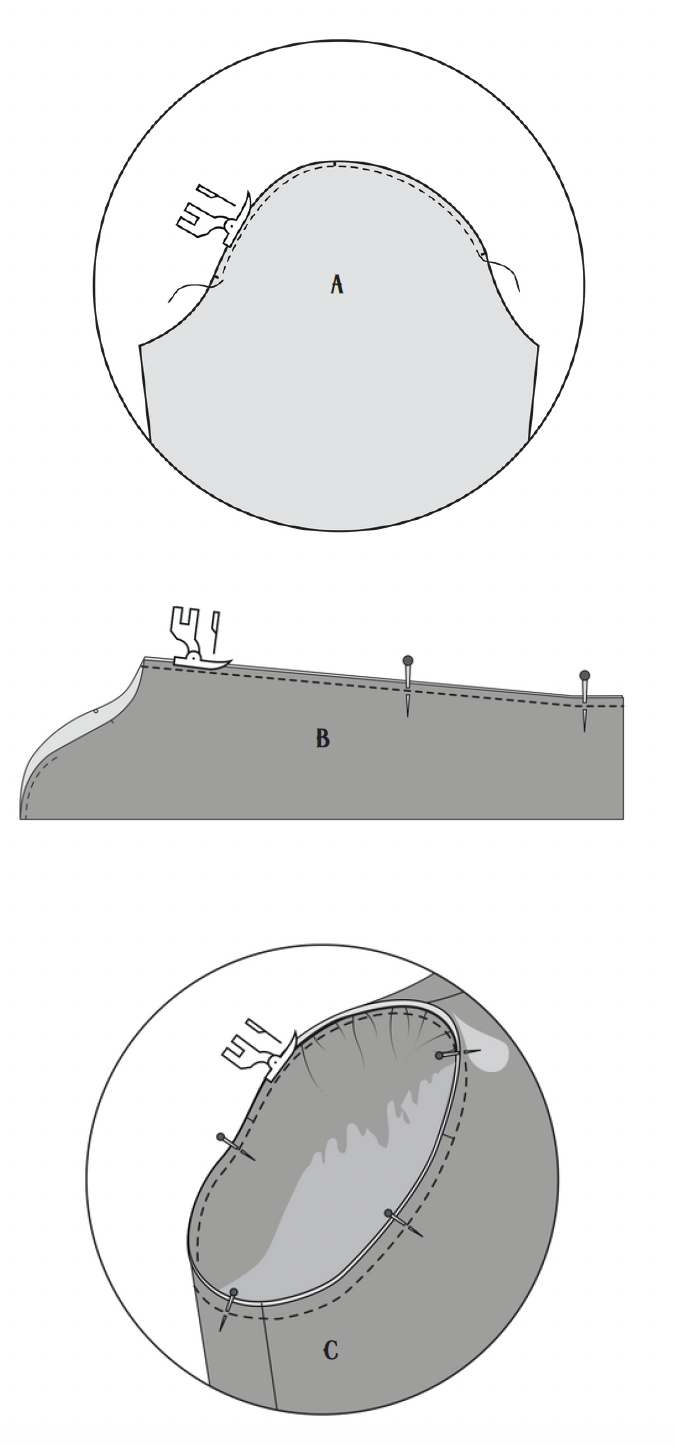
Step #8 Illustrated above
Step 9: Attaching the Shell to the Outer Lining
Take the shell fabric and the lining. Lay them out so that their right sides are facing each other.
Your initial focus will be on the Right side of the garment, where there is a distinct 90-degree corner. Begin by sewing the L-shaped seam using a 1/2" seam allowance. Sew carefully, especially around the corner, to ensure a neat finish. (a)
After sewing the L shape, proceed to cut into the corner. Cut close to, but not through, the seam you’ve just stitched. This trimming allows the fabric to lie flat and reduces bulk in the corner when turned right side out. Next, trim the seam allowance by half along the entire L shape. (b)
Now, turn over the corner to the right side and press it thoroughly with an iron. A well-pressed corner will have a crisp and professional appearance.
Moving on, reposition the shell fabric and lining so they are right sides together again. Start pinning down the right center front of the coat. Continue this process along the hem of the facing. Pin it in place methodically, ensuring smoothness and alignment, all the way to the seam between the Front lining and Side Lining. Sew in place using a 1/2" seam
allowance. (c)
After sewing, trim away half the seam allowance and also the corners. When trimming, be extra careful not to cut through the stitching you just completed.
Repeat the process on the Left Center Front, only this time you will sew directly from the top to the hem.

Step #9 Illustrated Above
Step 10: Sewing the Drape
Grab the Front and Back Drape pieces and place them wrong sides together. This orientation is vital for the French seam technique, which creates a neat, enclosed seam.
Proceed to pin the pieces together. Focus on aligning around the shoulders, carefully matching the notches.
Now, you will sew the pieces together using a French seam. Begin by sewing at 1/4" seam allowance. This first seam encases the raw edges. (a)
After sewing the initial seam, move on to trimming the edges. Trim close to your stitching
line, but be careful not to cut the stitches. (b)
Next, fold the fabric along the seam line so that the right sides of the fabric are now facing each other, encasing the trimmed seam. Ensure the fold is precise and the seam line is exactly at the edge. Pin this fold in place, preparing for the second round of sewing.
Sew again along the folded edge, using a 1/4" seam allowance. This second seam encloses the trimmed raw edges from your first seam, creating a neat and elegant finish inside the garment. (c)
Finally, press the seams with an iron.

Step #10 Illustrated Above
Step 11: Hemming the Drape
Just as we did on step 5, we are going to hem the edge of the Drape.
Lay it out and focus on the outside edge, which is the edge you'll be hemming. The rolled hem is a delicate and elegant finish, perfect for light-weigh and flowing fabrics.

Step #11 Illustrated Above
Step 12: Preparing the Collar
Place the collar pieces right sides facing together. Ensure the edges of the collars match
up precisely.
Carefully pin the collars along the top edge, paying special attention to the curve in the
front. Stitch along the pinned top edge, following the curve of the collar. (a)
Once the collar is stitched, clip half of the seam allowance away. This reduces bulk and helps the collar lay flat when turned right side out. (b)
Gently turn the collar right side out and press with an iron. (c)

Step #12 Illustrated Above
Step 13: Preparing the Sleeve Flounce
Take the Sleeve Flounce piece and fold it in half, with right sides facing. Once folded, begin pinning the sides of the Sleeve Flounce together. Ensure the edges are aligned precisely.
Proceed to sew the pinned sides. Use a 1/2" seam allowance for stitching (a). Finish the seam with an overlock stitch or add a bias tape.
Next, finish the hem of the Flounce, by adding a bias tape. Open one fold of the bias tape and align it with the raw edge of the hem, right sides together. Pin the tape all around the hem and sew along the fold line. (b)
Fold the bias tape over the raw edge to the wrong side of the Flounce. Pin and then stitch in place. Press the hem for a crisp edge.

Step #13 Illustrated Above
Step 14: :Sewing the Wrists
Place the Sleeve Flounce and Sleeve shell right sides together, aligning the raw edges. Pin in place and sew a basting stitch to catch the flounce in place. (a)
Next, place the wrists of the lining and the shell fabric so their right sides are facing each
other, with the Flounce in between.
Make sure everything is perfectly aligned, and then pin the layers together securely.
Proceed to stitch the layers, maintaining a 1/2" seam allowance as you go. (b)
Turn the coat inside out and you will observe that the shell sleeve is slightly longer than the lining. The idea was that the Flounce looks like a shirt underneath. Pull the sleeve hem in it’s natural position and press with an iron.(c)

Step #14 Illustrated Above
Step 15: Attaching the Drape
Place the Drape piece over the Shell Coat. It’s important to orient the pieces correctly: the
wrong side of the Drape should be facing the right side of the Shell Coat. Leave the lining free.
Focus next on aligning the edges of the Drape with the neckline of the Shell Coat. Carefully match the notches on both pieces and pin in place.
After pinning, proceed to sew a basting stitch along the aligned edge. Remember, the basting stitch is not a final stitch; it's meant to be temporary and is usually removed or sewn over in later steps.

Step #15 Illustrated Above
Step 16: Attaching the Collar
Start by turning the coat so that the wrong sides are facing out. This positioning will make
it easier to work with the layers of fabric.
Next, prepare to introduce the collar. Take the collar piece and position it between the shell of the coat and the lining. Ensure that the right sides of the collar are facing the right sides of both the shell and the lining. (a)
Carefully align the edges of the collar with the neckline of the coat. Make sure to match the notches on the collar with the corresponding notches on both the shell coat and the lining. Once everything is aligned, pin all layers together - the shell coat, the Drape, the collar, and the coat lining. You’re essentially creating a “sandwich” with these layers, with the collar in between.
Now, sew all the pinned layers together using a 1/2" seam allowance. This seam will
permanently attach the collar to the coat, so it’s important to sew carefully and maintain the seam allowance for a uniform seam. (b)
Once the sewing is complete, turn the coat right side out through the hem. Finally, give the neckline a thorough pressing with an iron. This step is crucial to set the seams and ensure a crisp, neat finish. Take extra care to pull out the corners on the center fronts to achieve sharp, defined edges.

Step #16 Illustrated Above
Step 17: Hemming the Coat
Begin by aligning the hem of the coat, focusing on both the shell and the lining. Lay them out so that the wrong sides are facing each other. Once aligned, start pinning the hem in place. Make sure the edges are evenly matched.
Now, sew the hem using a 1/4" seam allowance. After sewing, finish the raw edge
with an overlock stitch. (a)
Next, focus on folding the Shell layer. Lift it up towards the inside of the coat to the same
level as the facing. To do this more easily, pull the lining upward slightly. This action gives you the room you need to fold the Shell layer neatly. Once folded, pin the fold in place.
With the Shell fabric folded and pinned, press it with an iron. This pressing sets the fold and gives a crisp edge to the hem. (b)
After pressing the Shell fabric, pull the lining back down into its normal position. Give the entire hem, including the lining, a final press. This step helps to integrate the layers and
ensures a smooth finish.
Finally, close the small gaps on the sides with a hand stitch. This finishing touch is crucial
for a neatly constructed garment. (c)

Step #17 Illustrated Above
Step 18: Finishing the Coat
Buttonholes (Optional): If you choose to add buttons, now is the perfect time to sew
buttonholes on the Right Front Piece. Ensure your buttonholes are aligned with the
markings on the pattern and sew them in place.
Preparing for Snaps: For those opting to add snaps instead, start with the Right Front Piece of your garment. Fold it along the center front, following the markings on your pattern.
After folding, press the fold with an iron to create a sharp, crisp line. Next, pin the folded
edge in place, preparing it for topstitching. Start topstitching at the collar, but remember to remove the Drape first as we don't want to sew through it. Follow the markings on the
pattern for your topstitch, ensuring it is even and straight. (a)
Once the topstitching is complete, it's time to add the female parts of the snaps, ensuring
they are spaced equally from each other. Hand-stitch each snap in place carefully, making
sure they are secure. (b)
Now, move to the Left Front Piece and attach the male parts of the snaps. It's crucial to align these snaps precisely with the female parts on the Right Front Piece. This alignment ensures that when closed, the snaps line up perfectly and hold the garment securely in place.
It’s a good idea to hand-stitch the top of the Right Front piece around the L edge. (c)

Step #18 Illustrated Above