The Gunnar Trouser Sewing Pattern Guide

Hello and welcome to The Gunnar Trouser Sewing Guide!

I tried to make this tutorial as easy as I could. I over explain in some areas, but we tackle everything from the Fly Front and Fly Shield on a pair of jeans all the way to Welt Pockets in backpacker area of a trouser. I wanted to make sure you felt confident in the process, and give you the skills to do this on other projects.

Please send me photos of your creations. I LOVE SEEING THEM! Tag me on instagram, send me an email, or message me on Patreon. Whatever works for you.

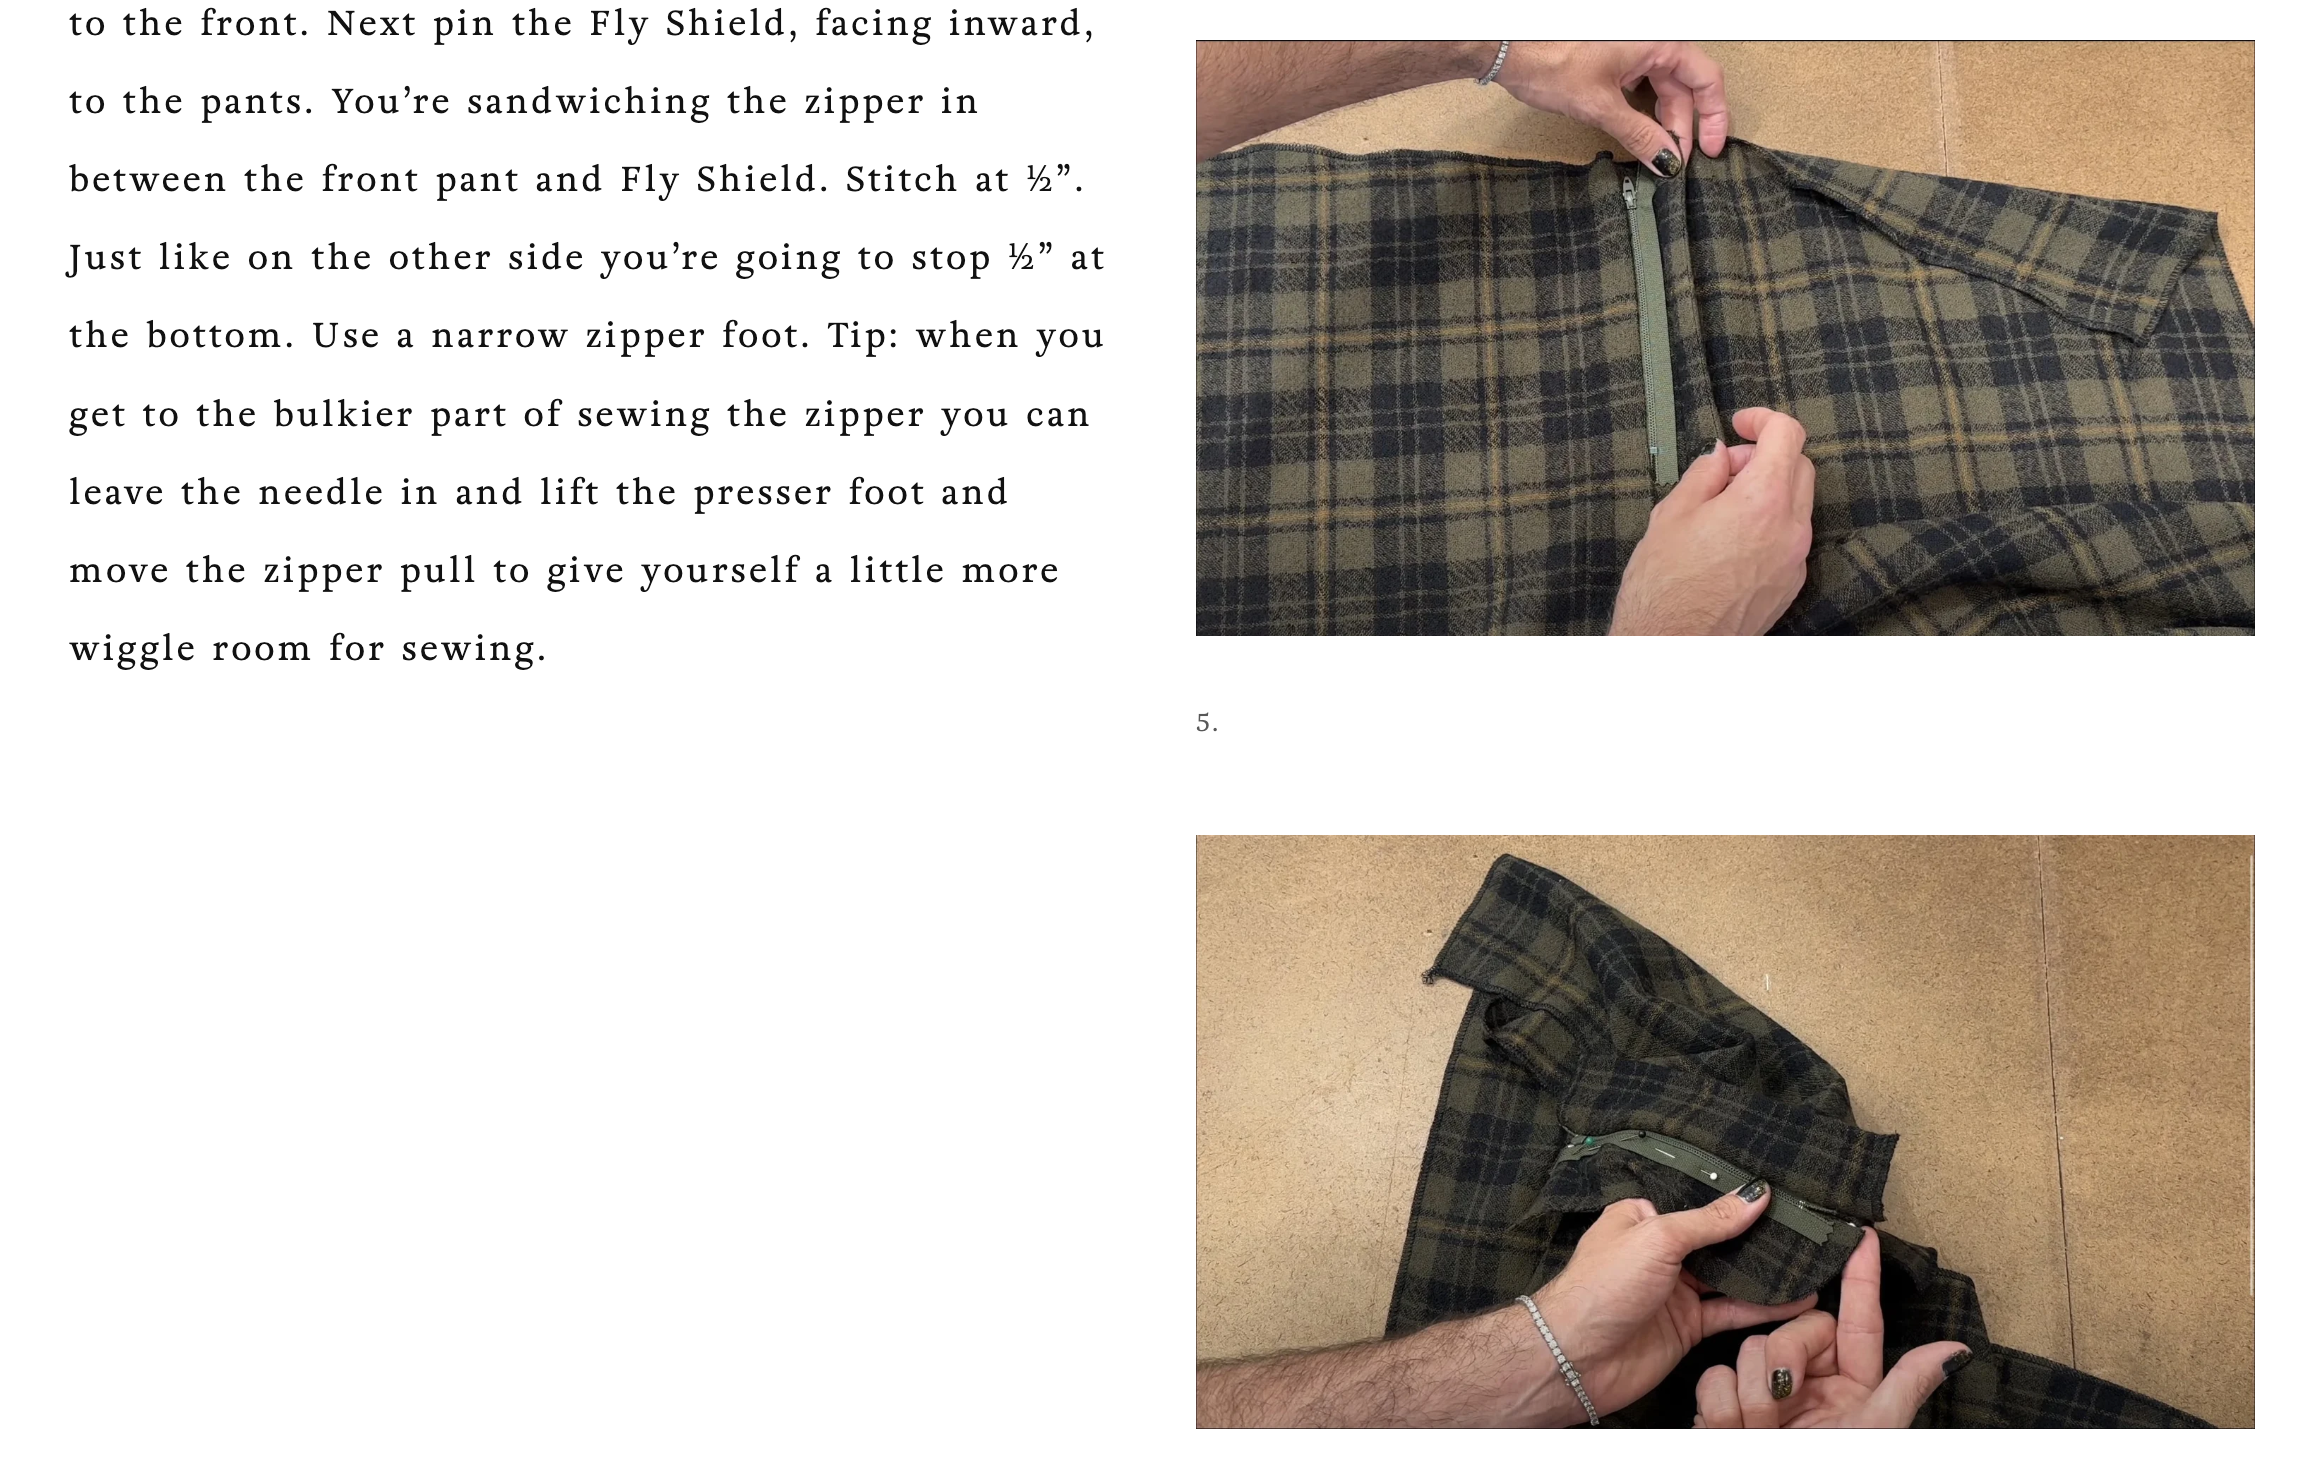
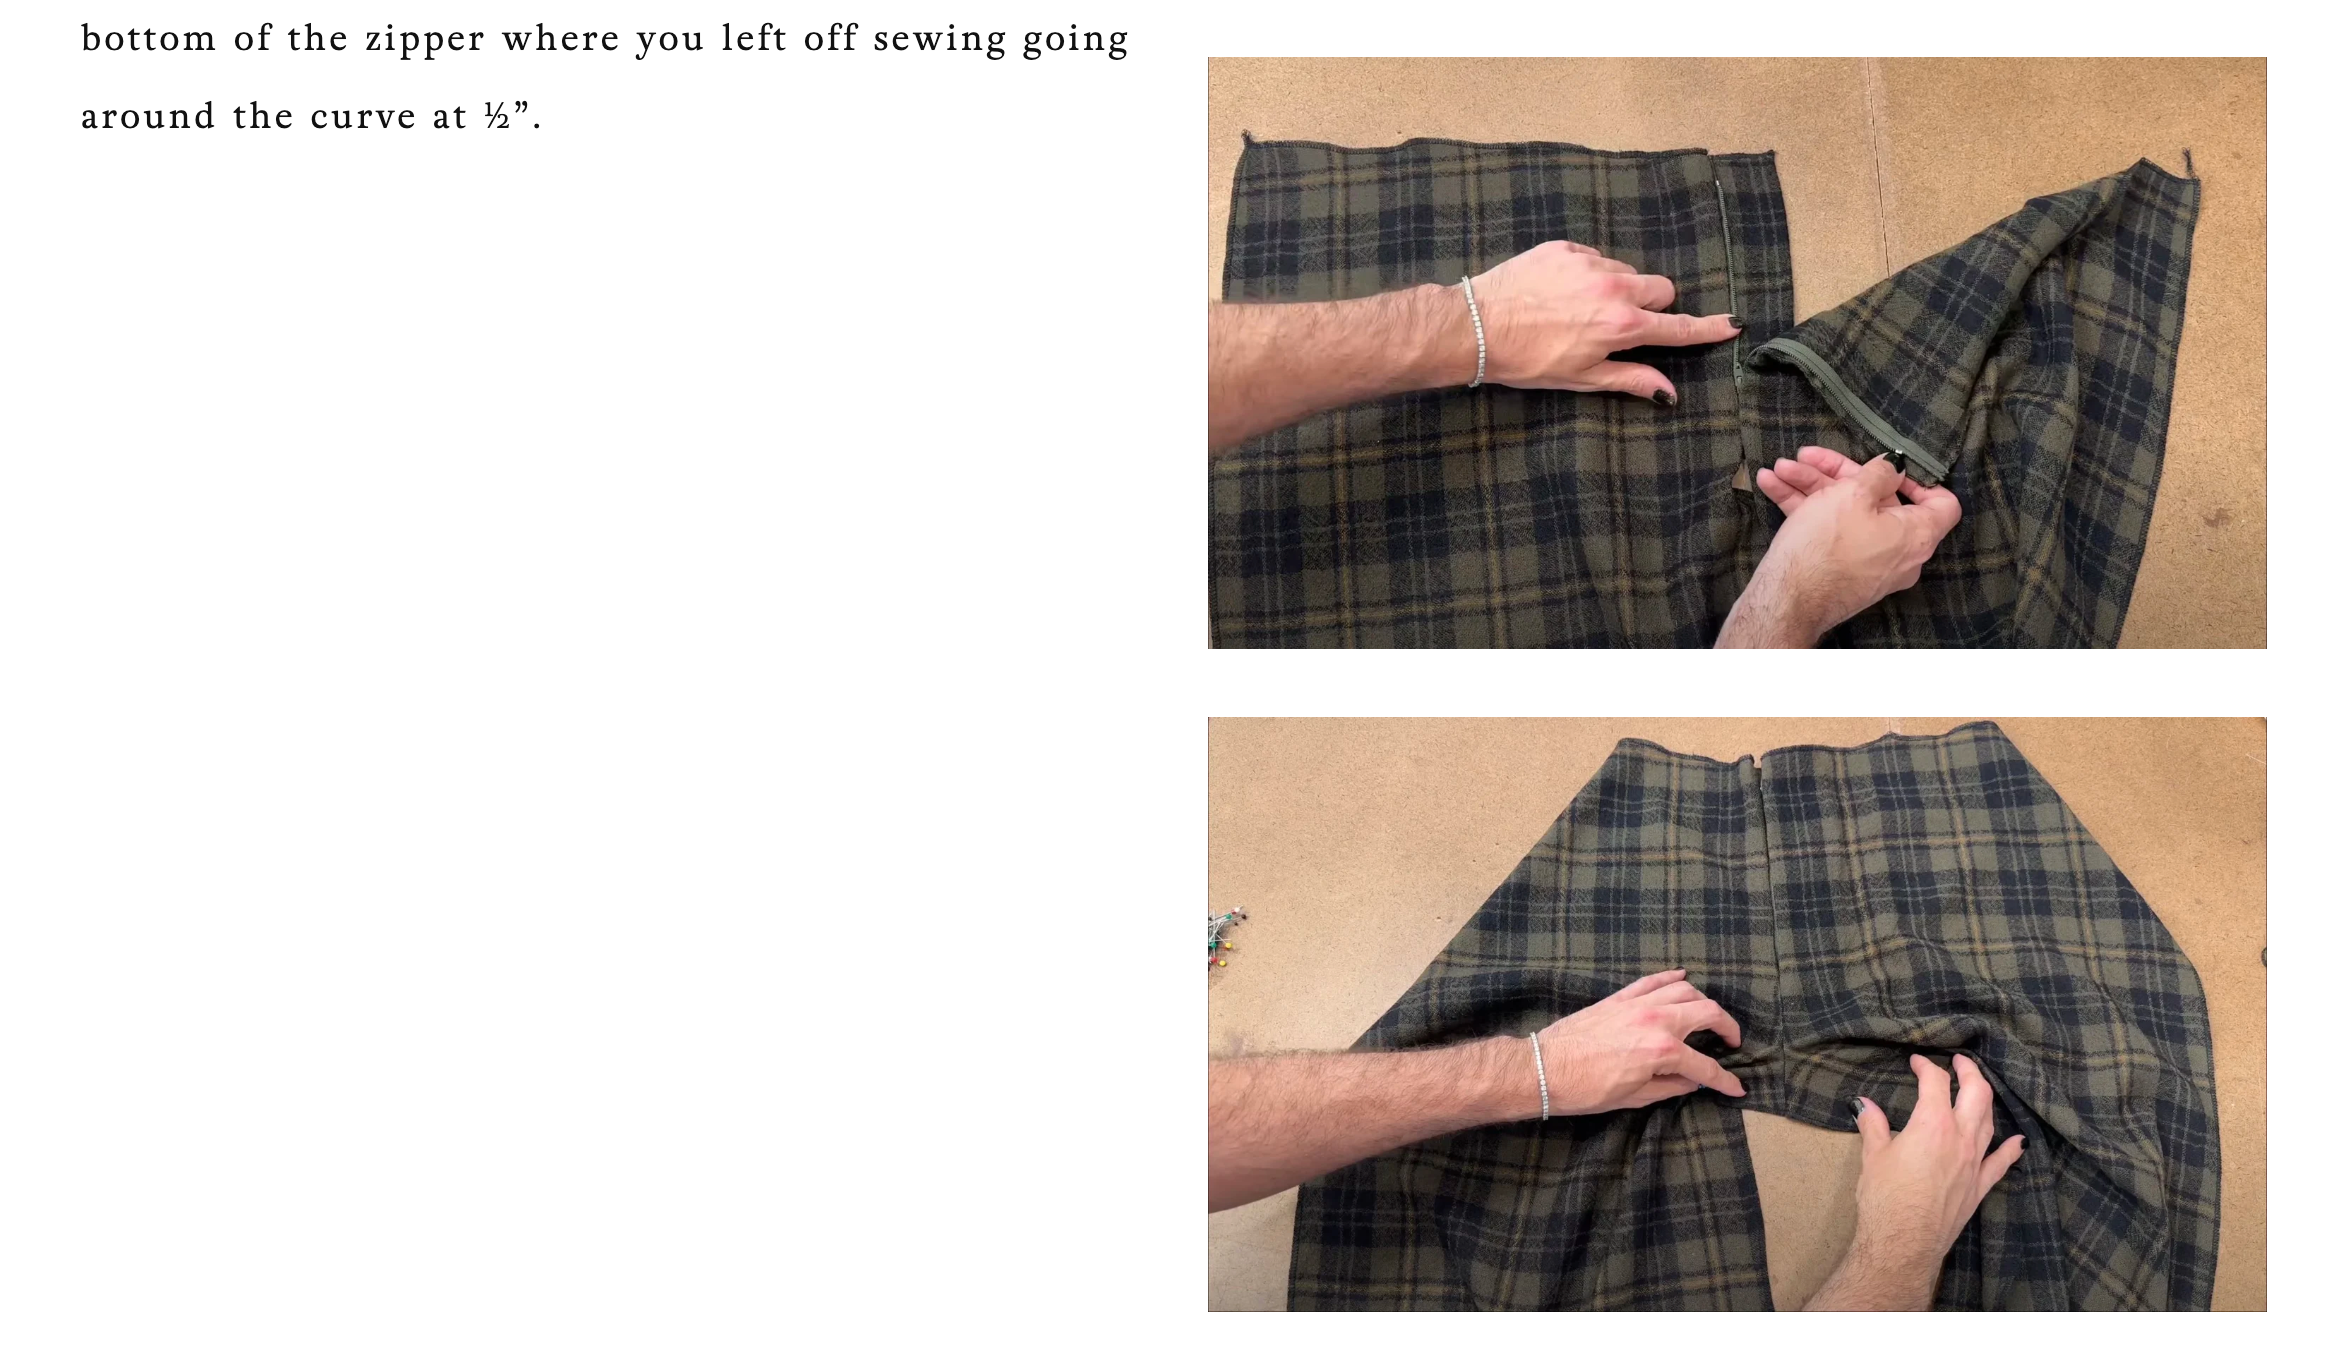
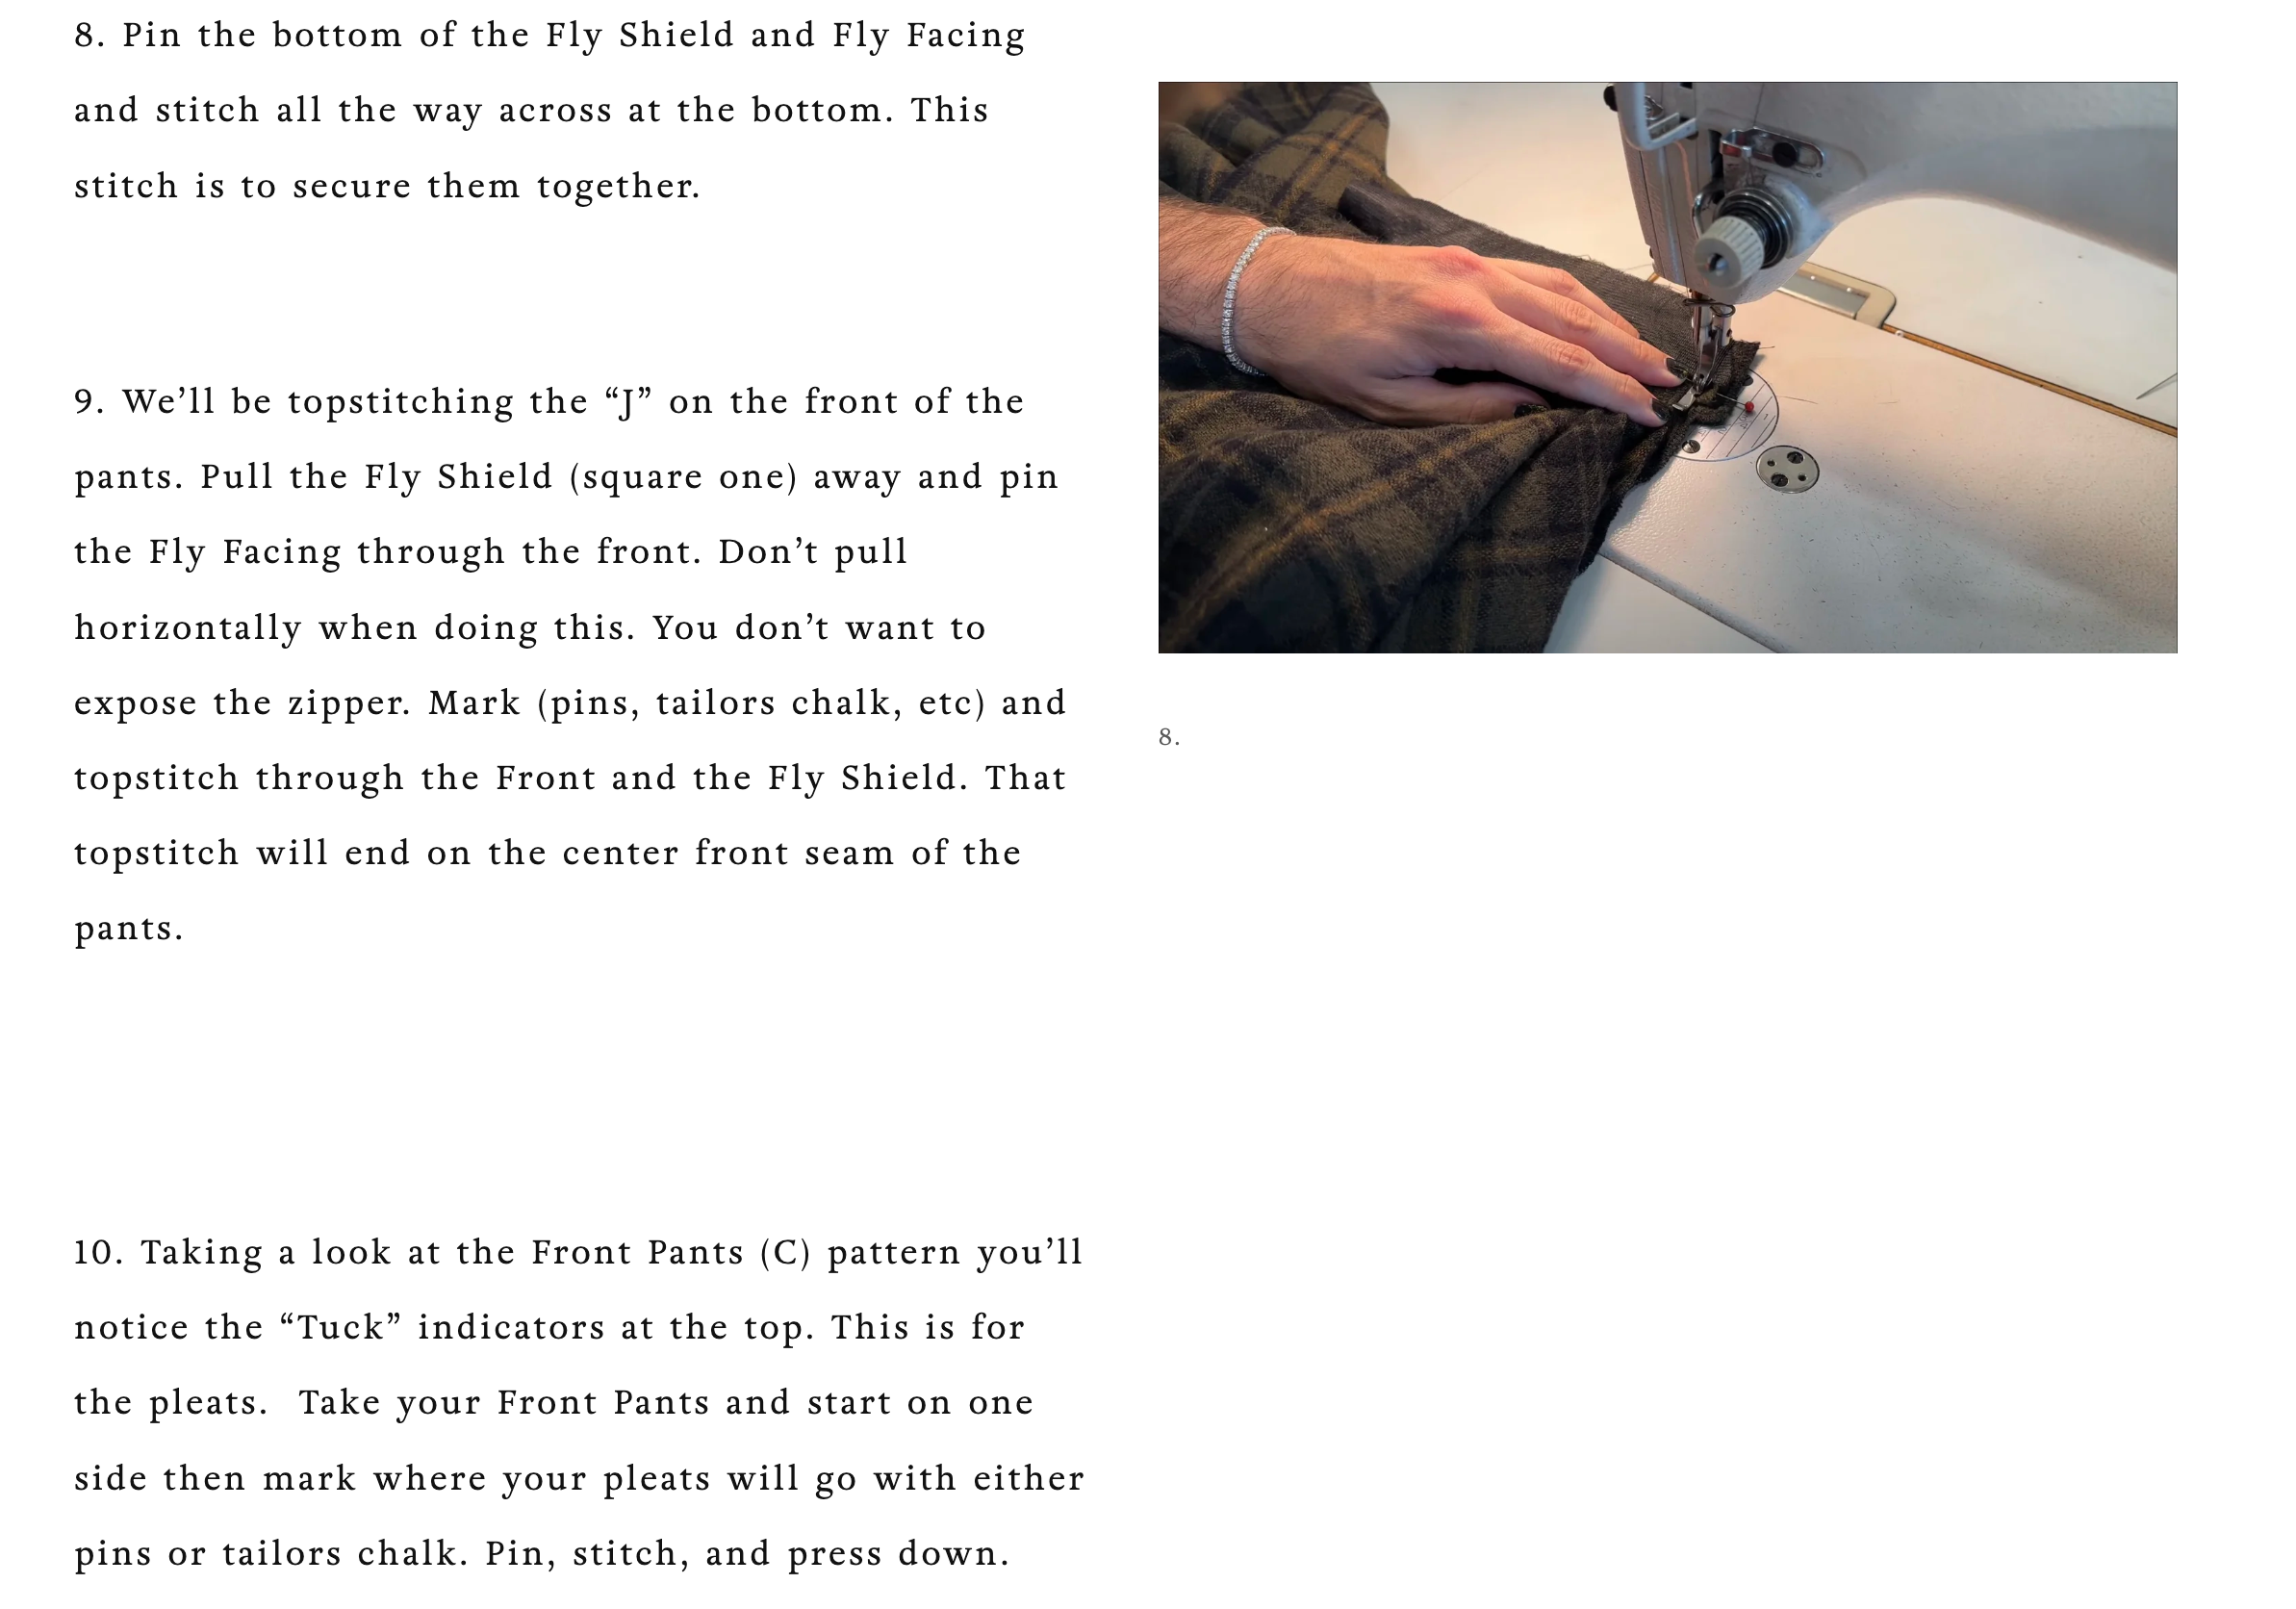
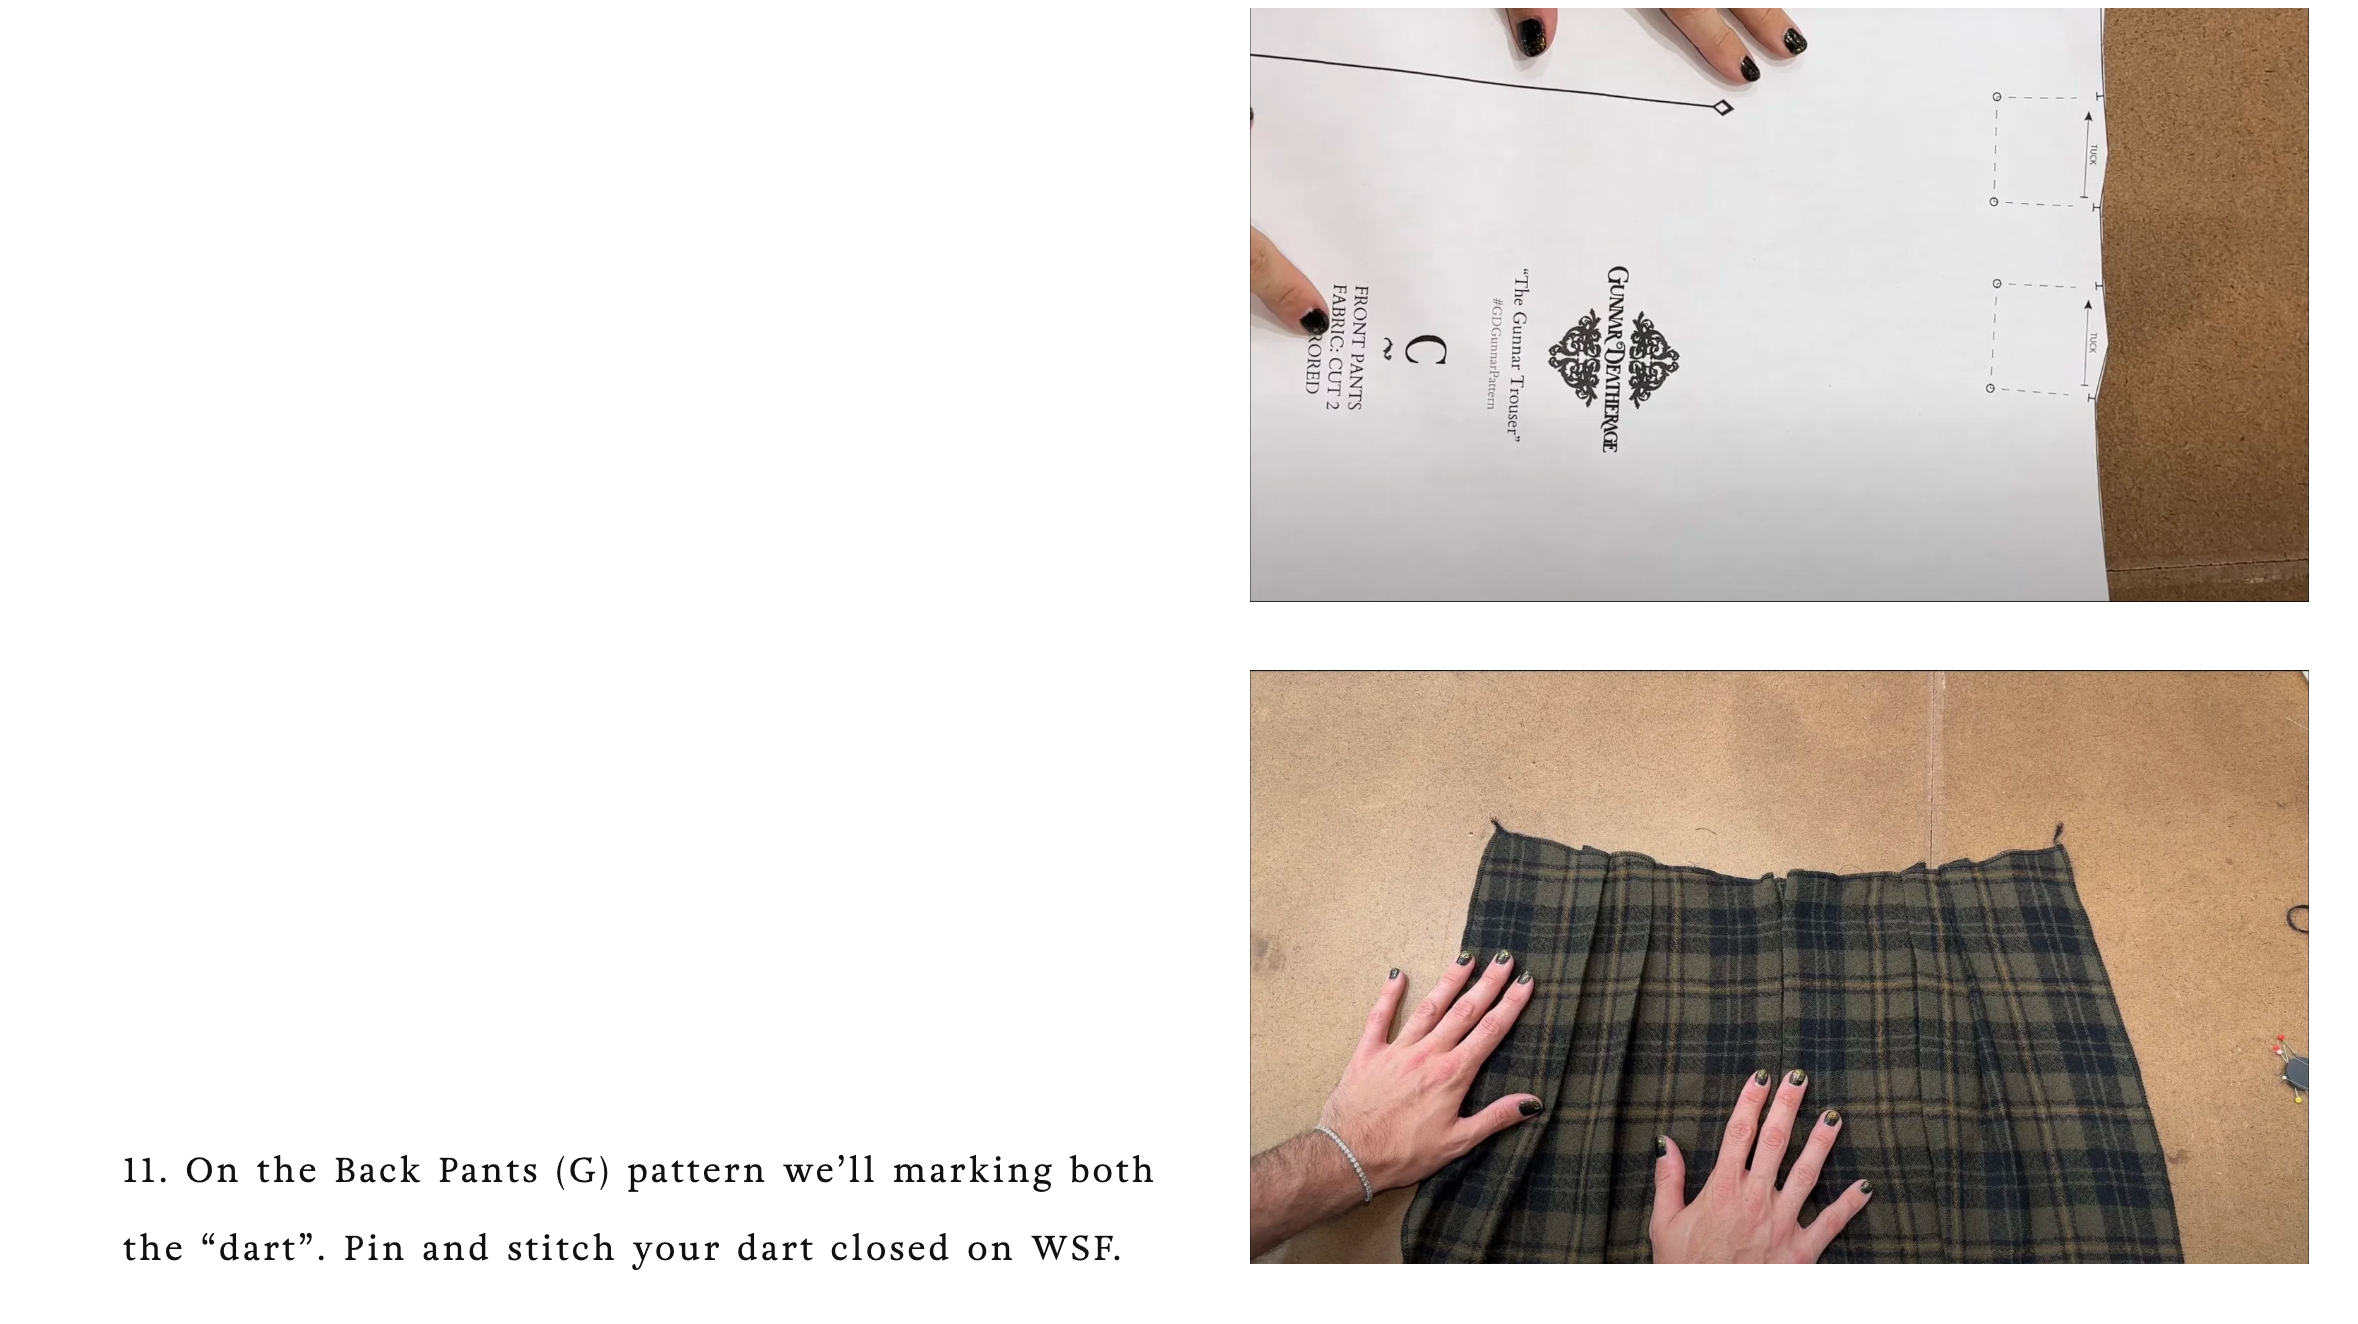
The instructions are below!


Before You Get Started

Please take note that the seam allowances on this pattern is 1/2” unless otherwise stated.

The Pattern will have all notions and cutting layout you will need.

Difficulty: Intermediate

Fabrics: woven suiting fabric and wools. however, you could make these in whatever fabric you would like.

Notions: are on the pattern to tell you what you need to buy

Cut out your pattern. If you are using a fabric with a pattern making sure your seams and pattern matches are important.


Glossary

RSF = Right Side Facing

RSO = Right Side Out

WSO = Wrong Side Out

Pleating = To fold fabric doubling material over itself. Here’s a tutorial if you need help. https://www.patreon.com/posts/50184974

Flatline = To secure two pieces of fabric together into one single section.

Gathering = process of bunching fabric into a pre-measured length creating fullness. Here’s a tutorial if you need help. https://www.patreon.com/posts/50168324

Zipper Tutorial = https://www.patreon.com/posts/50029964

Rolled Hem Tutorial = https://www.patreon.com/posts/new-tutorial-hem-78784340


PANTS

1. Front Piece (C) there are indications where your pleats will go and there is also a note that says “Trim ⅛” from seam allowance on left side”. Start by trimming this off.

2. Overlock (or zigzag stitch) around the outside edges of all 4 pieces: the two front pieces and the two back pieces. We’re doing this because once the legs are sewn together you may want to let them out or take them in, but it's nice to have a finished edge .

The next steps are the most difficult. We are going to add in a Fly Front Facing with Fly Shield (E), Fly Facing (D) and a zipper (that is not an invisible zipper. You want to make sure it's a front pull zipper). Basically the Fly Shield will get folded in half lengthwise and the Fly Facing will sit directly on top of it, and in between these two pieces the zipper will go.

3. On the Fly Facing (D) piece it says “cut fusing 1 right side up” what this means is that you are going to fuse the back of the piece and it will become our “right side”.

- Pin then stitch the RSF Fly Facing (D) to the Front Piece (C ) and stop ½” at the end of the Fly Facing. Press seam open and fold under and press again.

4. Fold your Fly Shield (E) in half and serge around the 3 edges that are open. If you do not have a serger you can use a zigzag stitch.

5. On Front Piece (the one that does not have the front facing on it) open the zipper, flip over, and pin to the front. Next pin the Fly Shield, facing inward, to the pants. You’re sandwiching the zipper in between the front pant and Fly Shield. Stitch at ½”. Just like on the other side you’re going to stop ½” at the bottom. Use a narrow zipper foot. Tip: when you get to the bulkier part of sewing the zipper you can leave the needle in and lift the presser foot and move the zipper pull to give yourself a little more wiggle room for sewing.

6. Overlap the two front pieces to where they are touching/barely overlapping and pin. The unstitched side of the zipper will get sewn into the underside of the Fly Facing. Flip the garment over and open up the Fly Shield and Fly Facing. Pin the unstitched zipper side and unzip to make it easier to sew. There should be ½” free from the bottom of the Fly Facing. Sew with narrow zipper foot and you’re only sewing through the zipper and the Fly Facing

7. Next you’ll finish out the front of the crouch. Pin the couch with RSF making sure to match the curve. Using a narrow zipper foot begin sewing right at the bottom of the zipper where you left off sewing going around the curve at ½”.

8. Pin the bottom of the Fly Shield and Fly Facing and stitch all the way across at the bottom. This stitch is to secure them together.

9. We’ll be topstitching the “J” on the front of the pants. Pull the Fly Shield (square one) away and pin the Fly Facing through the front. Don’t pull horizontally when doing this. You don’t want to expose the zipper. Mark (pins, tailors chalk, etc) and topstitch through the Front and the Fly Shield. That topstitch will end on the center front seam of the pants.

10. Taking a look at the Front Pants (C) pattern you’ll notice the “Tuck” indicators at the top. This is for the pleats. Take your Front Pants and start on one side then mark where your pleats will go with either pins or tailors chalk. Pin, stitch, and press down.

11. On the Back Pants (G) pattern we’ll marking both the “dart”. Pin and stitch your dart closed on WSF.

BACK POCKET: This step if optional, if you dont want to include this then you can skip the next few steps. Make sure to finish out your edges on these pieces so they dont fray.

12. Using the Belt Loop (F) pattern. Fold one to create the Button Loop for the pockets. Fold in half, pin, and stitch at ½” turn RSO and press.

13. On the Back Pants (G), Pocket Welt (K), and Back Pocket Bag (J) mark where the pocket opening will be. You’ll also need Back Pocket Facing (L) for this step too. There are notches on the the bottom of Back Pocket Bag that match up with the Back Pocket Facing. Pin the Back Pocket Facing right side up to Back Pocket Bag and stitch all the way around.

14. Now attach the Welt Pocket to the Pocket Bag. Match the pocket squares up, pin, and stitch all the way around.

15. Take the Button Loop that you made in step 12. Fold in half and pin in the middle of the pocket square marked on the Back Pants with loop facing towards the pleat. With RSF match up the areas marked for pocket squares on both the Pocket Bag and the Back Front. Pin. Stitch the pocket square all the way around.

16. Cut, ¼” away from the stitch, down the middle of the pocket square then cut diagonally toward the four corners.

17. Flip the Pocket Back to the wrong side inside the pocket. This should leave a nice square on the right side of the Back Pants. Press flat and beautiful.

18. Pull the Pocket Bag towards the top of the pants, The Back Pocket Facing should be visible through the Welt Pocket square, and pin all the around then stitch the pocket closed. Do not sew through the Back Pants on the sides. On the top, at the waistband, stitch at ¼”.

19. Repeat on the other side.

FRONT POCKETS: optional

20. Overlock/Finish edges of Front Pocket Facing (I) and pin to Front Pocket Bag (see reference photo A)

21. On pattern piece Front Pocket Facing there are notches to indicate where to sew the pockets onto the pants. After marking where the notches are on the Front Pocket, grab the Front Pants again. With RSF align the top of the pocket with the top of the pants. pin.

22. Mark a line between the two notches ½” with tailors chalk. Then stitch the rectangle. Make small diagonal cut toward the corner of the square. Turn the pocket RSO. Press.

23. Fold your Pocket Bag in half matching the sides. Pin the pocket bag bottom closed. Stitch. Overlock or finish out seam.

24. Line up the Pocket with the Front Pants. Pin down the side and the top. Use a security stitch. Then repeat to the other side.

BACK TO PANTS

25. Pin the center back crouch of the Back Pants, stitch, press.

26. Match up RSF center seams of the Front and Back Pants and pin down each leg. Stitch from one leg to the other as one long line. Press inseam.

27. Turn pants RSO and pin down the sides, stitch, press open, repeat on the other side. It's important to note that if you include the pocket that you're not catching the finished edge of the pocket when you're sewing down the side seam. This is a good place to try on the pants to make sure they’re a good fit and that you don’t have to make any other alterations.

28. Let's discuss the belt loops. We are going to be treating the button loops. Fold them in half, sew them down the edge, trim the seam allowance, turn them RSO, and press. You should have 5.

29. Right Waistband (B) and Left Waistband (A) both have “center front” markers. This is where they overlap. You’ll be sewing these together at the end that says “center back”. Pin and stitch.

30. Pin the belt loops on starting at the center back and evenly space them out. Add as many or as few as you like, the pattern calls for 5.

31. Now addressing the top waist band (the other side) to the waist band. Stitch the center back first. Then put the two waistbands together with RSF pin 3 edges leaving one long edge exposed and stitch. Do a back stitch on the belt loops for extra security. Trim away half of the seam allowance, turn RSO, and press flat.

32. Starting at the Center Back pin the waistband around the top of the pants. You’re only pinning one side of the waistband. Starting right at the edge of the waistband sew all the way across using a backstitch on the belt loops for extra security.

33. Flip the seam allowance of the waistband under and place a pin. Do this all the way across the waistband. Then handstitch. You could use a top stitch but you’ll stitch through the outside belt loops.

34. Sew buttons on, add the button hole, and hem the bottom of the trousers with an invisible stitch.


CONGRAGULATIONS YOU MADE PANTS!


5.

5.

5.

5.


7.

8.


11.

13.

14.

15.

15.

15.

15.

16.

17.

18.

20.

Reference Photo A

22.

25.

28.

32.

34. adding button to back welt pant pocket.