The Pacifica Dress Pattern Instructions


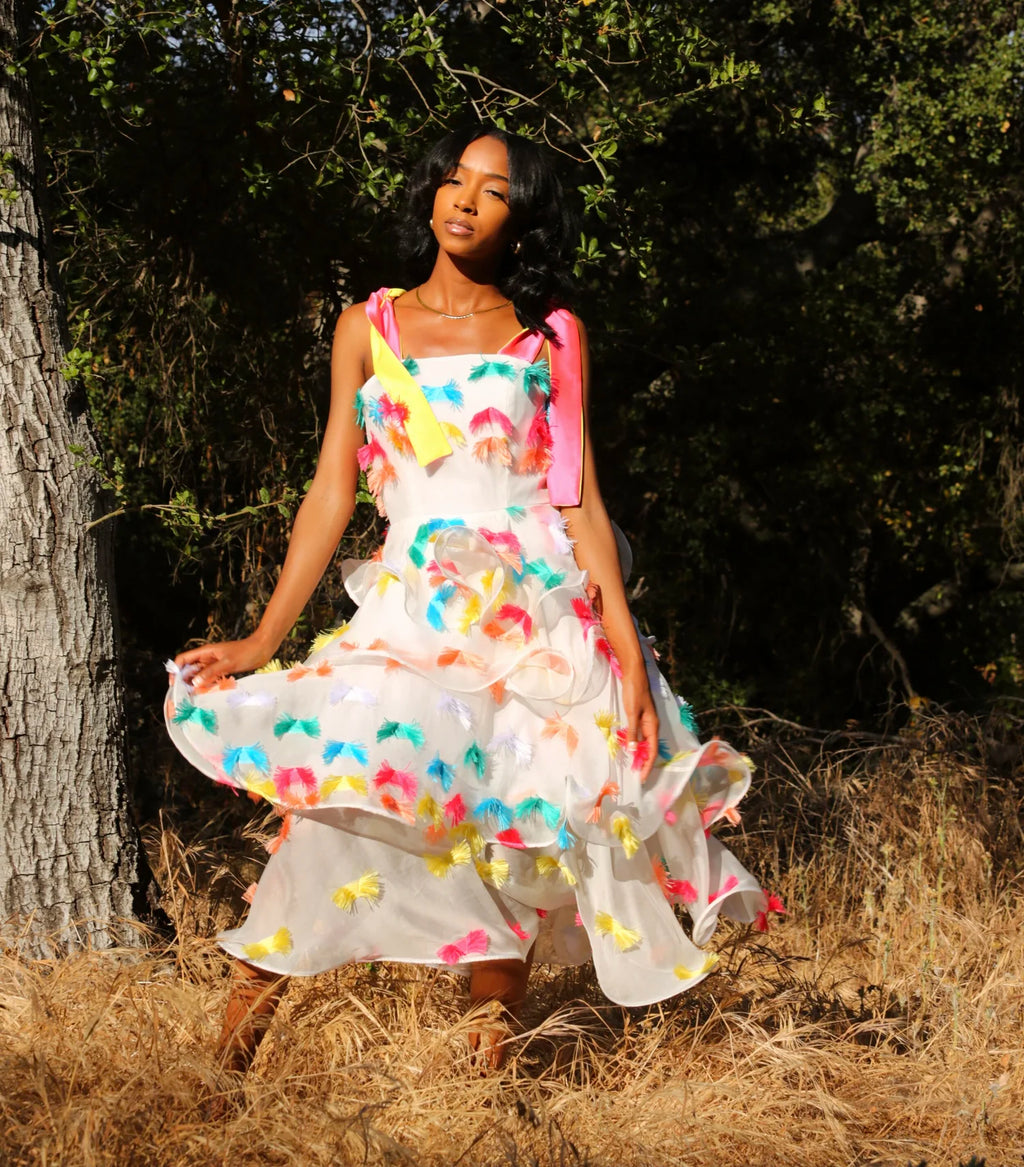
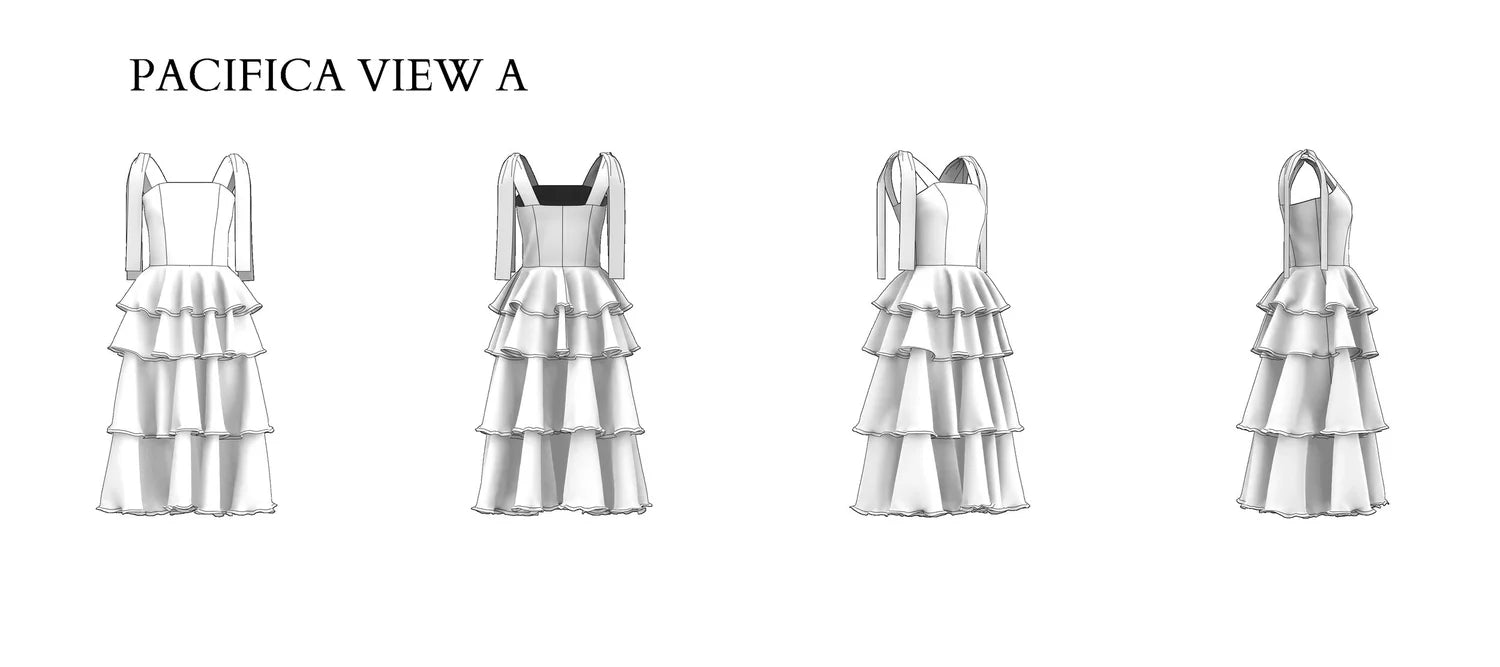
I am so excited to be Releasing the June Dress pattern! This dress has been a lot of fun to bring to life! There are so many ways you can customize the Pacifica Dress. This dress features two strap options, three flounce layers, and a peplum. You can choose to create your dress without the peplum, and with only two flounce layers. The Pacifica pattern would be great for lightweight or flowy fabrics. This silhouette is beautifully flattering in all sizes and body shapes. We tested the fit of every size from 00 to 32 based on current body & size data studies. Companies like Amazon have used the same 3D body scan technology to develop a realistic, modern size chart. It was very important to me that my sewing patterns and designs be size inclusive for everyone.
Below are the written sewing instructions, and I also filmed a step by step Youtube video of the entire creation process of this dress which is on the left of this text box! When you make your dress, please tag me! I would love to see what your dress looks like!!


Let's Get Started!

1.Welcome to the Pacifica Pattern! This page is dedicated to helping you construct your own version! Step #1 is to Familiarize yourself with the pattern pieces and the indicated markings such as grain lines, notches, and labels.You will have the following pattern pieces:

  • A- Front Tie Strap

  • B- Back Tie Strap

  • C- Front Bodice

  • D- Side Front Bodice

  • E- Side Back Bodice

  • F- Back Bodice

  • G- Front Peplum

  • H- Back Peplum

  • I- Front/ Back Flounce #1

  • J- Front/ Back Flounce #2

  • K- Front/ Back Flounce #3

  • L- Front/Back Skirt Base #1

  • M- Front/ Back Skirt Base #2

  • N- Front/ Back Skirt Base #3

  • O-Front/ Back Skirt Lining

  • P- Sleeve Flounce

  • Q- View B Shoulder Strap

2. Cut your pattern pieces in the fabric. A cutting layout guide is included with your pattern to help you with placement on the fabric

3. If you are using a super sheer fabric ( like I did for the sample) You may want to Flat Line The bodice Like I did so you don’t see the seams through the sheer fabric. This is when you would do that. Flatline all bodice pieces (C,D,E,F.)You may also want to flatline your Skirt Base pieces if they are also sheer(I chose to do this because my lining was also very sheer)

-For steps 4-7, you will want to also sew the lining in the same steps. I find it faster to sew them both simultaneously.

4. With Right sides together, Pin and sew the bodice Front to Bodice Side front pieces.(Pieces C, and D)

5.With Right sides together, Pin and sew the Bodice Side back pieces to Bodice Side Front pieces. (Pieces D and E)

6.With Right sides together, pin and sew Bodice Back pieces to Bodice side back pieces.( Pieces E and f)

7. Press the seams of your bodice, and bodice lining pieces Flat and Beautiful! (Make sure to clip the curve a bit on the Bodice Side front Seam so you can get a gorgeous press.)

8.With right sides together, pin and sew the front strap pieces together, and the back strap pieces together,(pieces A and b).You will have 2 front straps, and two back straps when finished. After sewing, clip the edges, and turn the straps right side out. After turning, you will want to press them nice and Flat!

8A.IF you are making the strap with the sewn in flounce, you will start by hemming the outside of your flounce with a rolled hem. (pattern piece P)

8B.With right sides facing, pin the flounce to one side of the strap (pattern piece Q). Now roll the flounce up so it is compact(you want it to be out of the way), and fold the strap in half. Pin along the top (where you pinned the flounce to the strap) and then stitch across that side. For a visual reference, visit 05:04 in the video above.

8c. Now turn the strap rightsize out, and press it nice and flat.

9. With Finished end of straps pointing toward the bottom of the bodice, pin your straps to the bodice. (the center of the strap should be placed over the center of the seam of the Bodice Front/Side Front)

10. With right sides facing, pin the bodice lining to the bodice, and stitch along the top of the seam, and finish the seam accordingly.

11. After stitching the bodice to the bodice lining, under stitch the seam allowance to the bodice lining. (For a reference, visit the video above at time stamp 07:01)

12.Now let’s talk about the skirt. Depending on The view of the dress you are making, you will have 2-3 Skirt base sections. My sample dress only has 2 skirt base sections, but 3 flounce layers. (for my View A Dress I wanted my bottom flounce to be sheer rather than have a lining piece behind it, This is totally up to you!)

12.with right sides facing, pin and sew the side seams of the Front/Back pieces of Skirt base #1( pieces for L). Press your seam open, and finish accordingly.

13.with right sides facing, pin and sew the side seams of the Front/Back pieces of Skirt base #2 ( pieces for M). Press your seam open, and finish accordingly.

14.(if you plan on having a third skirt base layer)with right sides facing, pin and sew the side seams of the Front/Back pieces of Skirt base #3 ( pieces for N). Press your seam open, and finish accordingly.

15.with right sides facing, pin and sew side seams of flounce #1.(Pattern pieces I) Press your seam open, and finish the seam accordingly.

.16.with right sides facing, pin and sew side seams of flounce #2.(Pattern pieces J) Press your seam open, and finish the seam accordingly.

17.with right sides facing, pin and sew side seams of flounce #3.(Pattern pieces k) Press your seam open, and finish the seam accordingly.

18. (If you plan on utilizing the peplum. ) With right sides facing, pin and sew side seams of Peplum front ( pattern piece G) to Peplum Back(Pattern Piece H). press seam flat, and finish accordingly.

19.for view a (If you plan on using skirt base layer #3) with back side of flounce #3 facing front of Skirt base layer#3, Pin along the top. Now, with right sides facing, pin the bottom of Skirt Base layer #2 to the top of Flounce#3/Skirt base#3. Stitch along the edge, and finish the seam accordingly.

19b. If you are not using the skirt base#3, you will just stitch the top of flounce #3 to the bottom of Skirt base layer#2 with right sides facing.

20. View B, this is where you jump in.with back side of flounce #2 facing front of Skirt base layer#2, Pin along the top. Now, with right sides facing, pin the bottom of Skirt Base layer #1 to the top of Flounce#2/Skirt base#2. Stitch along the edge, and finish the seam accordingly.

21.with back side of flounce #1 facing front of Skirt base layer#1, Pin along the top.(If you are using the peplum, this will get laid right on top of Flounce#1, and pinned in place.) At this point, your skirt is assembled, and ready to be attached to the bodice.

22.with right sides facing, pin the skirt to the bottom of the bodice at the waist seam. Stitch along the edge. Press the seam open, and finish accordingly.

23. Let’s work on the skirt lining. There is a cut line on the skirt lining( pattern piece O) to let you decide how long you want your skirt lining. After you have decided/ cut your lining, with right sides facing, pin your skirt lining pieces together at the side seam, and stitch. Press open, and finish accordingly.

24. Attach your skirt lining to the bodice lining at the waist seam by pinning right sides facing, and then stitching/ pressing and finishing the seam.

25.If you are planning on using a horsehair hem like I did, now is the time to do so. I will be adding a full tutorial to this on my Patreon shortly after posting the pattern.

26.Flip your garment rightsize out. Pin down the center back flounces so they can be sewn into the zipper neatly. Now insert your invisible zipper. if you need help with a zipper, there is a tutorial on my pattern for my level 2+ tiers. . After inserting both sides of the zipper, close the bottom of the skirt.

27. flip your lining inside the dress, and stitch the center back lining seam to the edge of the invisible zipper. afterward, close the bottom of the center back seam from zipper end to the hem.

28.Hem your skirt and skirt lining.

29. (optional) Attach a hook and eye at the top of the zipper for an added closure.

30.Tie your straps(if you chose View A) and try your dress on! I hope this dress inspires you, and if you have questions, please feel free to reach out! As a self taught designer, I am always looking to improve my skills so I can better help you all! Very thankful for all of you!


A Few Things to Note:

-The Seam Allowance for this pattern is 1/2” unless otherwise specified.

-Some of the pattern pieces that are labeled both (Front and Back) will have two separate cut lines on one side to indicate the seam allowance needed(photo below). For the front pieces, you will cut the pattern piece on the fold, and cut at indicated seam allowance line. for the Back pieces, you will cut two with the longer seam allowance.


sleeve flounce pinned to the strap

if you are using a third skirt base, your flounce will be sewn in between pattern piece M, and N. if you are not using the skirt base#3, you will just sew flounce #3 to the bottom of pattern piece M.

This is Flounce #2 sewn in between Skirt base #1, and Skirt base #2.

This is the layering of the flounces/ peplum. the skirt bases are under these pieces, but the flounces are designed to hang just below the hem of the skirt bases.

This is the Peplum laid on top of Flounce layer #1, and Skirt base#1. Ready to be pinned and stitched to the bottom of the bodice at the waist seam.

this is where you’ll add horsehair trim.

pin the center back flounces down so you can stitch them into the zipper.

Finish your look off with a hook and eye at the top of the zipper.