The Spellbound Corset/Bustier Sewing Pattern Guide

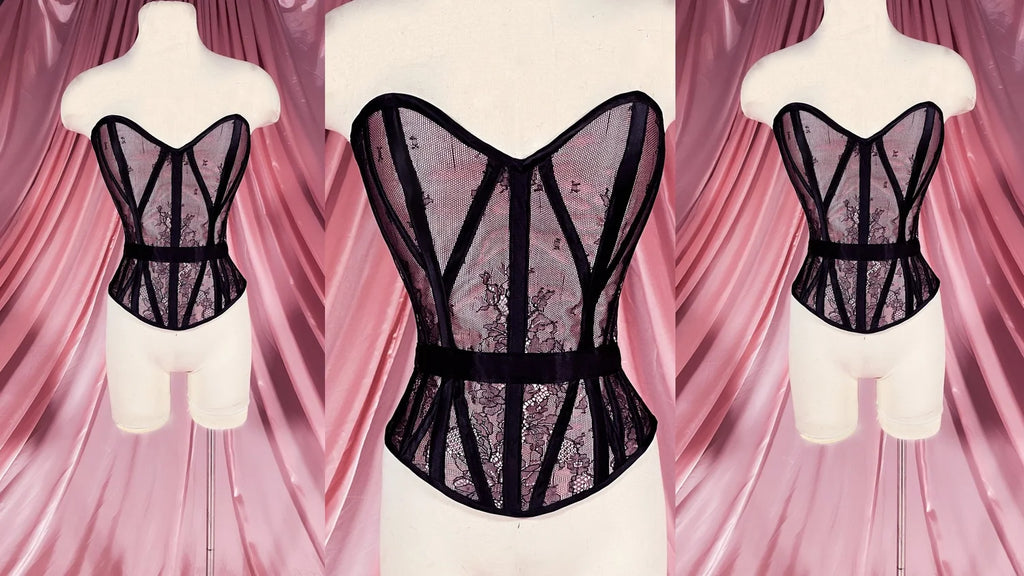
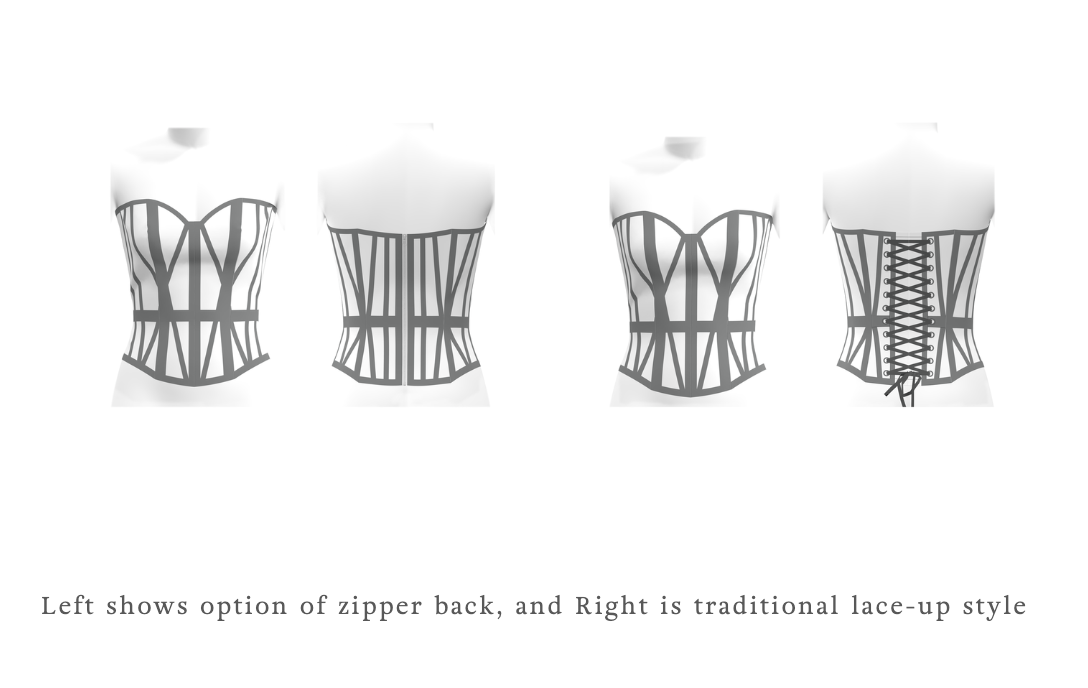
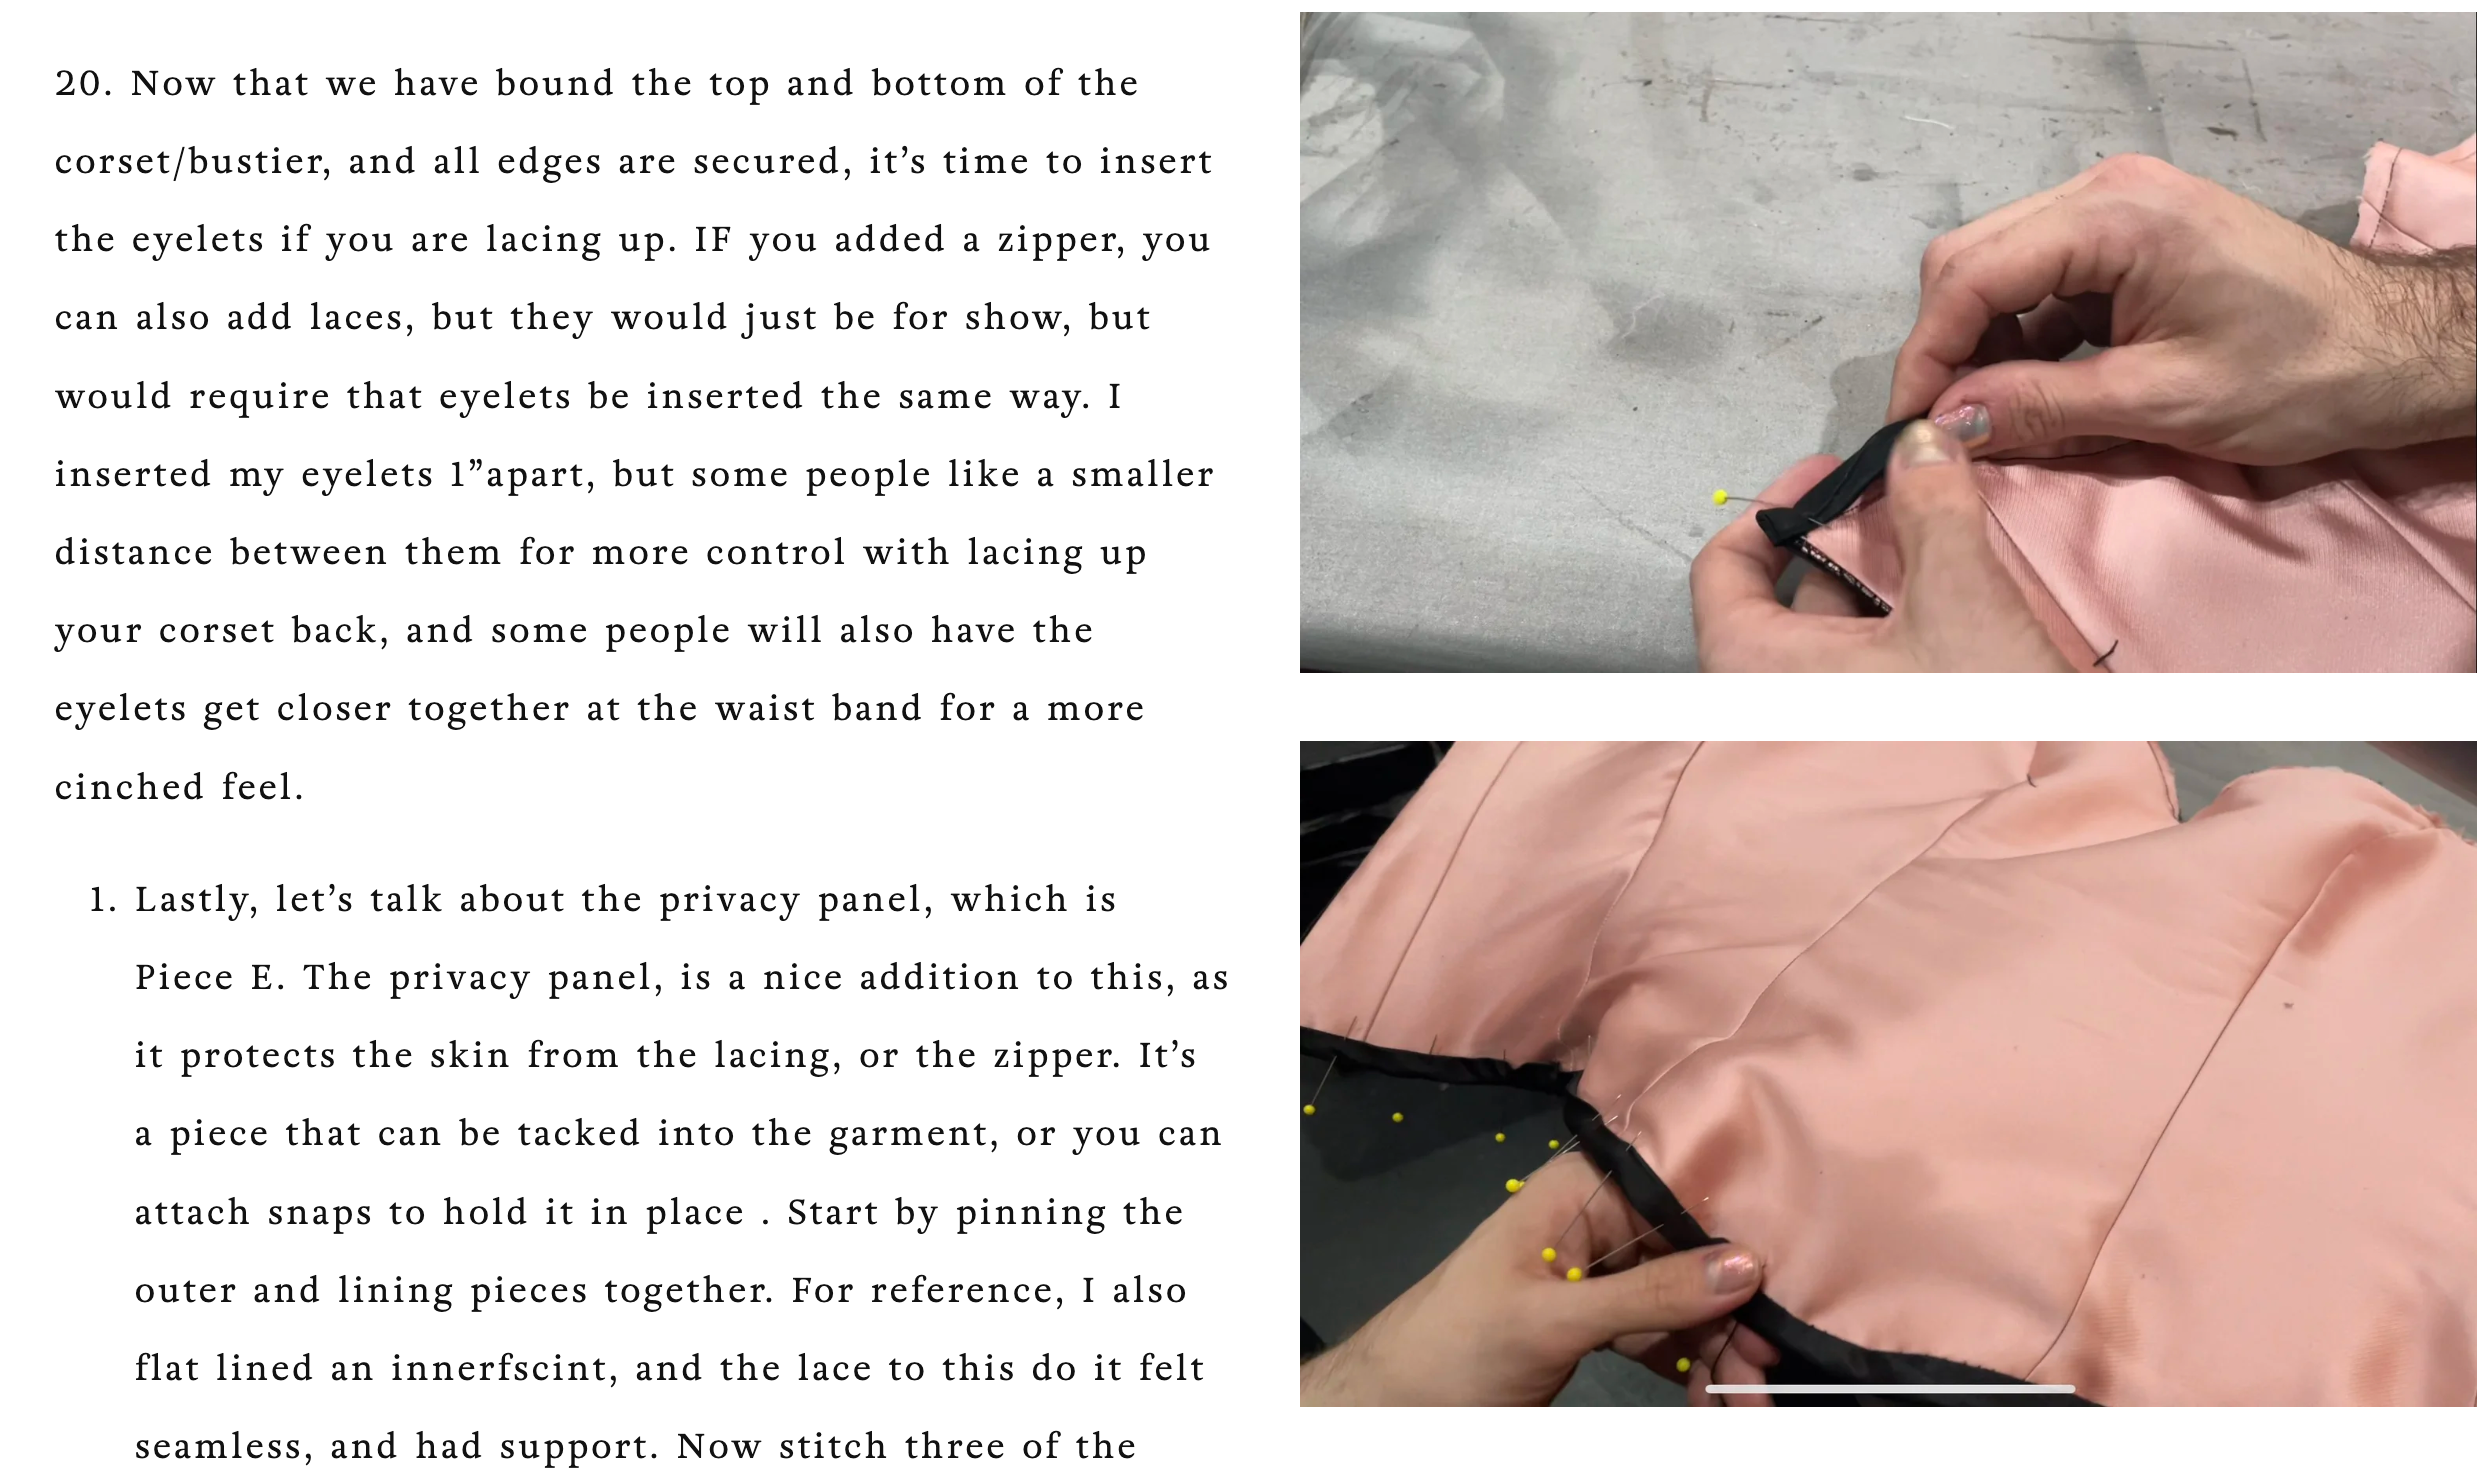
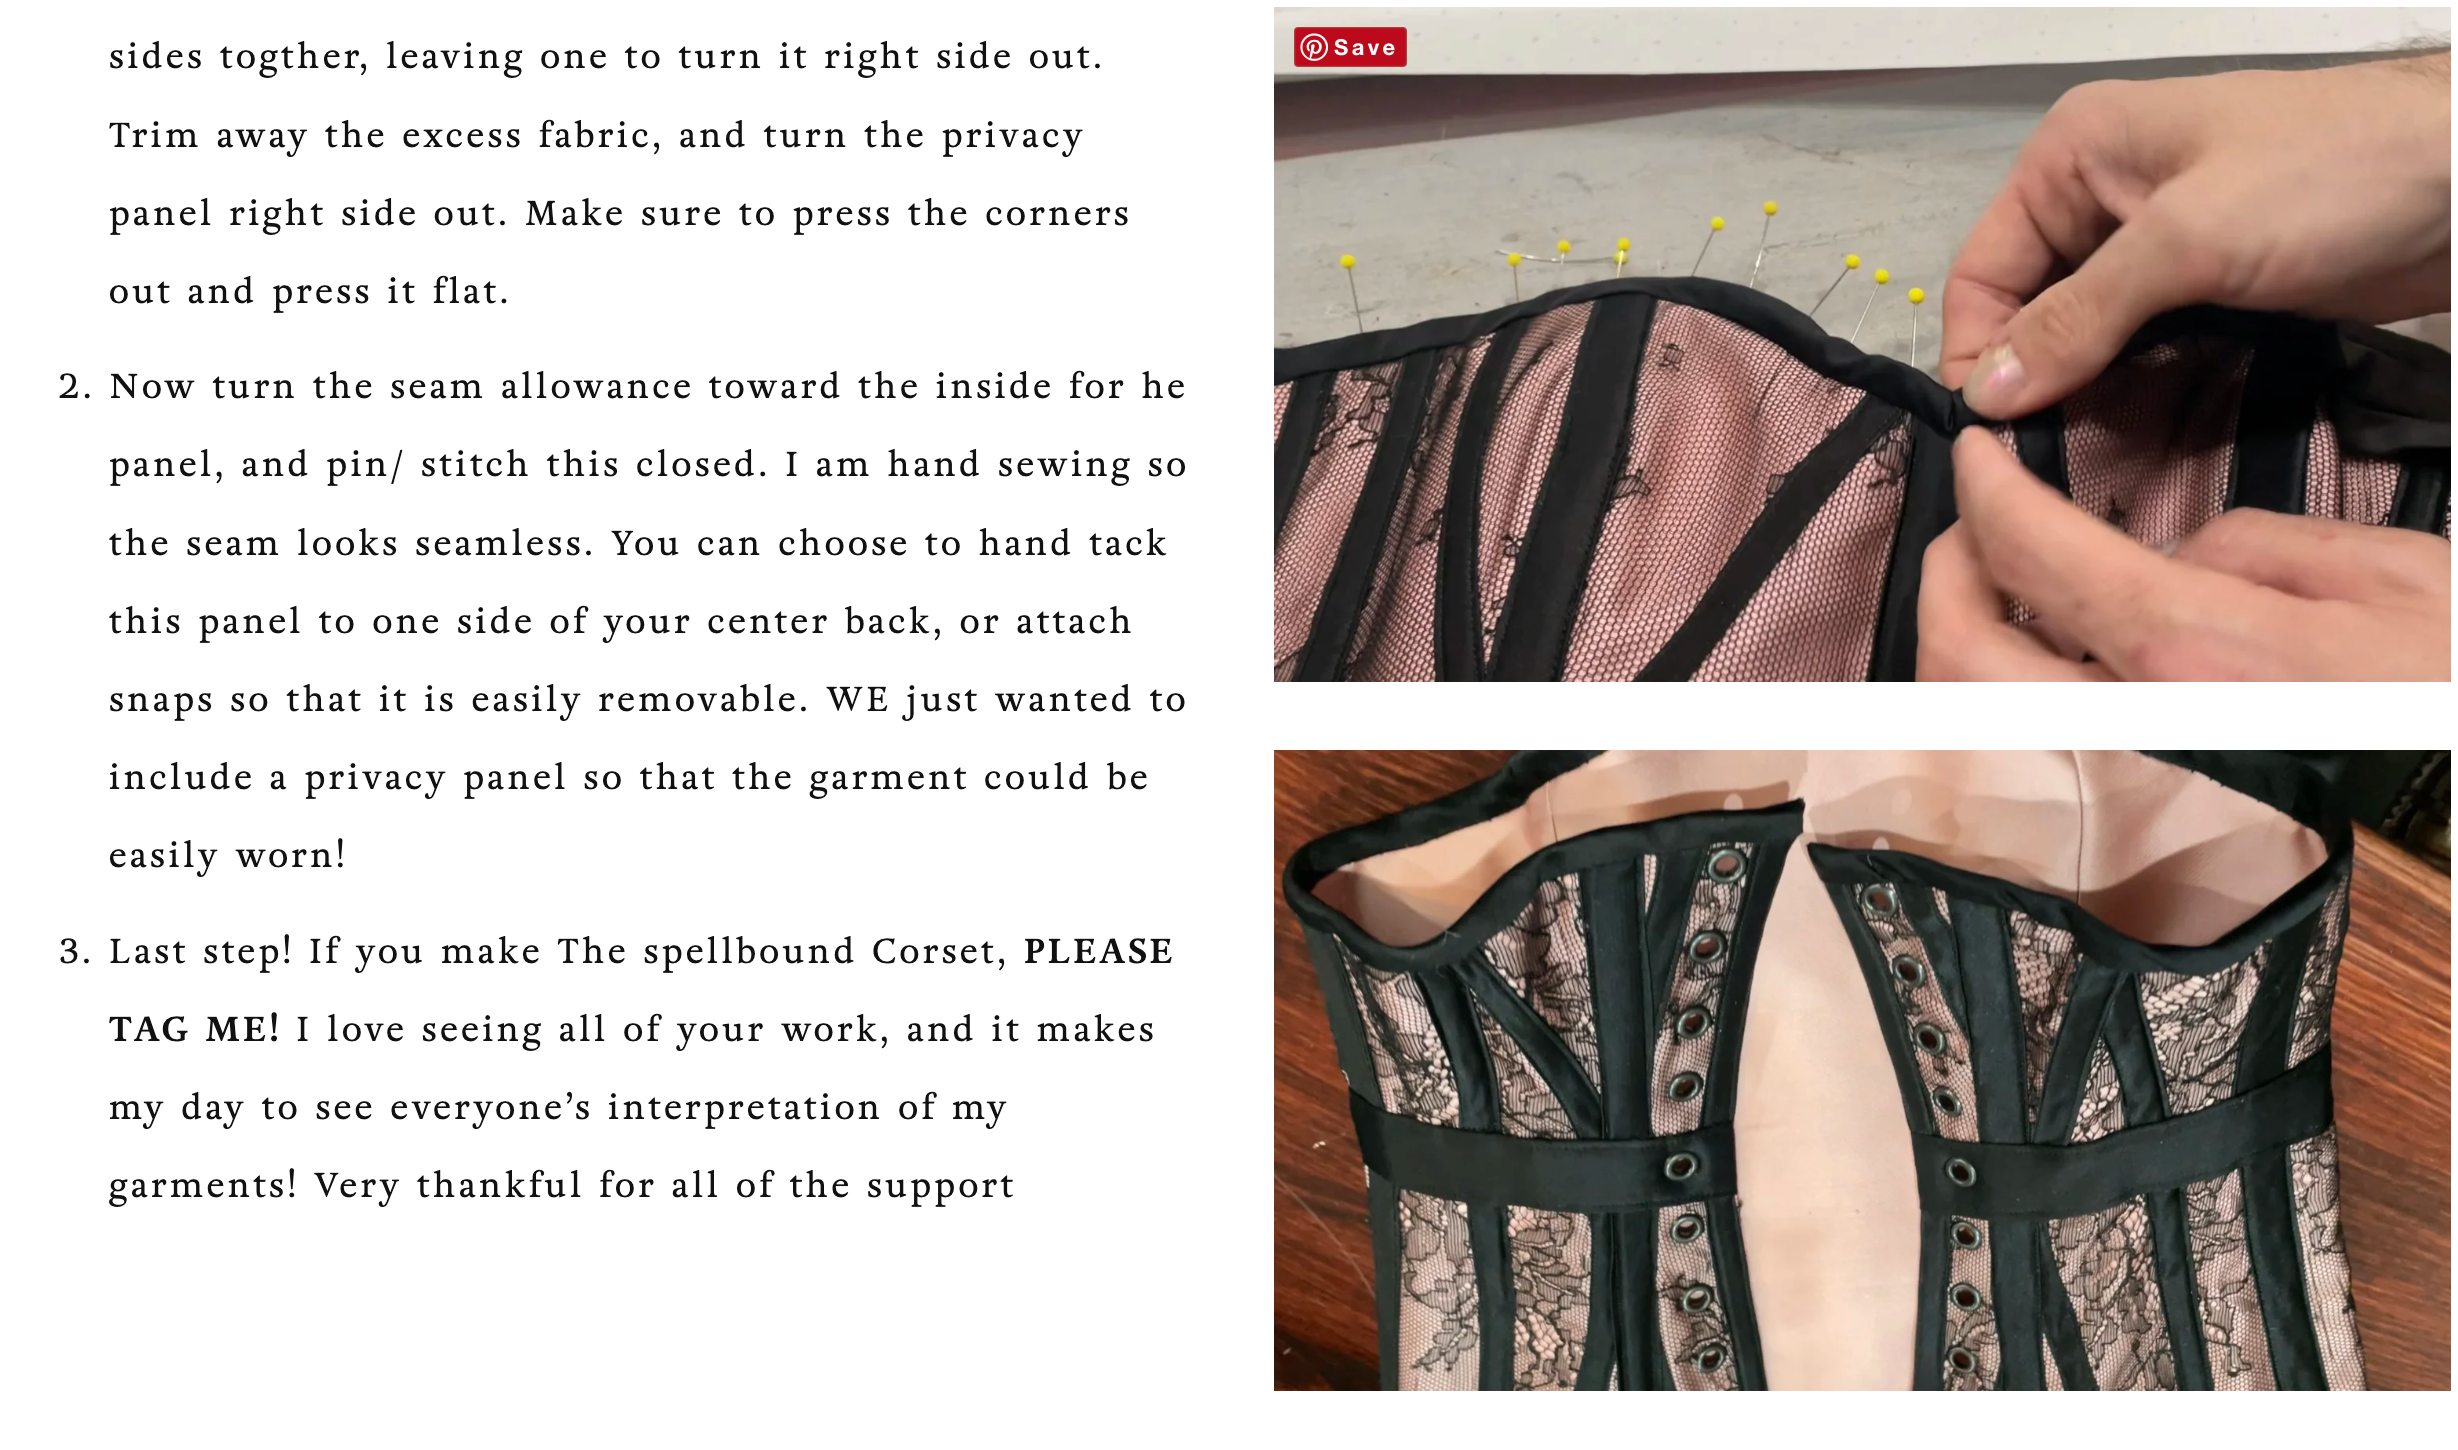
Hello, and welcome to the Spellbound Bustier/ Corset inspired pattern. This garment encompasses the glamour of the vintage burlesque scene, with a modern twist. The boning style lines could be altered and changed a hundred ways to fit your own personal aesthetic, but we have included a layout for this if you want to create this pattern exactly how I have. 

Before we hop into the pattern pieces, and how to construct, I think we should take a moment to talk about the inner workings of this “Corset.” I use the Word Corset very loosely here, as corsets have a long and deep history of construction, and symbolism that is wildly fascinating to delve into. IF you’d like a but more info on the history of corsets, (CLICK HERE.) for a wiki link to the history.


Below are the written sewing instructions, and I also filmed a step by step Youtube video of the entire creation process of this dress which is on the left of this text box! When you make your corset, please tag me! I would love to see what your garment looks like!!


Left shows option of zipper back, and Right is traditional lace-up style

.


-For the inner workings of this corset, I am going to be interfacing with a woven fabric that has no stretch, and a tight weave. Traditionally corsets were created with a fabric called Coutil. Coutil can be tricky to locate unless shopping online, so some alternatives include cotton duck, canvas and drill. Providing these fabrics are strong and tightly woven, they should perform well as a strength layer. Because I was approaching this Bustier for a more decorative feel, I chose to go a little lighter weight, but you could 100% use a heavier weight if you are wanting to really cinch your waist with this piece, and make it more functional as an undergarment. 

-When choosing outer layers, there really are no rules, this is where your design comes into play. I would recommend staying away from stretch fabric as you want a little structure. I used A 100% silk Duchess Satin from mood for this garment, and a Chantilly lace from mood Fabrics also. This corset can be made with one layer and no lining, or it could be lined! You could also choose to make an inner corset layer where the functional boning is used, and the outer bias tape is just for show. There are really SOO many ways to create this garment. Please note, if you do choose to line this garment, you will need to double the fabric needed for shell fabric listed on the fabric yardage listed. Also if you choose to add a lace like I did, you’ll need to add that fabric yardage to your shopping list as well. For my Corset, I purchased a yard and a half of the duchess satin to be safe, and a yard and a half of my lace, and a yard of the interfacing fabric.


The boning I have chose to use is a rigilene boning, but you could absolutely use a spiral steel boning. If you haven’t worked with boning before, I have a full boning tutorial on my patreon at the second tier for a little more help in understanding the boning, and their roles in a garment. You can purchase boning HERE!

Lastly, please note the seam allowances marked on each piece.

1.-Ok, now that we have discussed the fabrics, and the boning, let’s familiarize ourselves with the pattern. This pattern includes 11 Pattern pieces. This does not include the bias tape which you will need to make based on the size of your boning. We will discuss the bias tape a bit later in the instructions. 

The pattern pieces are as follows…

-A-Center Front

-B-Side Front

-C-Side Back

-D-Back

-E-Privacy Panel

-F-Front Bust Pad

-G-Side Bust Pad

-H-Center Front Style Template

-I-Side Front Style Template

-J-Side Back Style Template

-K-Back Style Template


2.Begin by cutting all your fabrics, Interfacings, and Linings. Please see that piece D, the back) has an additional cut line for those who want to add a zipper, rather than eyelets for lacing to secure the garment. 


  1. Because will be using a lace overlay ( which is not necessary to make a stunning version of the spellbound bustier,) I am going to flatline my lace to the duchess satin. Flat lining is where we stitch the lace all around the edges to the under fabric. You will want to do this at 1/4” seam allowance so thaT when we sew the rest of the bustier at 3/8” it doesn’t show. This step just allows us to carefully and securely join the two layers. While doing this step, I am going to also secure my interfacing/ strength layer to the back of the duchess satin. IF you plan on making a full corset inner layer that will go between the outer and lining, you wouldn’t need to flatline your interfacing to the back. I have always had good results with including my interfacing to the back of the outer layer, so I will be doing so for this garment.

  2. Before we assemble the base of the corset, you will need to decide if you want to make the complex version of the corset, like the sample shown, or if you want to simplify, and no include the diagonal style lines. If you are making the simple version, with just bias tape and boning running vertical over the seams, you won’t need to follow steps concerning diagonal bias tape, but you will need to make bias tape either way, so I suggest paying close attention to those steps. If you are replicating the sample, you’ll need to follow along the next few steps.

  3. Let’s talk bias tape! If you are not familiar with the term bias, it means Rather than following the straight line of the weave, the bias cut places the pattern at a 45° angle on the woven fabric. At this angle, the 'warp' and 'weft' threads give the fabric more of an elastic 'stretch. The width of your bias tape is determined by the size of the boning you will be adding to the garment. There are also a few different ways to approach Bias tape, and for this video, I’ll be showing you the most simple way of doing so, in an effort to keep this beginner friendly. Depending on what type of boning you do, may need you to create a full casing rather than the half casing I will be using. There is no right or wrong way of approaching this, just different techniques! For my sample, I used a 1/2” rigilene boning for the vertical seams, and a 1/4” boning for the diagonal seams. I felt like the dimension between the two would be really nice, especially considering that the waist “belt” is 1” in width. A bias tape is where a strip of fabric cut on the bias has both sides of the raw edge folded towards the center of the strip, and ironed down. This gives your a clean finish on both sides when stitched down. They can also be folded in half again once the sides have been folded in, and sewn that way (which we will be doing on the top/ bottom of the corset, but we will touch on that later. For now…To determine the width of your bias tape, you will take the measurement of your boning, Let’s say our boning is 1/2” so we know our bias tape will need to be 1/2” with he clean edge, so we need to account for the seam allowance that is folded towards the center and press on both sides. We will be folding 1/4” on each side, so the 1/2” original measurement is actually doubled. I know thats a long winded way of saying to double the measurement, but I wanted to give a little logic as to the process, so it made sense.

  4. -After cutting the bias tape to your desired width, carefully press the sides towards the center. I am using an ironing ham, which can be found on amazon. I find that it helps to insert pins into one end where the seam allowance is pressed towards the center, and give the bias tape a bit of tension which makes pressing it down a little easier.

5. Once I have created all my bias tape I can begin to sew the diagonal boning channels onto the garment. A boning channel refers to the bias tape we are sewing on, which will act as a channel to house the boning. Using the templates (pieces H-K) We will sew the diagonal bias tapes on. I found it helpful to lay the template over the piece, and place my bias tape between the two, and pin one side under the template line, and then pull taught to the other side. That way I know I had a straight line. Also using a LOT of pins is super helpful also. After pinning the bias tape on the desired locations, you will carefully stitch it down on each side. You will want to stitch as close as possible tot he edge so your boning has enough room to slid into the channel. Take your time with this, and make sure the stitching as as straight as possible. Because this design has the exposed boning channels, and I like exposed stitching, I made this a focal point, and you want this to feel as clean as possible.

6. After you have sewn your diagonal tapes onto your front, Side Front, Side Back, and Back pieces we can start assembling the outer shell. The boning can be inserted into the channels after stitching together, as the have access points from the top and bottom.

7. Let’s begin by stitching the side front (pice B) to the Center front pieces. With right sides facing, pin and stitch .After stitching, you will want to clip the curve so you can relieve some of the tension in the curve of the bodice. After clipping, press open. Now repeat this with your lining pieces.

8. Now let’s attach our side back to the side front. With right sides facing, pin and stitch. After stitching, press open. Now repeat this with your lining pieces.

9. The last step is to attach the Back to the side back. With right sides facing, pin and stitch. Afterwards press open flat and beautiful. Now repeat this step with the lining pieces .

10. Now, let’s stitch the bias tape over top of our main seams that run vertical. Make your way across covering all of the seams that make up this garment with the bias tape. Use a lot of pins, and make sure it’s centered over every seam. If you notice, there’s a space in the center of the center front for a bias tape, but no seam…. This is because this piece of bias tape for boning is optional, but I really love the structure it gives it, and it helps with the overall illusion, so I suggest adding it.

11. After attaching the vertical bias tape, let’s insert our boning! Because I’m using a rigilene boning, it can be very sharp, and the last thing you want to do is to puncture or snag your bias tape. I am wrapping the ends of my rigilene with a painters tape to help me guide it through the channel. There are so many ways of capping the ends of rigilene, but I suggest snipping the sharp corners to make them more round, and either covering with a piece of satin ribbon folded in half, and stitch down to create a satin ended cap. Some people will also dip the ends in Plastidip ( which is a technique used a lot with steel boning. If I’m in a pinch, and don’t have the time/ supplies above, I will just leave a layer of painters tape just at the end. This wouldn’t be the most desired way, but it will be hidden, and do the trick. If you need the intro to Boning, there is a video on My patreon for Tier 2 and 3 patrons that explains the process of trimming the boning/ what each boning offers.

12.Next up, let’s address the waist band. This piece is optional, and can be created at whatever width you like. You will be treating it the exact same way as we did the bias tape for the boning. I made my waist band a full 1” wide because I like a focal point at the waist. Now…. If you used steel boning, or a rigid plastic boning, you won’t be able to machine sew the band on. You will need to blind stitch the waist band all around the bustier/ corset body. If you take your time, and stitch carefully, it will look stunning. Because I uses a rigilene boning, I actually just stitched my waist band right on top of the rigilene. It helps hold everything in place. I will note, I did decide to add some heavy fusible to the back of this waist band, because I didn’t want the lines of the boning to show through the satin waist band. I wanted this to be a nice sturdy band that wrapped around the waist.

13. Let’s talk about padding for the bust. We have included 2 pattern pieces ( F and G) which can be used to make your own padding if you like. The type of foam I am using for this can be purchased at stores like joann fabrics, or purchased online. For this padding, I chose a 1/4” thick padding. (You can also just purchase your own bust cups, and then stitch them in/ trim to fit exactly! We just wanted to include the option to create your own that fit exactly into the bustier.) To create this bust cup using our pattern pieces, I cut out my foam pieces, and line them up next to each other. I will be utilizing a zigzag stitch, and just zigzagging them tougher, making sure not to overlap the pieces. We want them to meet perfectly in the center. You will need to pull/ add a little tension around the curves, but this is what creates that nice bust cup shape. After you have done this, you can repeat for the other cup. Use your pattern pieces as guides.. there are notches to help you line them up.

14. After you have created your bust cups, you will tack them inside the bustier. I like to attach mine to the seam allowances so they stay in place, but also so it doesn’t show where I tacked not he outside. The top of the cup should align with the top of the corset because it will all be sewn into the top bias binding int he last steps.

15. it’s time to attach the lining to the outer shell. I start this process by stitching the center back seams together of the lining/ outer shell. Depending on whether you are adding a zipper, or utilizing eyelets to lace up the garment will determine how you finish it out. IF you are doing a zipper, you will need to make sure it is a separating zipper. You will insert the zipper in between the outer shell, and lining fabrics. After pinning in place, stitch the lining/zipper/outer shell together. You will repeat this step on the other size, with the other side of the zipper.

-If you are not utilizing a zipper, we will just pin the outer shell to the lining at the center back with right sides facing, and then stitch together.

16.Now lets turn the corset right side out. The center back should have a clean seam, and the top and bottom should be raw edges. Now press those center back seams.

17.For the next part of the process, I will be pinning the lining to the outer shell across the top and bottom, making sure the seams align so that the tension is correct. Use a lot of pins if you like. After pinning, I am going to add a stitch at .25” across the top and bottom to secure my lining tot he outer shell. This will also make it easier when sewing the bias binding.

18. Now let’s talk about our bias binding. We will be approaching this similarly to the bias tape, but instead of sewing it on flat, we are adding a step by folding it in half! This will go across the top and bottom of the corset to close in the raw edges. My favorite way of doing this is to create my bias tape like before, but inserted of folding both sides towards the center and ironing, I will just fold one. After I have done this, I like to pin the raw edge to the corset, matching right sides, and then stitch all across the bottom. After stitching, I can then fold the bias binding over the raw edge of the bottom of the corset, and pin it to the lining side. With the ends, I will fold them under, and into the bias binding so it looks nice and clean. USE A LOT OF PINS TO DO THIS! You want this part to look nd feel so clean. After pinning, you will hand stitch the bias binding dow. Go slow, make your hand stitches as equidistant as possible so that it looks polished when you are finished.

19.The next step is to do this to the top. My favorite way of binding a sweet heart neckline is to do half to he neckline at a time. So repeat the step like we did on the bottom, and pin the raw edge with right sides facing to the top of the bustier, and start at the center back working your way to the center front. Stop stitching right at the center front seam. When cutting your bias tape, leave yourself an extra half an inch that we will use to fold under bias binding and sew down so we have a clean edge. This will give you a nice angle at the center front, and when we do this tot he other side, the “V” at the center front bias binding should match up perfectly. When stitching the bias binding to the lining , you will also want to stitch the center front bias binding at that V so it is perfectly in place also.

20. Now that we have bound the top and bottom of the corset/bustier, and all edges are secured, it’s time to insert the eyelets if you are lacing up. IF you added a zipper, you can also add laces, but they would just be for show, but would require that eyelets be inserted the same way. I inserted my eyelets 1”apart, but some people like a smaller distance between them for more control with lacing up your corset back, and some people will also have the eyelets get closer together at the waist band for a more cinched feel.

  1. Lastly, let’s talk about the privacy panel, which is Piece E. The privacy panel, is a nice addition to this, as it protects the skin from the lacing, or the zipper. It’s a piece that can be tacked into the garment, or you can attach snaps to hold it in place . Start by pinning the outer and lining pieces together. For reference, I also flat lined an innerfscint, and the lace to this do it felt seamless, and had support. Now stitch three of the sides togther, leaving one to turn it right side out. Trim away the excess fabric, and turn the privacy panel right side out. Make sure to press the corners out and press it flat.

  2. Now turn the seam allowance toward the inside for he panel, and pin/ stitch this closed. I am hand sewing so the seam looks seamless. You can choose to hand tack this panel to one side of your center back, or attach snaps so that it is easily removable. WE just wanted to include a privacy panel so that the garment could be easily worn!

  3. Last step! If you make The spellbound Corset, PLEASE TAG ME! I love seeing all of your work, and it makes my day to see everyone’s interpretation of my garments! Very thankful for all of the support