The Camelot Dress Guide

Let’s Get Started!

1.Welcome to The Camelot Dress  Pattern! This page is dedicated to helping you construct your own version! Step #1 is to Familiarize yourself with the pattern pieces and the indicated markings such as grain lines, notches, and labels. You will have the following pattern pieces:


A-Front Bust

B-Side Front Bust

C-Bust Overlay

D-Front Tie

E-Center Front Bodice

F-Middle Front Bodice

G-Side Front Bodice

H-Side Back Bodice

I-Middle Back Bodice

J-Back Modesty Panel

K-Grommet Placket

L-Sleeve Band Overlay

M-Sleeve

N-Cuff

O-Cuff Extension

P- Sleeve Slit Binding

Q-Front Skirt

R-Front Skirt Band

S-Side Front Skirt

T-Side Front Skirt Band

U-Side Back Skirt

V-Side Back Skirt Band

W-Back Skirt

X-Back Skirt Band

Y—Skirt Ruffle


2.Cut out all of your pattern pieces, linings, and interfacings! I also go ahead and iron my fusible interfacings to the pieces they belong to in this step! Your pattern pieces will tell you what you need to cut from which fabrics! For My Sample, I wanted to note that I added an interfacing to my skirt bottom band. I also chose to work with a chiffon that is super sheer, so I flat lined all of my outside pieces to that you couldn’t see my seam allowances once it’s sewn. This step isn’t necessary, but when working with a super sheer fabric I prefer the look of backing it with a solid fabric. If you choose to do this, it will effect the amount of yardage you need, so be mindful of that. 


3.Let’s begin by assembling the bodice. For all of the bodice steps, you will repeat the same to the lining so you can complete your lining as you complete your bodice. 

3A-Begin by sewing the side seams of your Center Front Bodice (Pattern piece E) and your Middle Front Bodice( Pattern piece F.) With right sides facing, pin and stitch. Afterward press the seam Flat and Beautiful.

3B- With right sides facing, Pin and stitch your Side Front Bodice (pattern piece G) to the side seam of your Middle Front Bodice( piece F,) Press open.

3C- With right sides facing, pin and stitch the Side Back Bodice(pattern piece H,) to Side Front Bodice (Piece G) Press seam open

3D-Pin and stitch your Middle Back Bodice (piece I,) to Side Back Bodice(piece H)

4.If you are planning on not utilizing the lace-up feature, you will need to Stitch the Center Back Bodice (Piece J) to the Middle Back Bodice(Piece I.) IF you notice, Pattern piece J also double as the modesty panel for the lace up option. The pattern has  markings of where to cut if you plan on utilizing it for either piece. The modesty panel would be cut on the fold where the back pieces are meant to cut two separate pieces.

5.Before we hop into working on the bust cups, now would be a great time to add boning to your bodice. I chose to add a lightweight boning with a pre-made casing.I stitched the boning to the seam allowance of my lining pieces. If you need help with boning, I have a full tutorial on my Patreon page.


6.Now let’s begin working on the bust pieces. The bust features two pieces that form a cup like shape, and then we will be adding an overlay which gives the bust area a nice draped effect. To start, pin Front bust (pattern piece A ) to Side front bust (pattern piece B.) The curve of Pattern piece B Will match up to the slight curve of Pattern piece A. Now we can stitch. After stitching, you will want to press open. Depending on your fabric you may want to clip the curve before pressing.


7.Now let’s have a look at pattern piece C which is the overlay. If you notice, there is a marking on the bottom edge to gather. You want to create a gather stitch from one notch to the other. Don’t gather yet.


8.Next up is to create our front ties using pattern piece D. You want to fold this in half , and stitch one end closed, and the side. If you notice, the seam allowance on this piece is 1/4”, so you’ll want to stitch accordingly. This piece is small, and delicate, so you’ll want to use a fair amount of pins to help. After stitching, turn the tie right side out, and press it flat. To turn, I used a turner, but you can use any long thin instrument.


9.Now let’s join our overlay and our lining bust! Pin the right side bust cup to the wrong side of the overlay. Stop your pins where the overlay needs gathered( where we stitched the gather stitch). We can now gather that stitch to fit the measurement of the bust cup. Now that the bodice overlay is a perfect fit for the bust cup, We will be flatline stitching all around the edges to join the two.


10. Now that our overlays are attached to the bodice cups, we will join the bodice cup linings to the outer bodice cups. With right sides facing, pin them together. We will be stitching the center front seams and the top edge to join the overlay to the bodice cups, but first we must pin our ties to the center front of the cups. Pin your tie to the top corner of the center front part of the cups with the ties facing inward. Now stitch the center front seam of the cup and the top edge . After stitching we can turn the bodice cups rightsize out and press the seams nice and flat. We should not have two bust cups.

11.The next step is to add a stay stitch to the curves of the bodice front where the bust cups will be inserted. This should be a stitch at a scant 1/2”, meaning in between 1/4” and 1/2”. You don’t want it to show on the outside of the seam, but you want it to help support the inner seam.


12. Afterward, we will be to add the same stay stitch to the bust cup at the bottom edge. This will close up the bust cup. IF you would like to add an additional purchased cup for support, this would be the time to do so. Just add it before closing the bottom of the cups with the stay-stitch .


13.Now we can pin out bust cups to the bodice with right sides facing. The seam in the bust cup should match up perfectly to the center front/side seam in the bodice. The cups should almost be touching at the center front, but not fully. Once sewn, they will leave a gap, and this is what the tie is for. Now that our bust cups are pinned to the bodice, let’s stitch them in. After you stitch, you can do a few different things. IF you want to use the seam allowance to secure underwire, you could definitely do so. You could also bind the seam with bias tape for a bit more support. You could also stitch the seam allowance down, which will show on the outside. If you do this, make sure to clip the curve so you can press the fabric nice and flat.
Clipping the curve of the seam allowance is super important to creating a polished garment. After you’ve decided how you want to treat your under bust, make sure you press that seam open.


14.IF you are planning on adding the lace up feature, this step is for you! Let’s create our grommet placket( pattern piece K.) IF you plan on adding grommets to this, ensure that you have added an interfacing, this section will definitely be getting some tension, so it will need the support. After adding your interfacing, fold the placket in half with right sides facing. WE will stitch the top and bottom edges closed. After stitching, trim the seam allowance, and turn it right side out, and then press! Now let’s pin our grommet plackets to the side back bodice pieces, with the raw edges on the seam side. We will be stitching them into the side back seam once we join the outer bodice with the lining at that seam.

15.Now let’s pin our bodice lining to the bodice with right sides facing. We will be sewing the side back seam, and the top of the back pieces over to the arm hole ( please note: if you are utilizing the back piece/ not planning on having a lace up back, you will not sew the center back seam, you will only sew the top of the back over to the arm hole. After stitching, turn the bodice right side out and press. The next step will be to attach the lining to the under bust. I love a clean finish in a garment, so I prefer to hand sew this section. I pinned my lining to the under bust matching my 1/2’ seam allowance folded under. Once pinned in place, I hand-stitch from armhole to armhole. If you need a hand sewing tutorial, I have one on the Patreon page. After hand sewing, we should now have a bodice ready for sleeves!


16.Let’s talk about the sleeves. IF you notice there are two lines at the top of the pattern. These are your gather lines. Before we can gather though, we will need to mark those lines. I am using transfer paper and a rotary wheel. Once I have the lines marked, I will be folding the top edge of the sleeve down to 1/4” over that top gather line. I am going to pin and then stitch along that top line to create my gather line( your top gather line will be on top of both layers of fabric.) After stitching the top gather I can stitch my bottom gather line. Now let’s gather the sleeve to meet the width of the sleeve arm band (pattern piece L). After gathering, you will fold the top and bottom seam allowances of the arm band to the Wong side of the arm band, and press them/ pin them. Now we can pin the arm band to the sleeve. It will cover both the gather stitches. After pinning, top stitch your arm band overlay to the sleeve. 15B If your sleeve fabric is not sheer or does not have a nice looking back side, you may want to skip the fold over step, and trim the top of your sleeve pattern off to where there is 1/4” seam allowance above that top gather line. Your next step would be to gather the sleeve to the width of the arm band. After doing so, you would stitch the top of the arm band to the top of the sleeve with wrong side of arm band facing wrong side of the top of the sleeve. After stitching, you would press open flat, and then fold up 1/2” of the bottom edge of the arm band and press that flat. You could then pin that arm band to the sleeve Which will hide that other gather stitch, then topstitch the band across the sleeve.

17.The next step is to address the sleeve slit.You will see this marked on your pattern piece. After cutting the slit to the stop line, you will add a very small stay stitch along both sides of the slit.


18.Now we can work on the sleeve slit binding ( which is pattern piece P) We will be turning this pattern piece into a bias tape essentially. Fold both sides of the pattern piece to where they meet in the center, and then press them. I find with small pieces like this that it’s easy to pin them in place before pressing. After you have pressed the seam allowances towards each other, the next step is to fold the piece in half (seam allowance facing seam allowance) and then press again. We now have a bias tape.

19.The next step is to attach the binding to the slit. Start by inserting one edge of the slit into the binding and pinning in place. Now insert your sewing machine needle into one end, and backstitch to get started. Now work your way down the slit stitching the binding down. You need to make sure your sleeve slit stays in the fold of the bias tape. When it comes to the top of the slit, straighten out the sleeve by pulling a bit to give it some tension, and keep sewing your binding straight. Pulling the fabric taught should allow you to make it more of a straight line to fit into the binding. After you have stitched the binding to the sleeve slit, press that nice and flat! We can now work on the cuff.


20.The cuff has a small placket style extensions, and I have added little loops here to secure buttons. I used a small piece of black elastic because I think it gives the arm security, but mobility to move ! Start by assembling the cuff Extension (pattern piece O )Begin by folding the cuff extension in half with right sides facing, and stitch the top and bottom edges closed. Afterwards trim your seam allowance, and turn it rightist out making sure to press the corners out so they are nice and pointy. Afterward press them flat and beautiful.


21.Now we can pin the cuff extensions to the cuffs at the outer edges. IF you plan on adding button loops like I did, you will need to cut them and add them to the cuff extension now before sewing the extension in. The loops should be big enough to accommodate your button, plus a tiny bit, and then half inch seam allowance for both ends once folded in half.It is also helpful to stitch these to the cuff extension at half inch seam allowance so they stay in place while sewing into the cuff. After adding your loops, making sure the cuff extensions is facing inward, and then pin your cuff pieces together with right sides facing. We will be sewing the side seams, and the bottom edges. After stitching, clip away your seam allowance at the corners, turn your cuffs rightsize out, and then press those corners out so they are nice and pointy. Then give everything a good press.


22.The next step is to stitch the side seam of the sleeves. With right sides facing, pin and stitch the sleeve side seams. After sewing, finish your seam accordingly and press open.


23.The next step is to create a gather stitch along the bottom edge of the sleeve at 1/4”. After stitching, gather the bottom of the sleeve to match the length of the sleeve cuff.


24.After gathering, you can pin the sleeve to the cuff, starting from one side of the slit and making your way around. Make sure your right sides are facing, and make sure to only catch the outer side of the cuff. After pinning, stitch your sleeve to the cuff. After stitching, you can fold the seam allowance of the other side of the cuff under and then hand sew it down for a clean finish. I prefer a clean look, but you could also choose to stitch the sleeve to both side of the cuff and just overlock, or zigzag that seam allowance. I won’t judge, hah!


25.Now we can pin the sleeve to the armhole of the bodice with our right sides facing. You will want to match those side seams to the sleeve inseam. You will want to tuck the raw edge of the ruffle if you chose to do it. I just dog ear fold this down toward the band and pin in place. After pinning, you can stitch in place. After stitching, you can either overlock this, or create a sleeve bias tape to bind the edge if you like. I chose to overlock this for times sake. You may also want to add a little stitch/ tack to keep the seam allowance of the sleeve facing the sleeve.


26.Now we can add our grommets to grommet placket. Make sure they Are evenly spaced out, unlike mine, haha. Take your time with this!


27.Our bodice is ready to sit aside, and we can start working on our skirt!


28.The first step is to assemble the skirt itself. Start by pinning the skirt front ( pieceQ) to the skirt side front (Piece S). At the side seam. Now stitch, and then press open. You will want to do this to the lining also


29.Now we can attach the skirt side back(piece U) to the skirt side front (piece S). After stitching the side seams, press open, and finish the seam accordingly. Also do this step with your lining piece.


30.Now let’s attach our skirt Back (piece W) to the skirt Side Back (piece U) press your seam open, and finish accordingly, then repeat this step on the lining.


31.Before we hop into the box pleats, we want to create a little finished edge at the center back skirt seam ONLY IF YOU ARE DOING THE LACE-UP OPTION) to do this, we will pin the right sides together, and start from center back, and stop at the second line from the back. You will stitch at 1/2” from center back, and stop with your needle still in the fabric at that second line. Now lift your presser foot, and rotate your fabric so you can sew from the point you stopped to the edge of the seam allowance. This will create little L shaped stitch. Now clip towards the corner of that L. We can now flip the seam right side out, and it will create a nice finished seam. where the seam stops, you will have a little raw edge. That is where the skirt gets inserted into the bodice, but we will get to that point a little later.


32.The next step is to address the box pleats at the top. The pattern will be marked with lines, and arrows showing which direction the fabric meets. The seams of the skirt will be hidden inside of the box pleats, so some arrows say “continued on other side” which means that lines’ partner is on another pattern piece . Mark your fabric using marking paper an a rotary wheel.


33.We will  be doing our box pleats with our lining and outer fabrics together. You can add a stay-stitch to the top of the skirt and skirt lining to join them at the waist seam of the skirt. 

34.We will also add a stay stitch to the bottom edge of the skirt , joining both the outer and lining fabrics. Lay the fabrics flat, and Pin along the bottom. You want to join at the raw edges.


35.Create your box pleats by joining the two lines of a pair, and pinning. Stitch from the top down to the stopping point. You want to make sure your right sides are facing together when pinning and sewing. Make sure you backstitch a few times at the end because you want the box pleat to be strong. Make your way around and create all of your box pleats minus your center back. Pleat. After you sew your pleats, pin them open at the waist seam, and then press your pleat seams open.


36.Now let’s work on our skirt bands. The skirt bands are essentially an extension of the skirt. We added a seam there so we could insert the ruffle. The band is not necessary if you just want to add the ruffle, that’s totally fine! You could also add a longer ruffle than our pattern piece calls for and it would just give you a lot more drama and be stunning!


37.To sew the bands, follow the same instructions as with the skirt. Stitch the Front band (piece R) to the front side skirt band ( piece T). With right sides together, pin and stitch., then press open. Also do this for your Band lining pieces.


38.Now stitch the side back skirt band (piece V) to the Side Front Skirt Band (piece T) Also do this with your skirt band lining pieces.


39.Lastly, join the back skirt band (piece X) to the skirt side front band (piece V). You will also do this to the skirt band lining pieces


40.Now that we have our outer and lining skirt band attached, we can pin them together with right sides facing, and stitch all along the bottom curve. After we stitch along the bottom curve, I chose to undertsittch so it lays nice and flat. This is where you stitch the seam allowance to the lining very closely to the stitch. After sewing the bottom curve, I turned the skirt band right side out and then pressed it flat and beautiful. Now sit the skirt band aside.


41.Now we can chat about our ruffle. We need to join all of our ruffle pieces at the side seams! You will have one very long ruffle piece. After joining and finishing those seams, you will need to hem the bottom edge. This is one long straight line which make sit easier. After hemming, it’s time to gather the top edge. This is a time consuming part because you want two gather the ruffle to the length of the top of the skirt bottom band, as that’s where it gets sewn in. I suggest doing two gather lines to make sure your thread doesn’t break.


42.After gathering your ruffle, you will pin it to the top of the skirt band , but only the outer layer.( if you are choosing to hand sew the lining of the skirt band) you can also just sew both sides of the skirt band and the ruffle to the skirt and overlock, but I like a clean edge because it will show due to the high/low feature of the gown. Now stitch your ruffle, and skirt band to the skirt. IF you only stitched the front of the band, you can now turn the seam allowance of the skirt band lining under and pin / hand stitch all the way around. It is more work, but I promise, it’s worth it for that clean look!


43.This step is optional, but because we will be joining our lining and outer skirt as one to a zipper, I chose to overlock all the way down the center back seam.


44.Now we can stitch our skirt to the bodice. IF you are choosing a zipper rather than the center back lacing, you will need to go ahead and create that box pleat at the center back on each side. After doing so, the skirt will match up perfectly to the bodice. if you are choosing the lacing, Stitch your skirt to the outer fabric part part of the bodice. The little raw edge dips we left on the skirt will fit perfectly into the bodice, and leave a few inches out of the seam with a clean edge.


45.After stitching, you will turn your seam allowance of the bodice lining under, and hand sew all along this seam for a beautiful clean edge. Then give it a good press. Now we can create our last two pleats at the center back. You will fold the lines on each side of the center back TOWARDS the center back. Line up the lines, and stitch. This should create a seam about 1/2” away from he center back seam. After doing this to both sides, push your pleat towards the bodice, and add a little stitch at the top so it looks nice and clean. This just keeps the pleat where you want it.


46.You can now add your zipper. If you need help with invisible zippers, you can find a tutorial on my Patreon.


47. If you are adding the modesty panel, you will have cut piece J on the fold. You will pin the modesty panel lining and outer fabrics together with right sides facing, and stitch around 3 of the edges. Clip your seam allowance, and then turn it right side out, and press it flat and beautiful. Now, fold your open seam allowances from the side you didn’t sew under, and then hand stitch. To attach, you can just do a quick hand stitch and attach the modesty panel to the side back seam so it can cover where the loading will go.


48.The last step is to add your buttons to the cuff.


49.You will now have a gorgeous gown that’s suitable for any castle or field you choose to run through!


Welcome to the Camelot dress guide! This dress was inspired by the idea of late nights running through castle hallways, prancing through fields of wildflowers, and the romance of times of the past. 


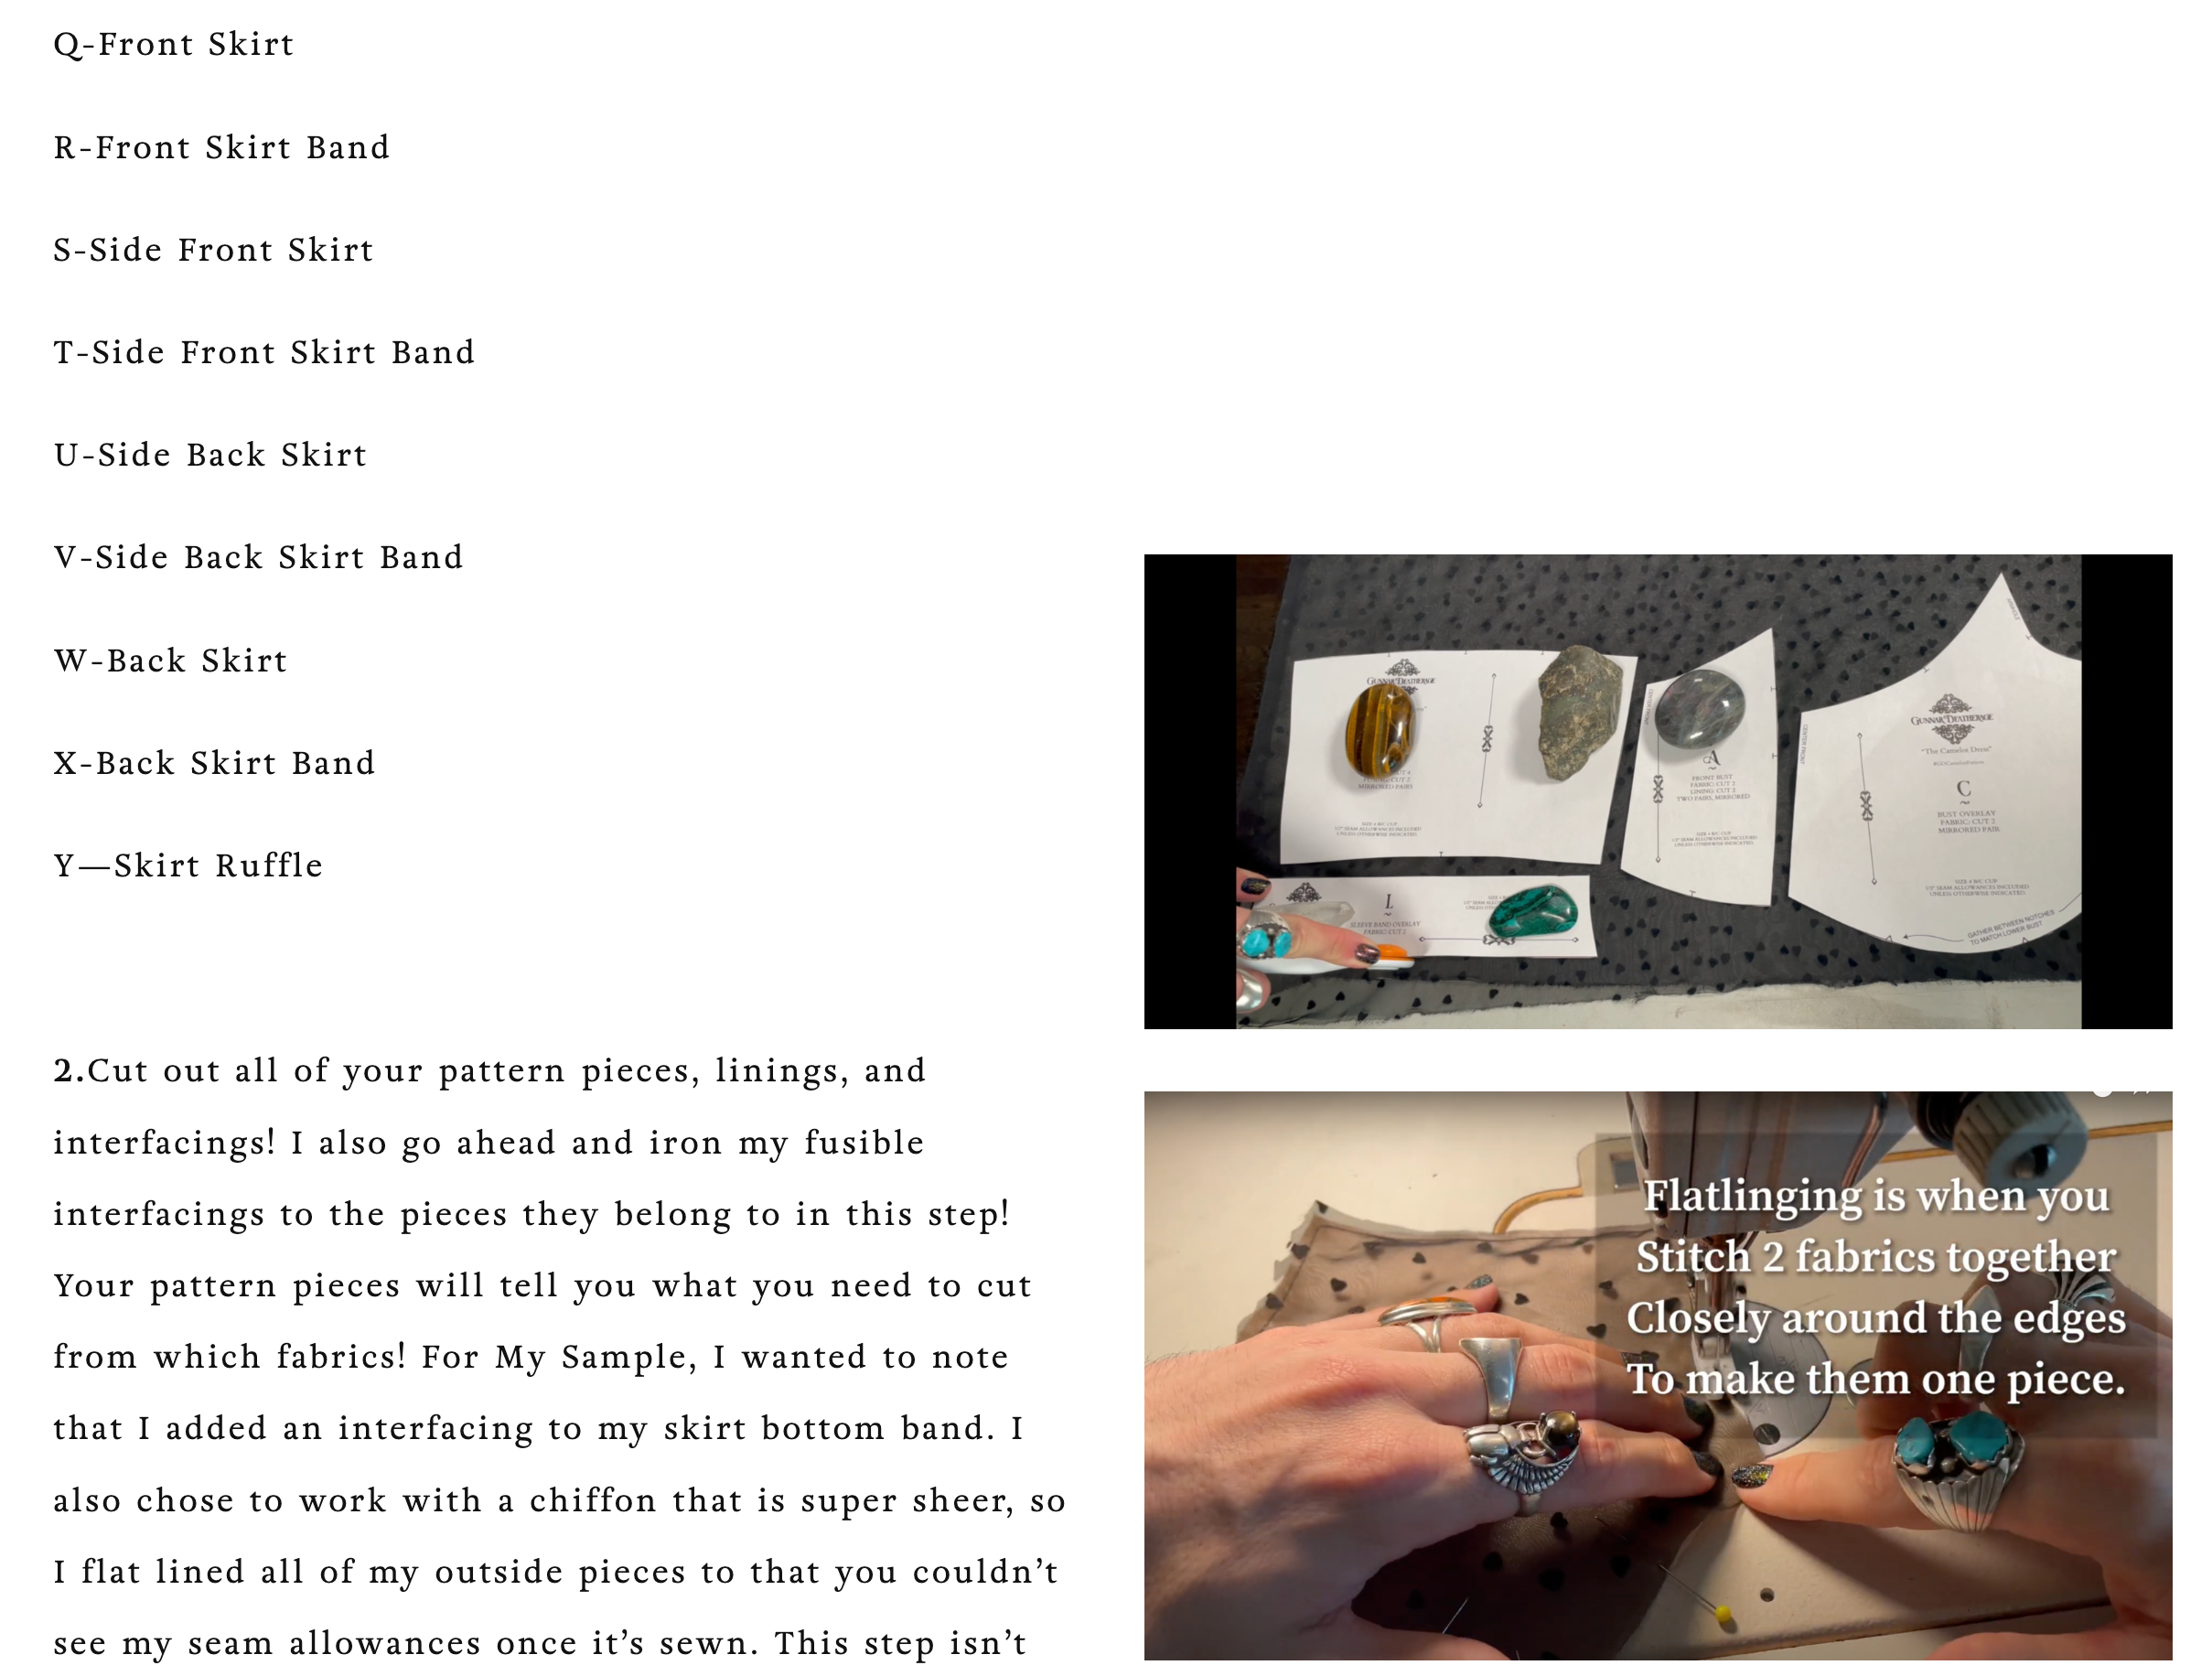
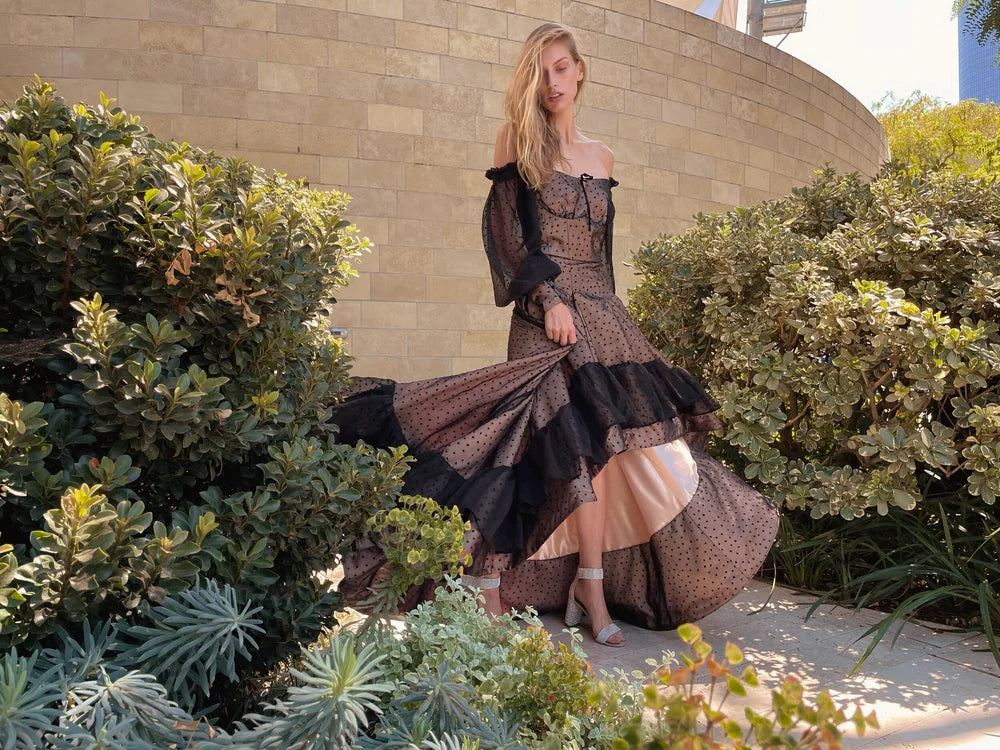
This dress features an off the shoulder design with  ruffle detailing, a bodice with corset style lines, the option to lace up, or zip, a beautifully draped sleeve that meets a high cuff for extra drama, and a high low skirt that is designed for beautiful movement.

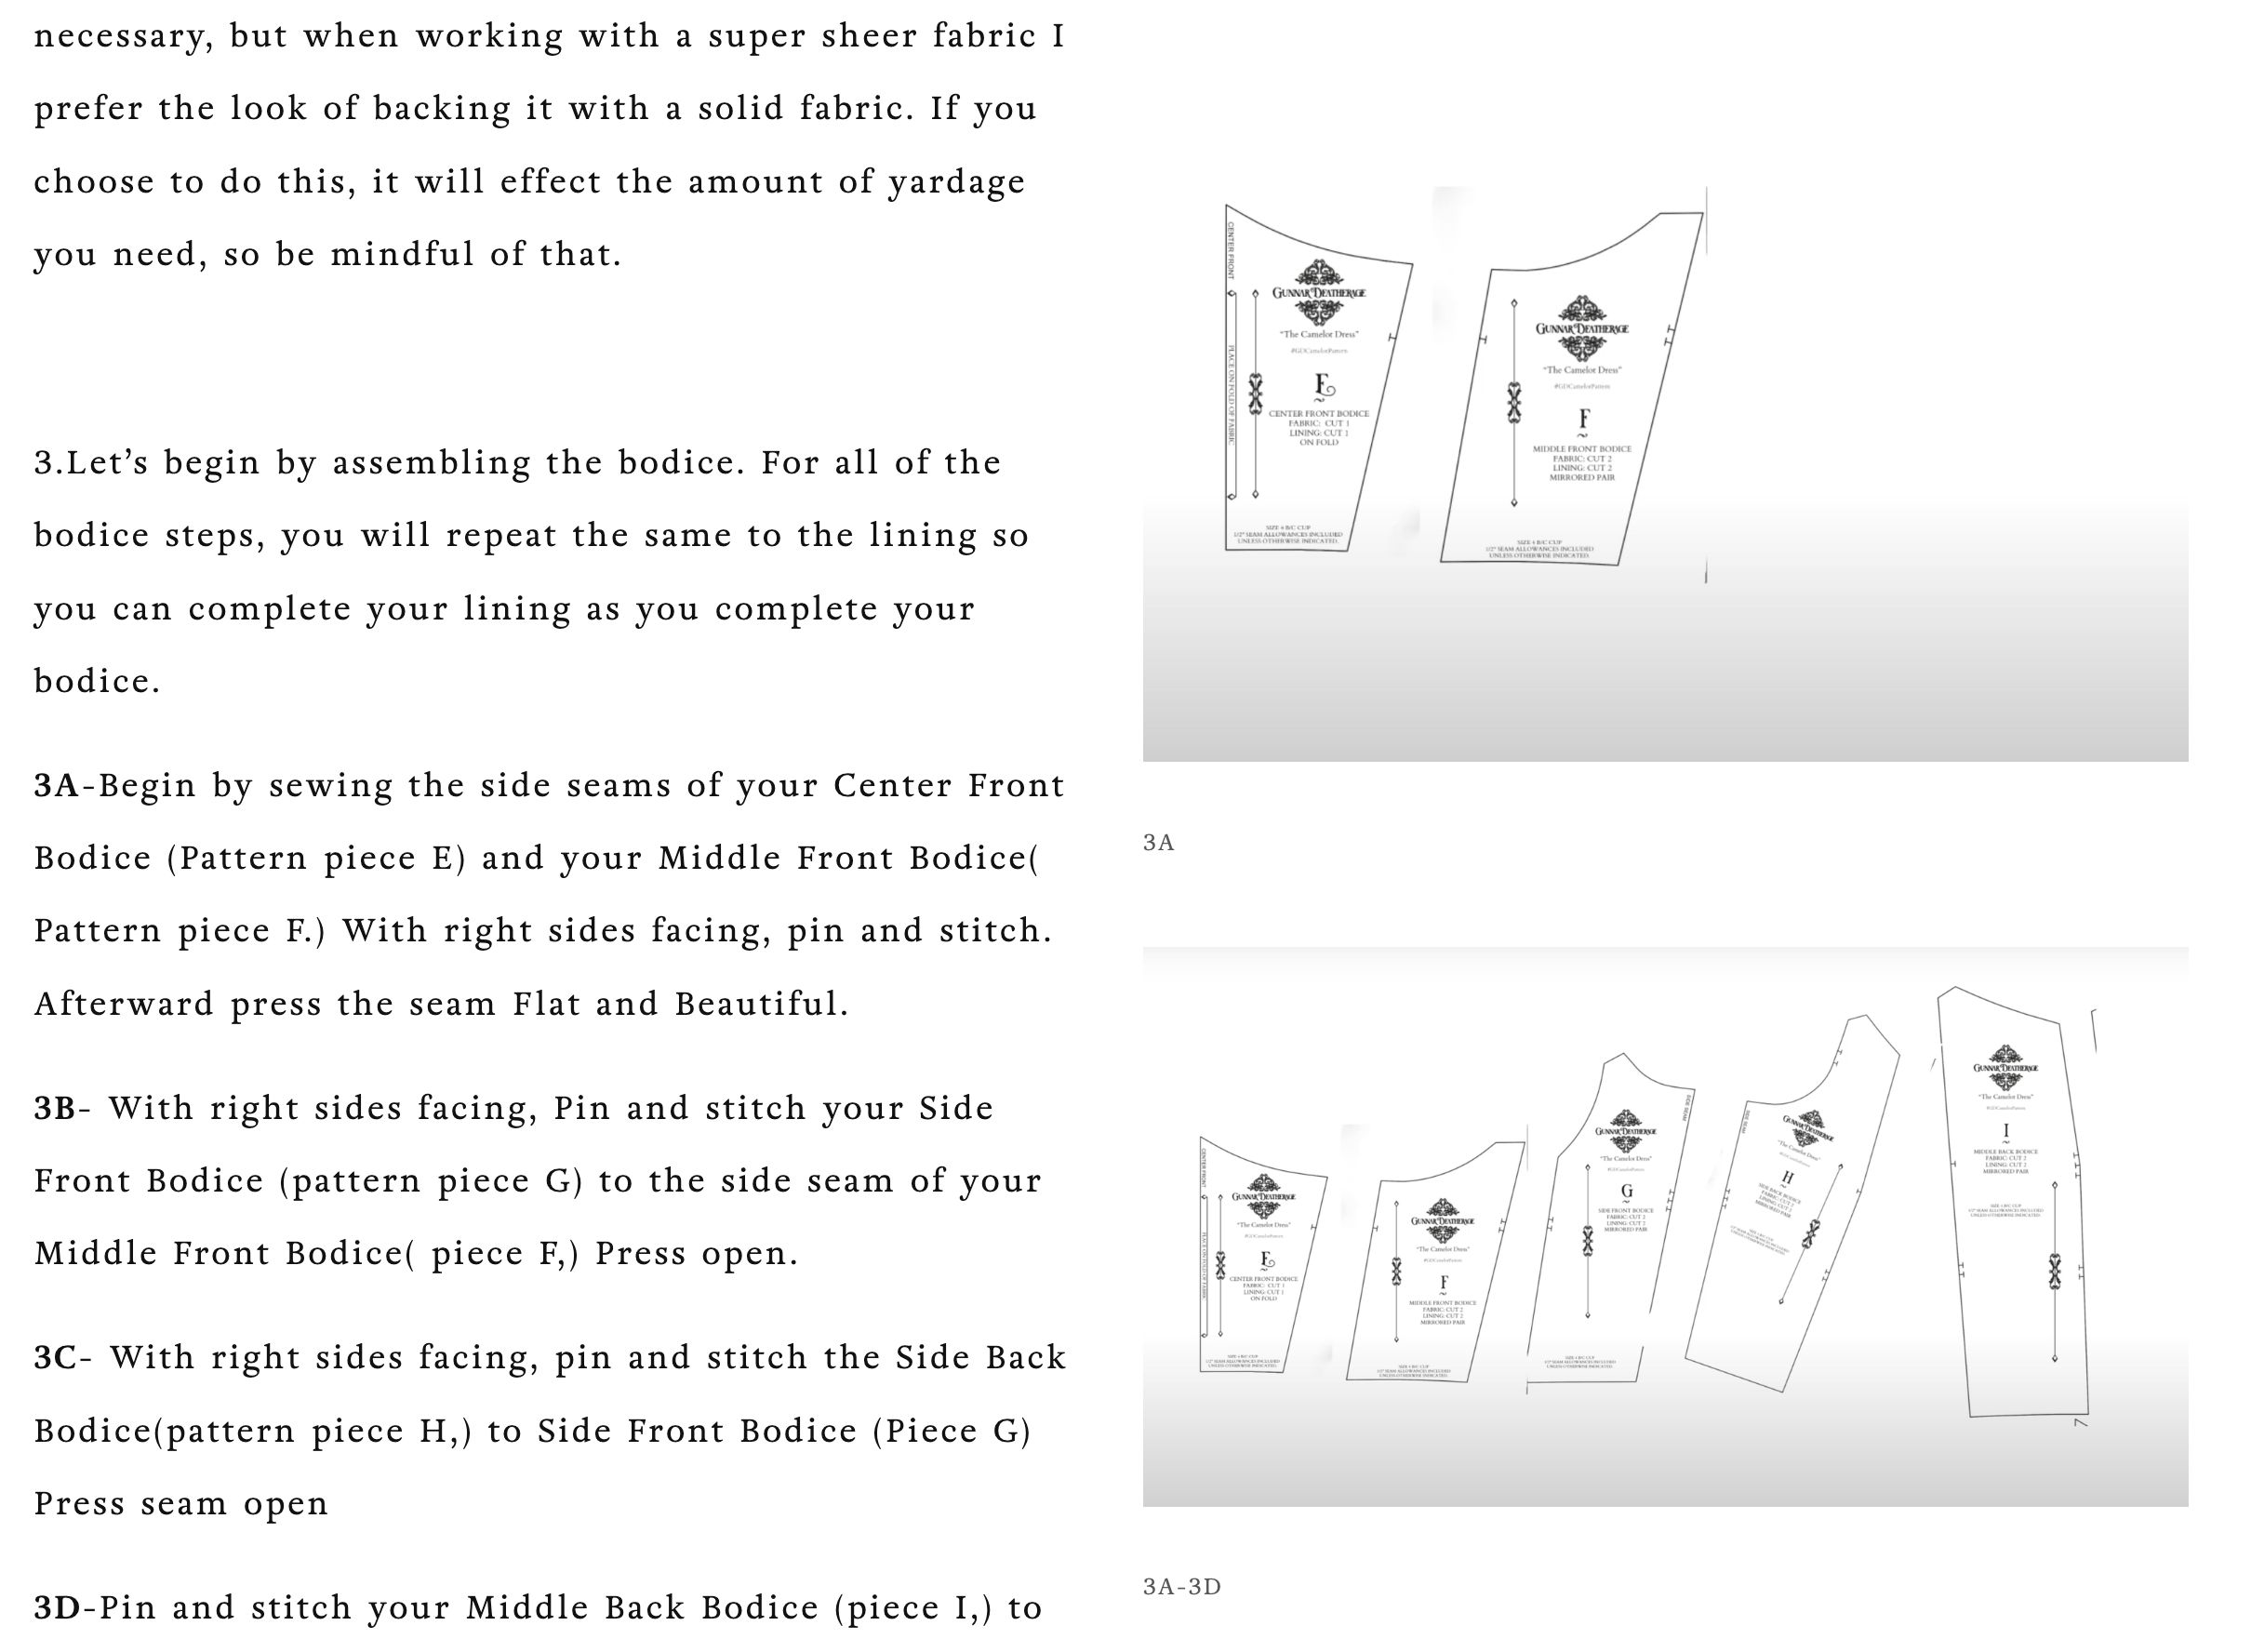
Below are the written sewing instructions, and I also filmed a step by step Youtube video of the entire creation process of this dress which is on the left of this text box! When you make your dress, please tag me! I would love to see what your dress looks like!!


3A

3A-3D

4.

5.

6.

7.

8.

9.

11.

12.

13.

Clipping the curves.

16.

16.

16.

16.

16.

16.

18/19

18/19

21.

24.

25.

25. folding the ruffle inward

26. measuring out the grommet holes

26. the grommet holes

26. finished grommets

31. where to mark four the finished edge if you are adding lacing.

31.

31.

32.

32.

33. add a stay stitch line across the top.

36.


41.

42.

42.

42.

44.

45.

45.

45.

45.

45.

46.

47.

48.