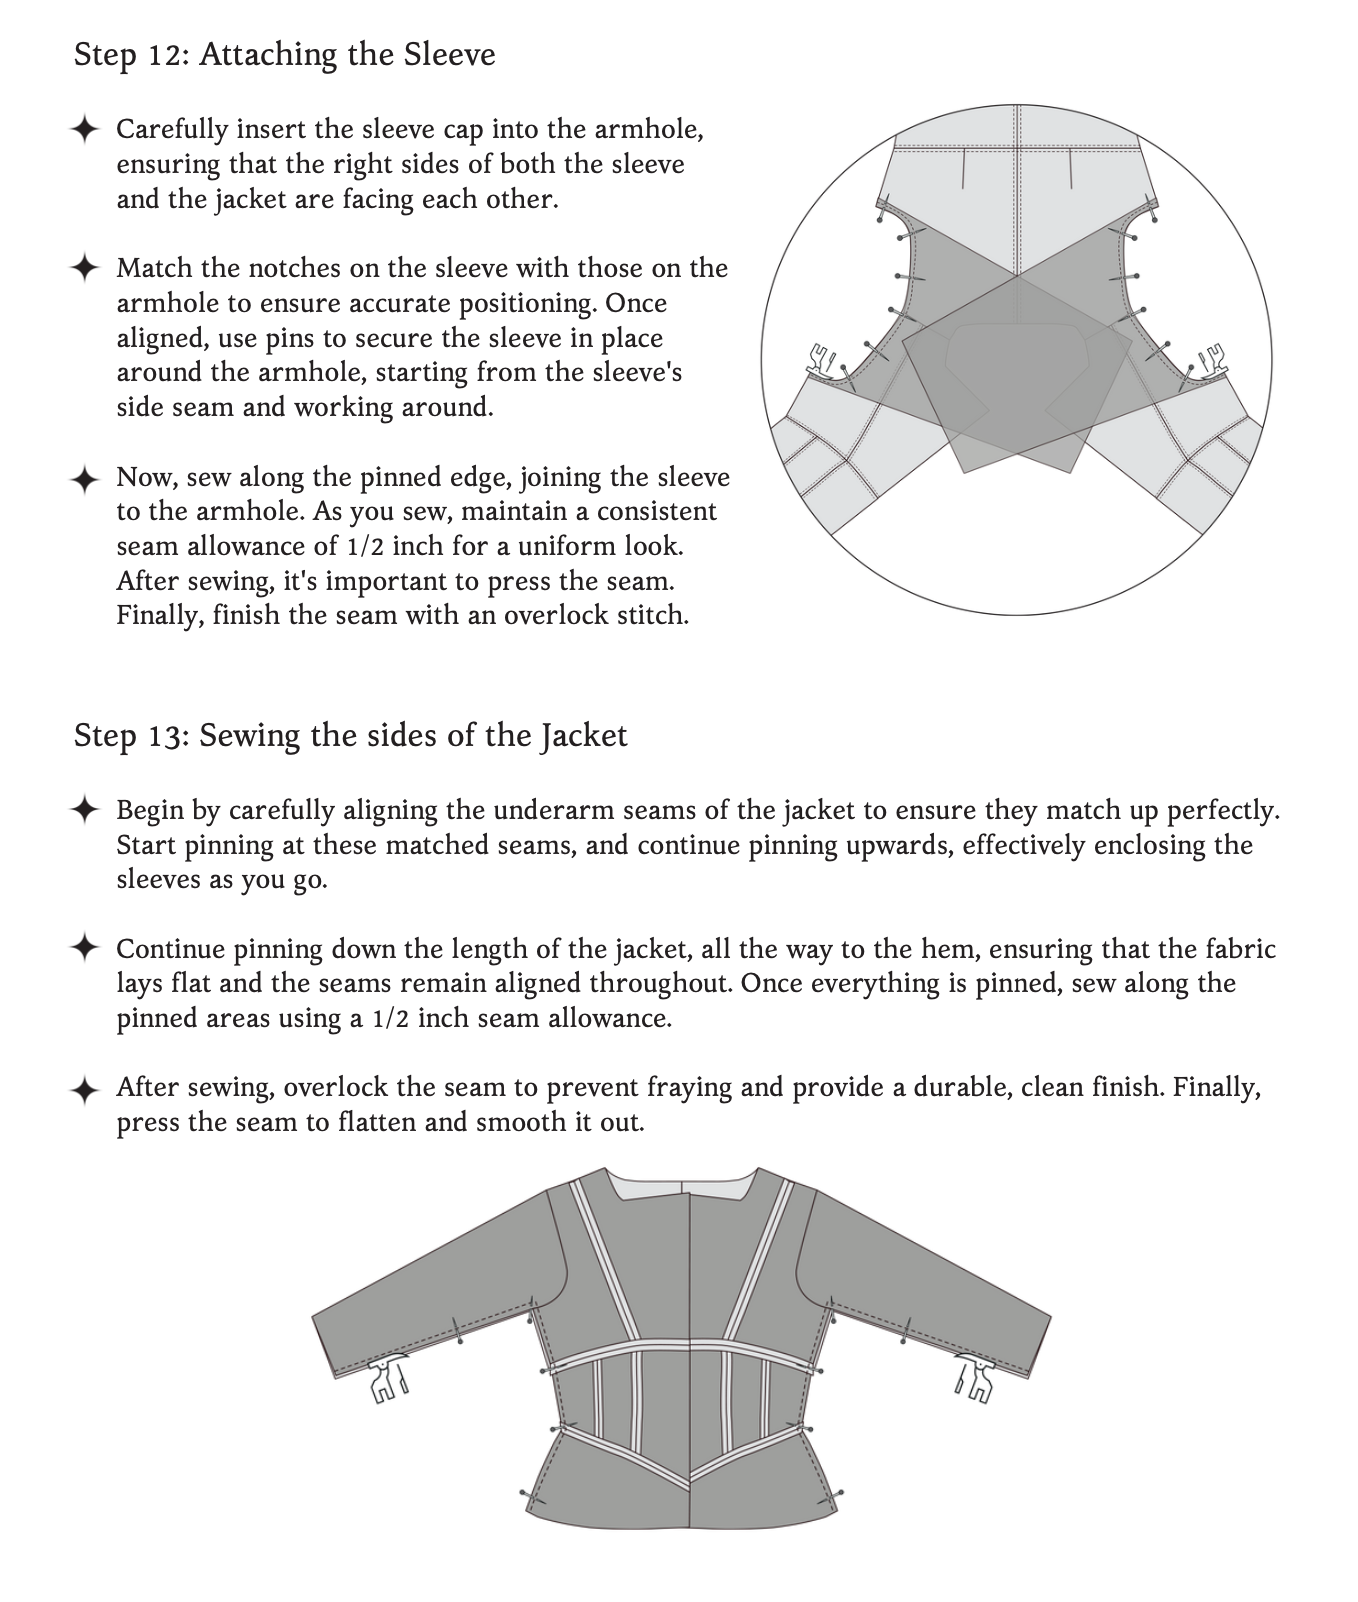
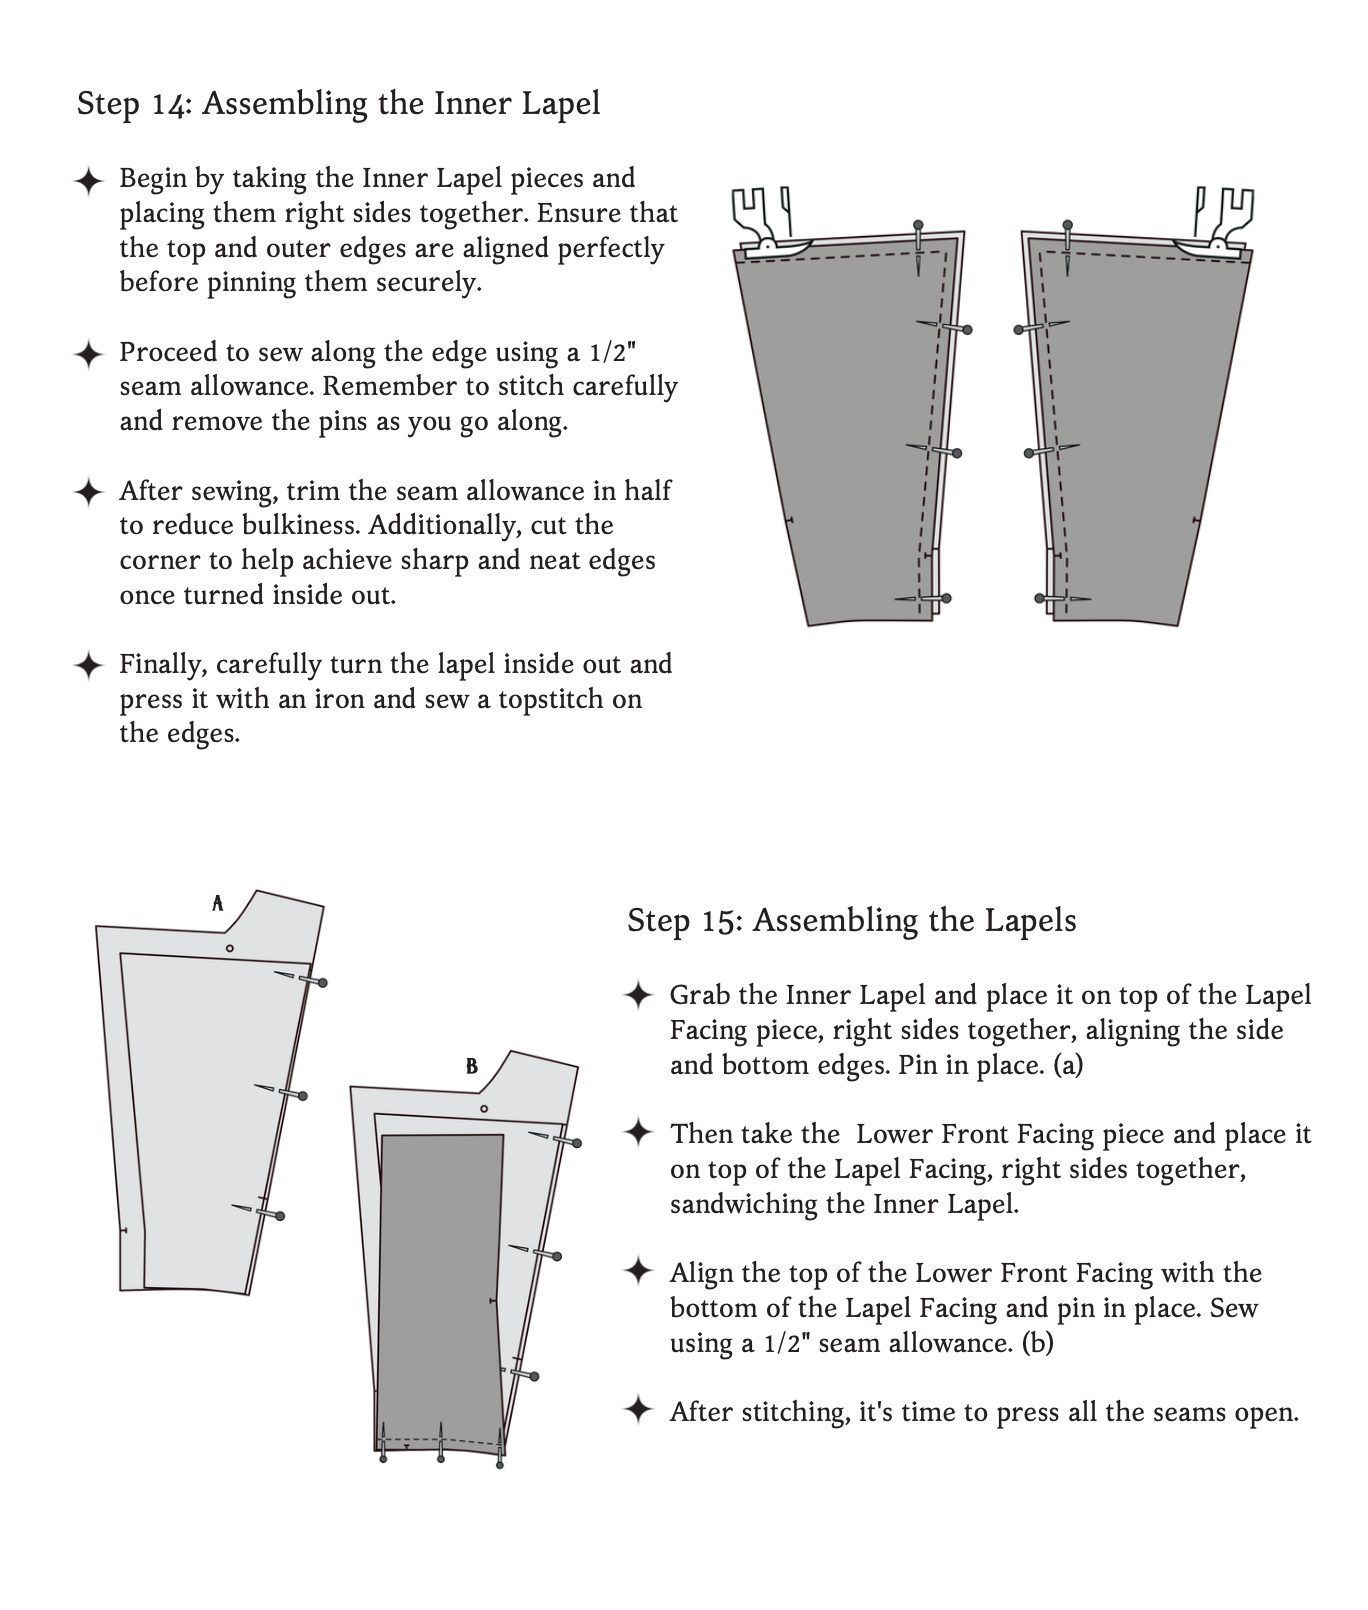
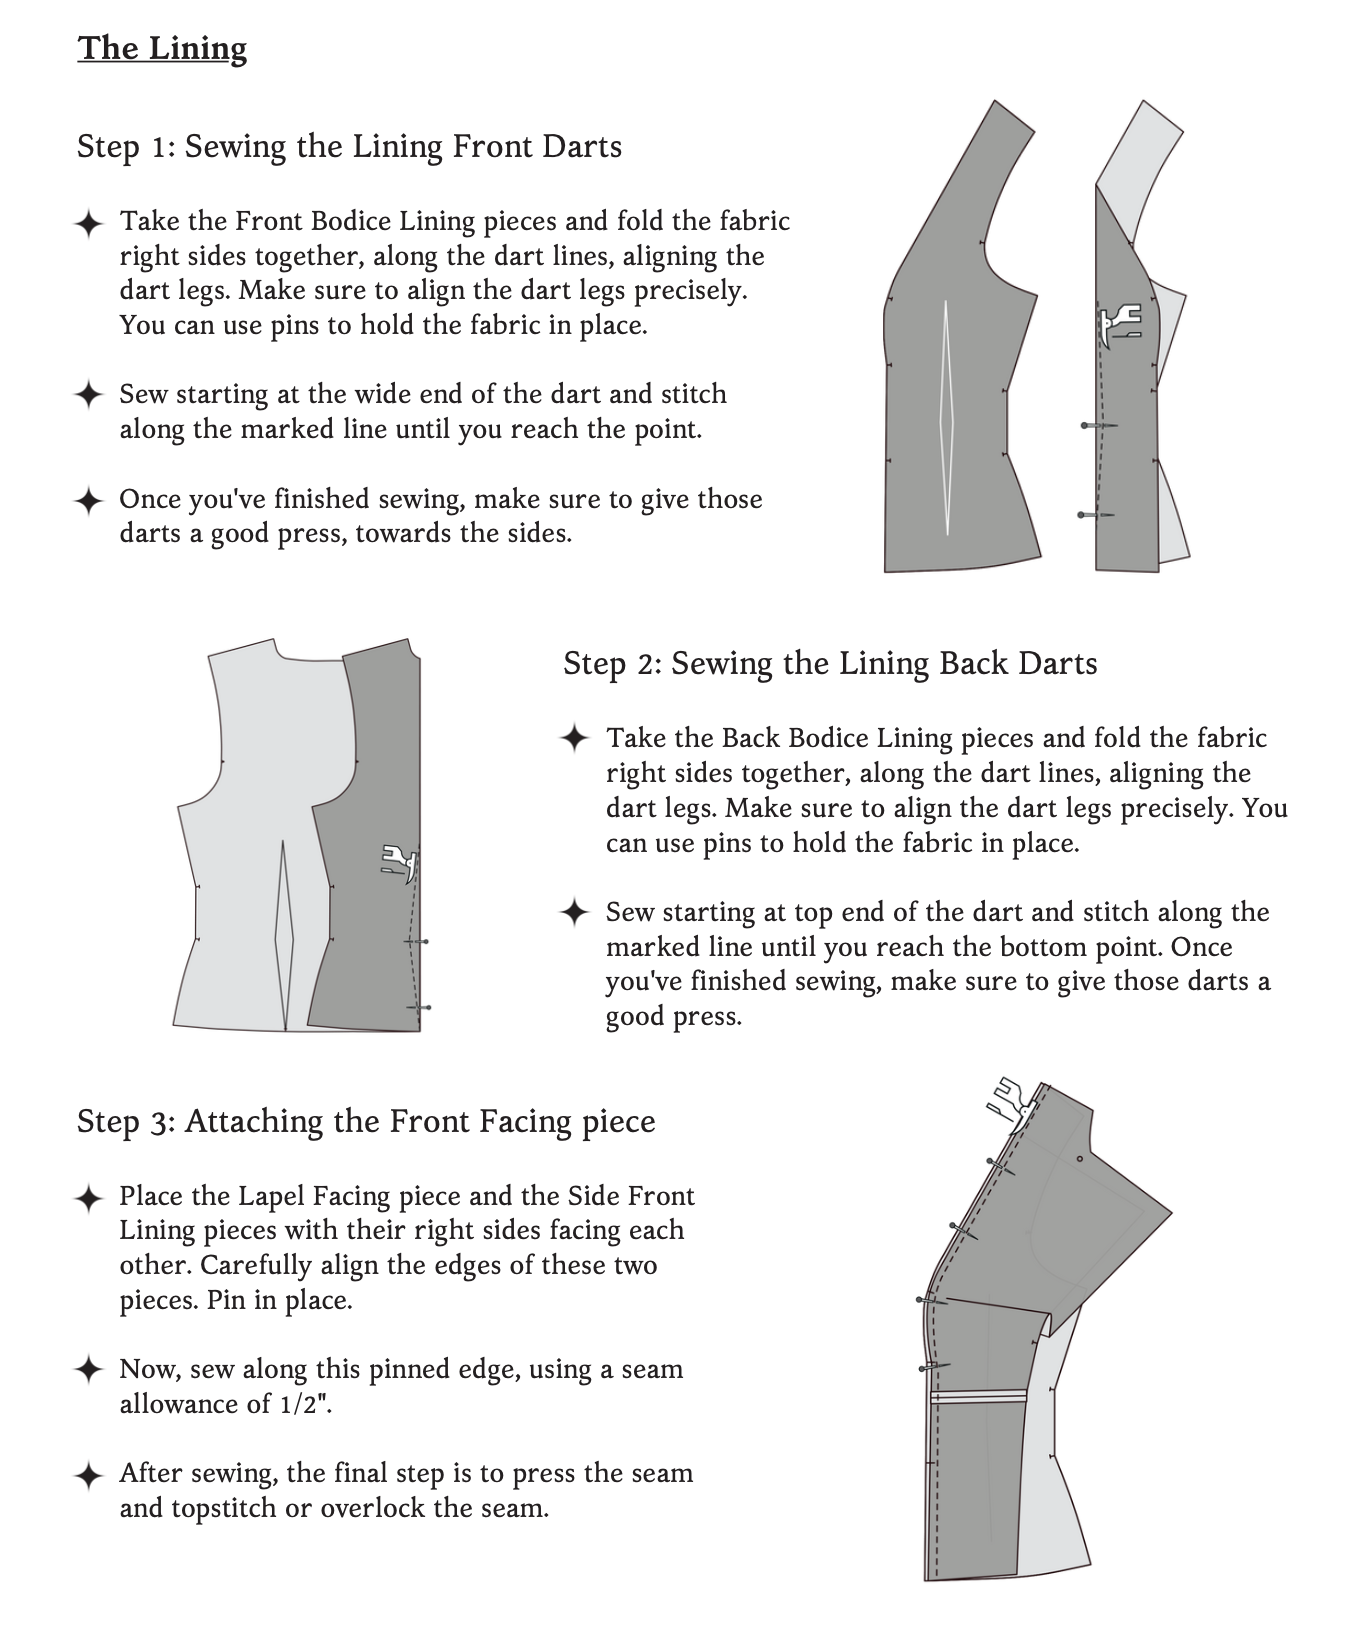
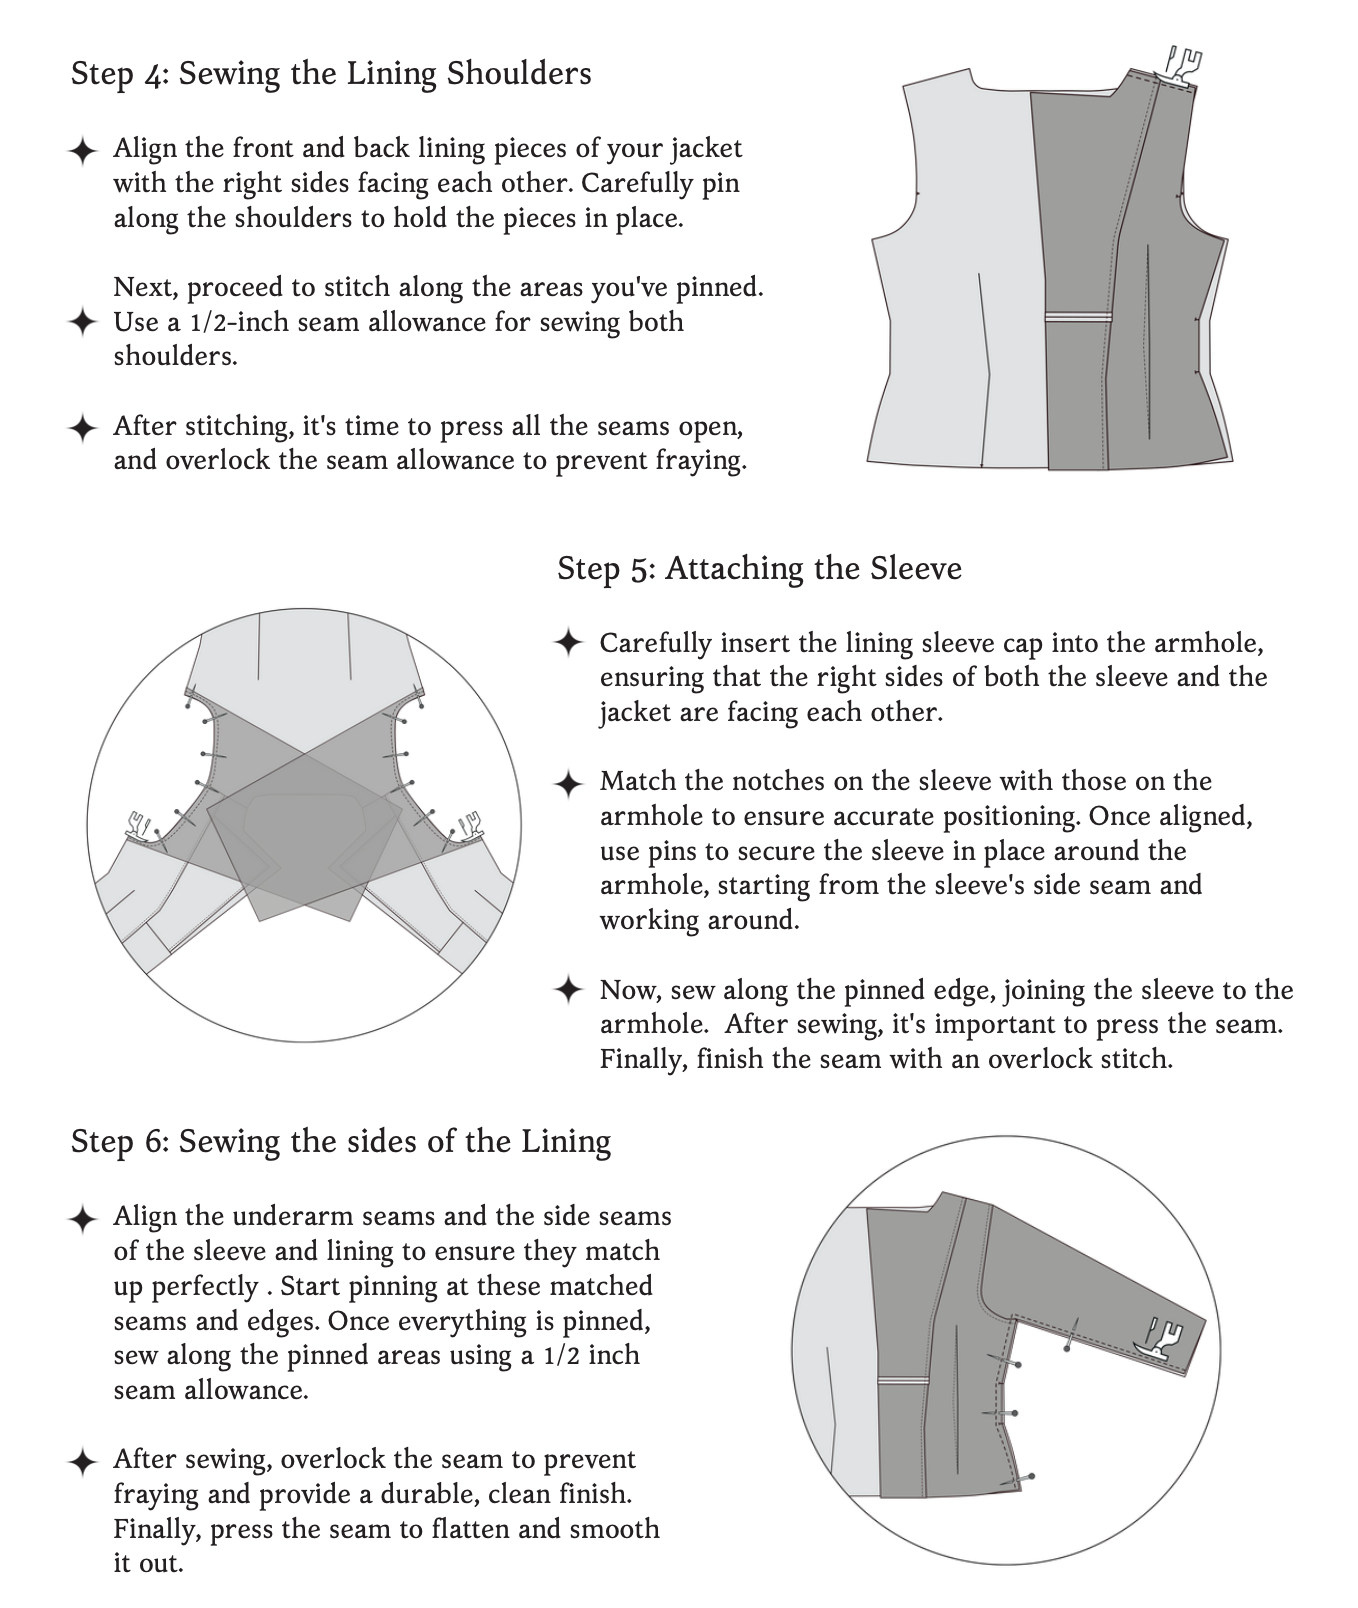
The Phantom Jacket Sewing Pattern Guide
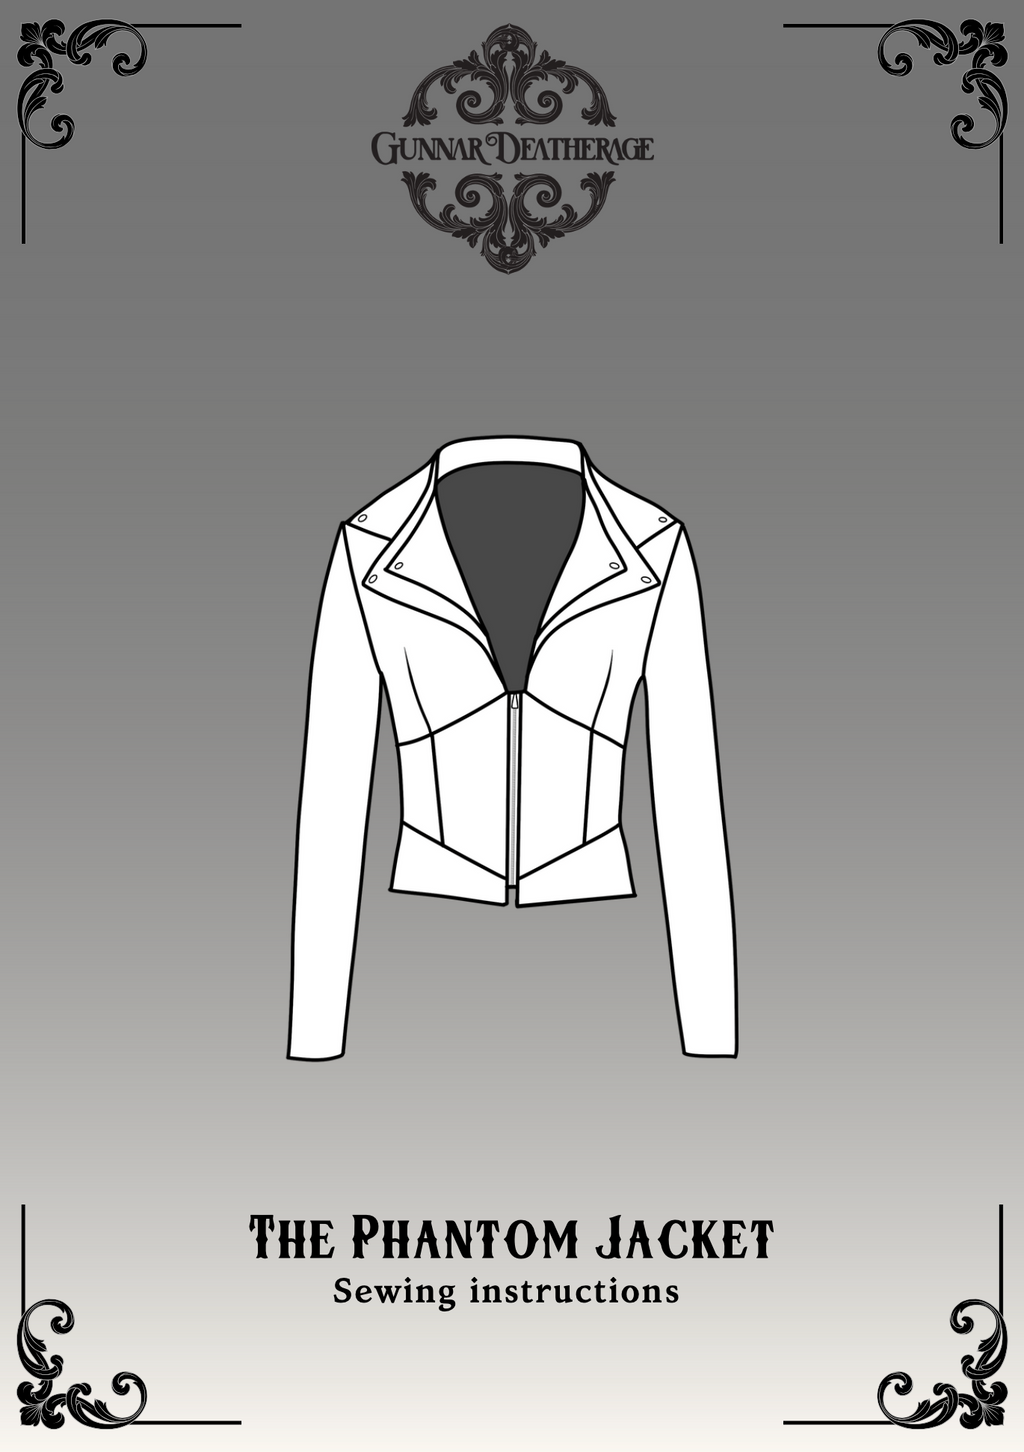
Hello and welcome to The Phantom Jacket Sewing Guide!

Introducing "Phantom." Crafted to be your go-to transitional piece, Phantom seamlessly blends style and function, perfect for late summer nights, and the ever-shifting temperatures of fall and spring.

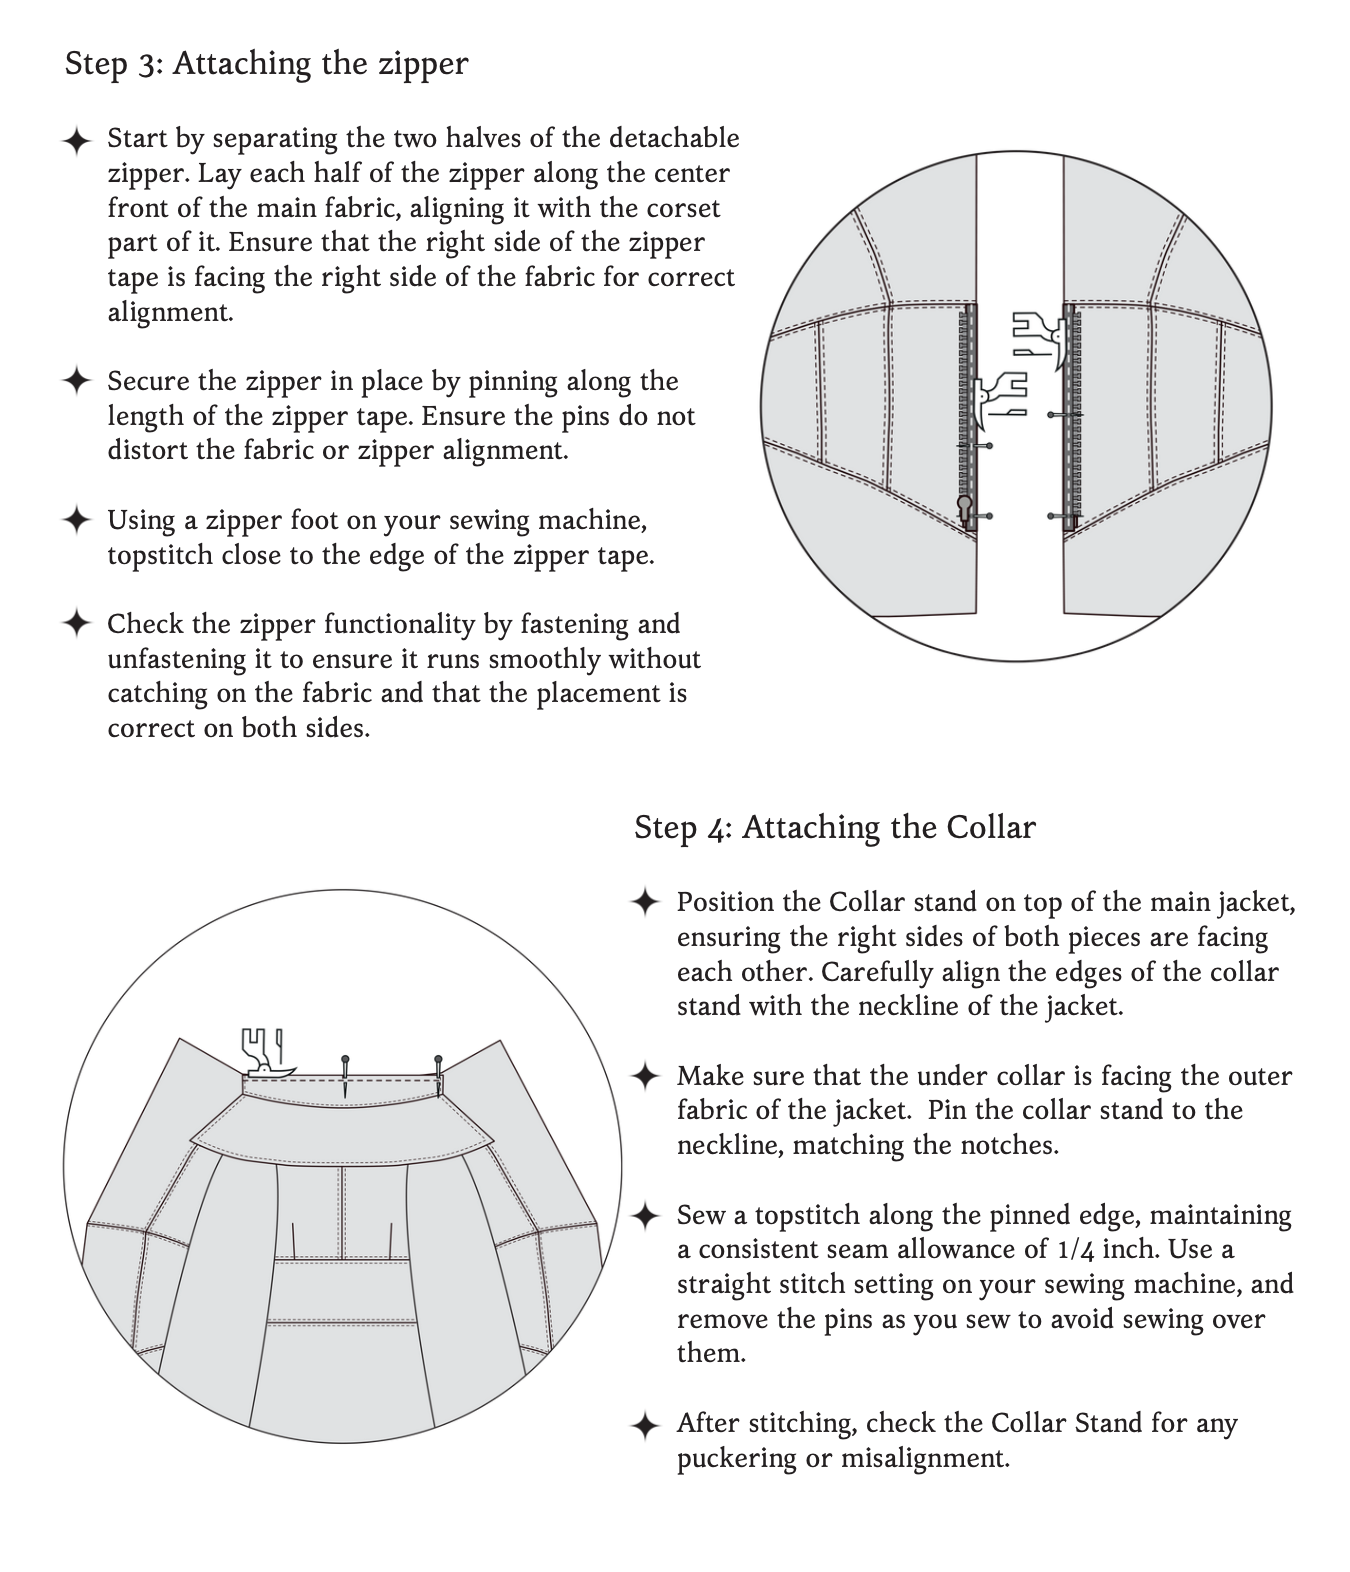
This pattern features a striking double lapel collar that adds a dramatic flair, and a corset-like waist to accentuate your silhouette. The central front zipper provides ease and versatility in styling, while the long sleeves offer additional warmth.


Before You Get Started

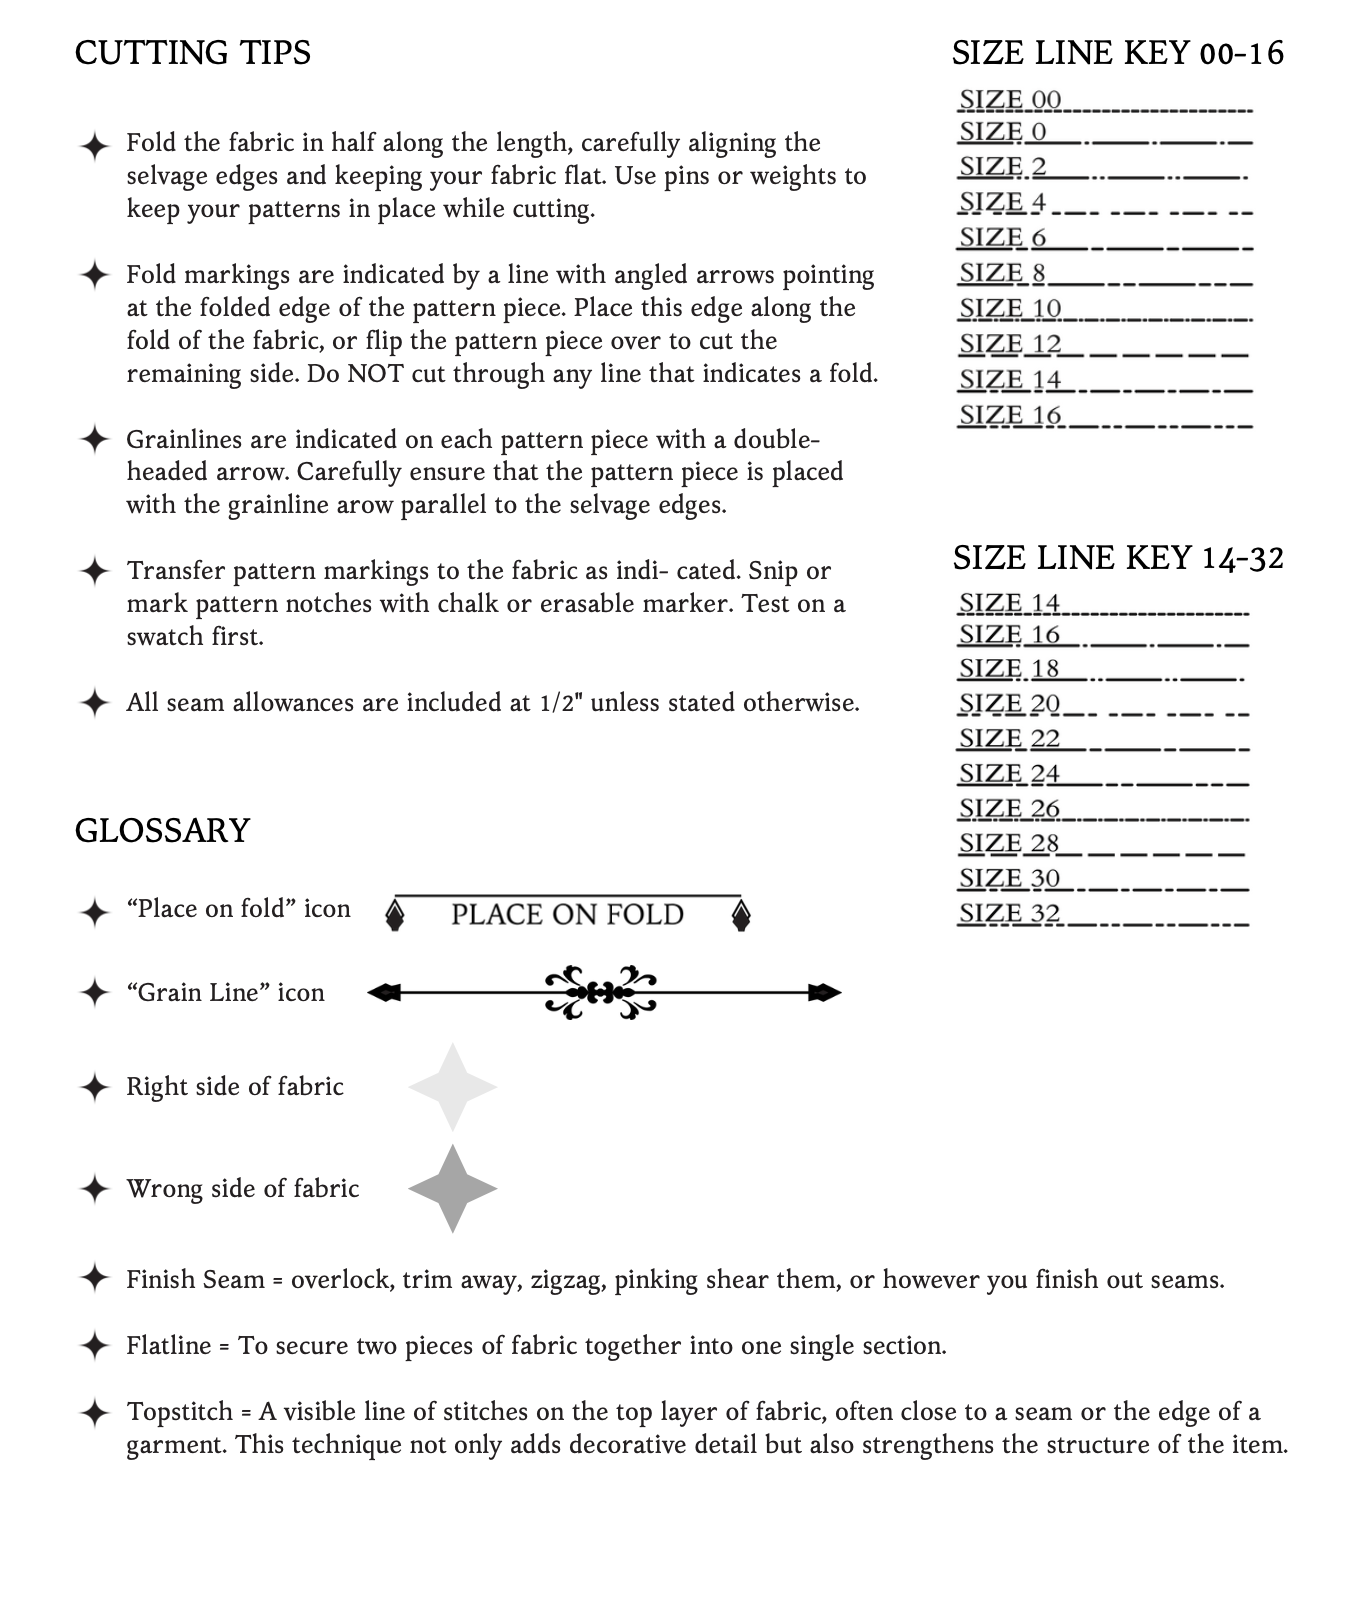
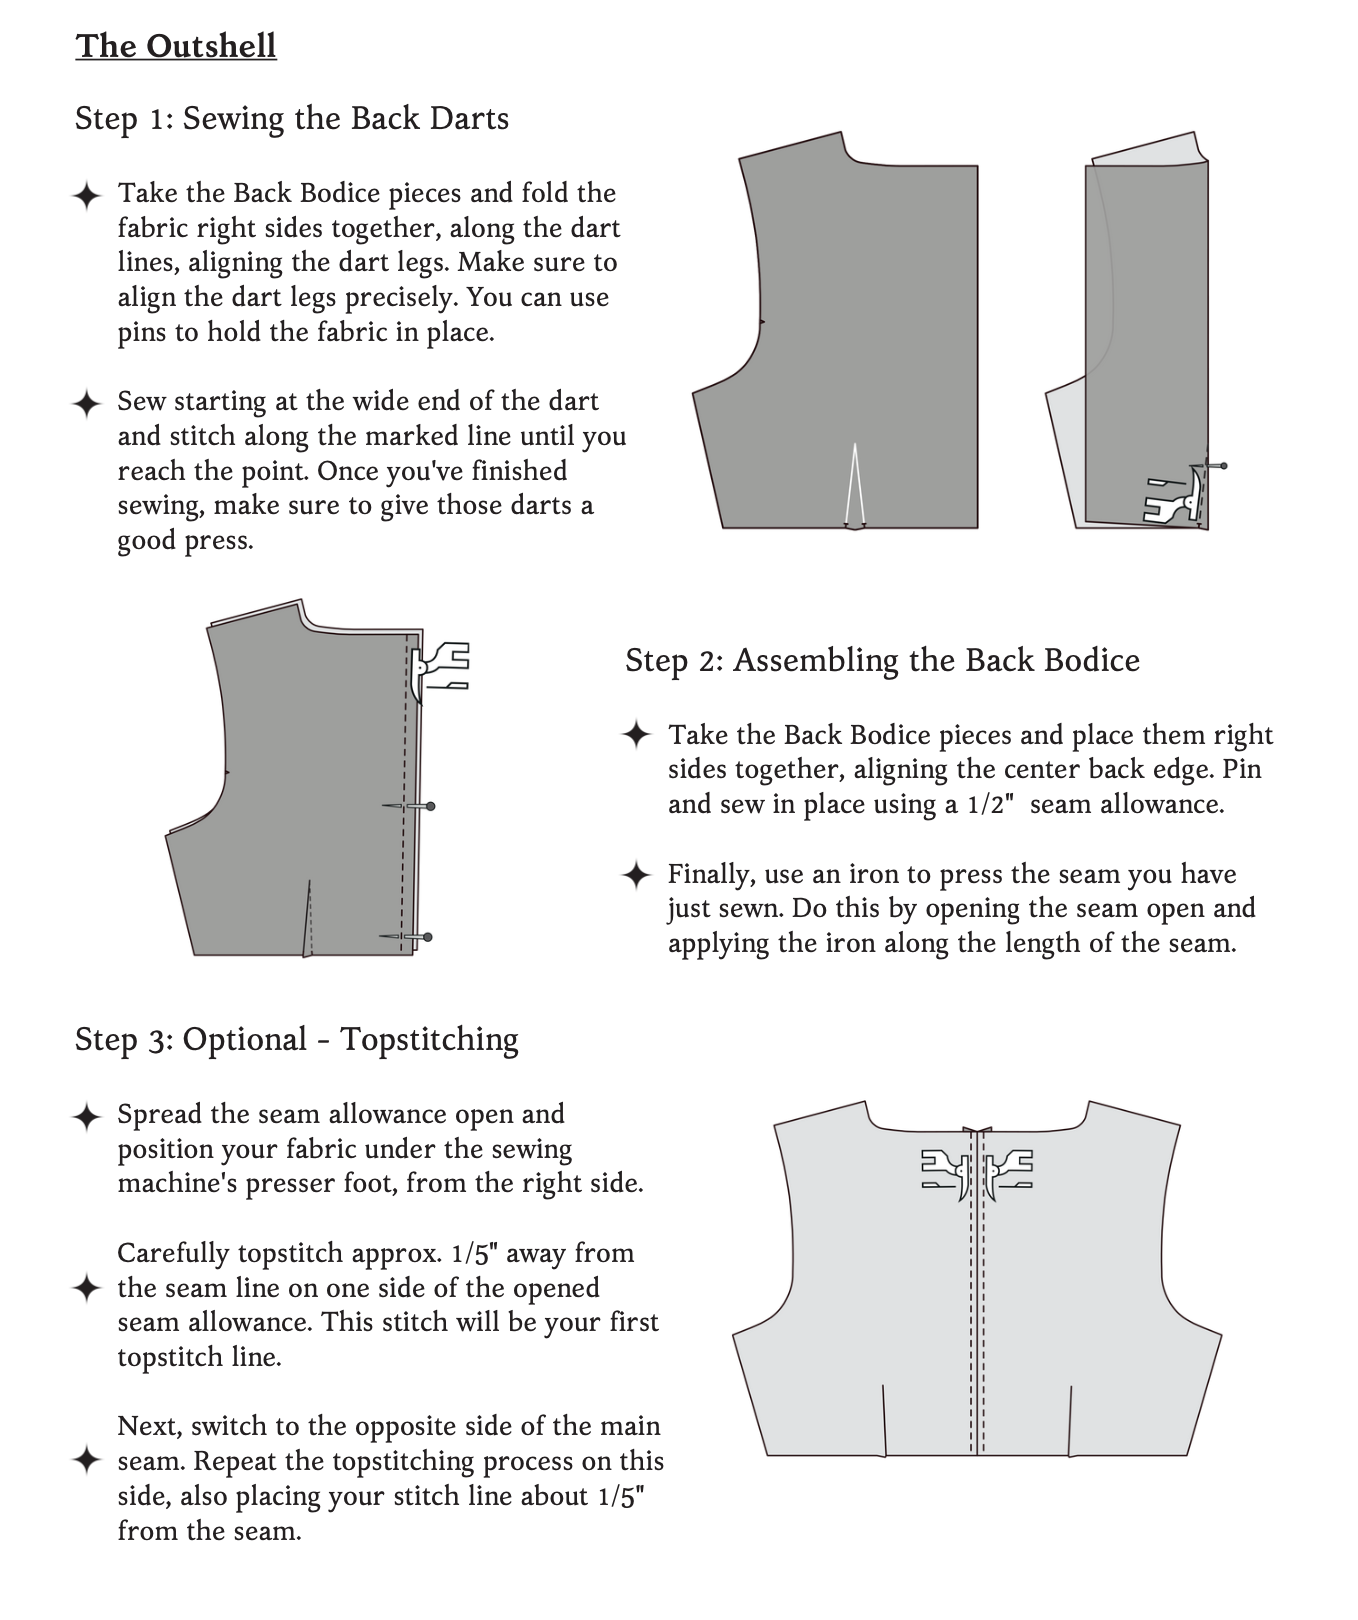
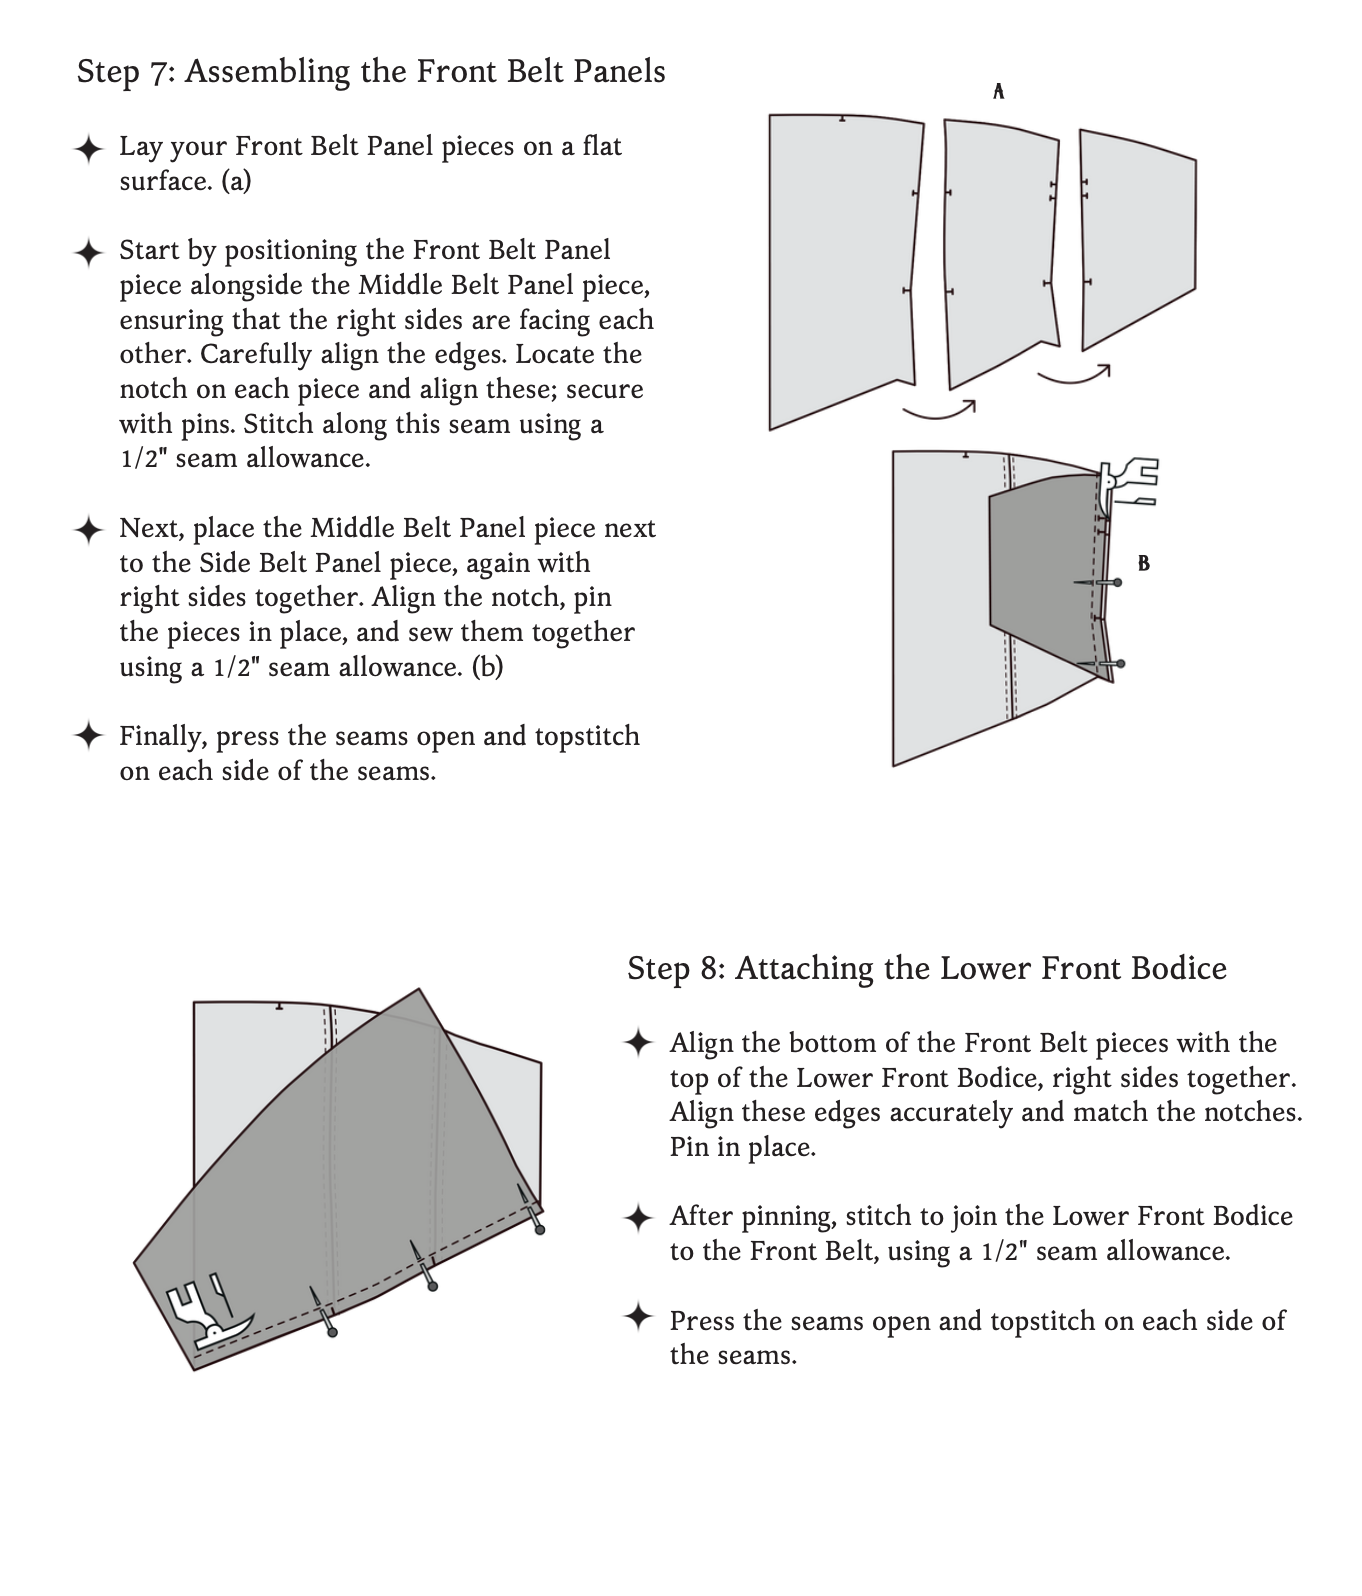
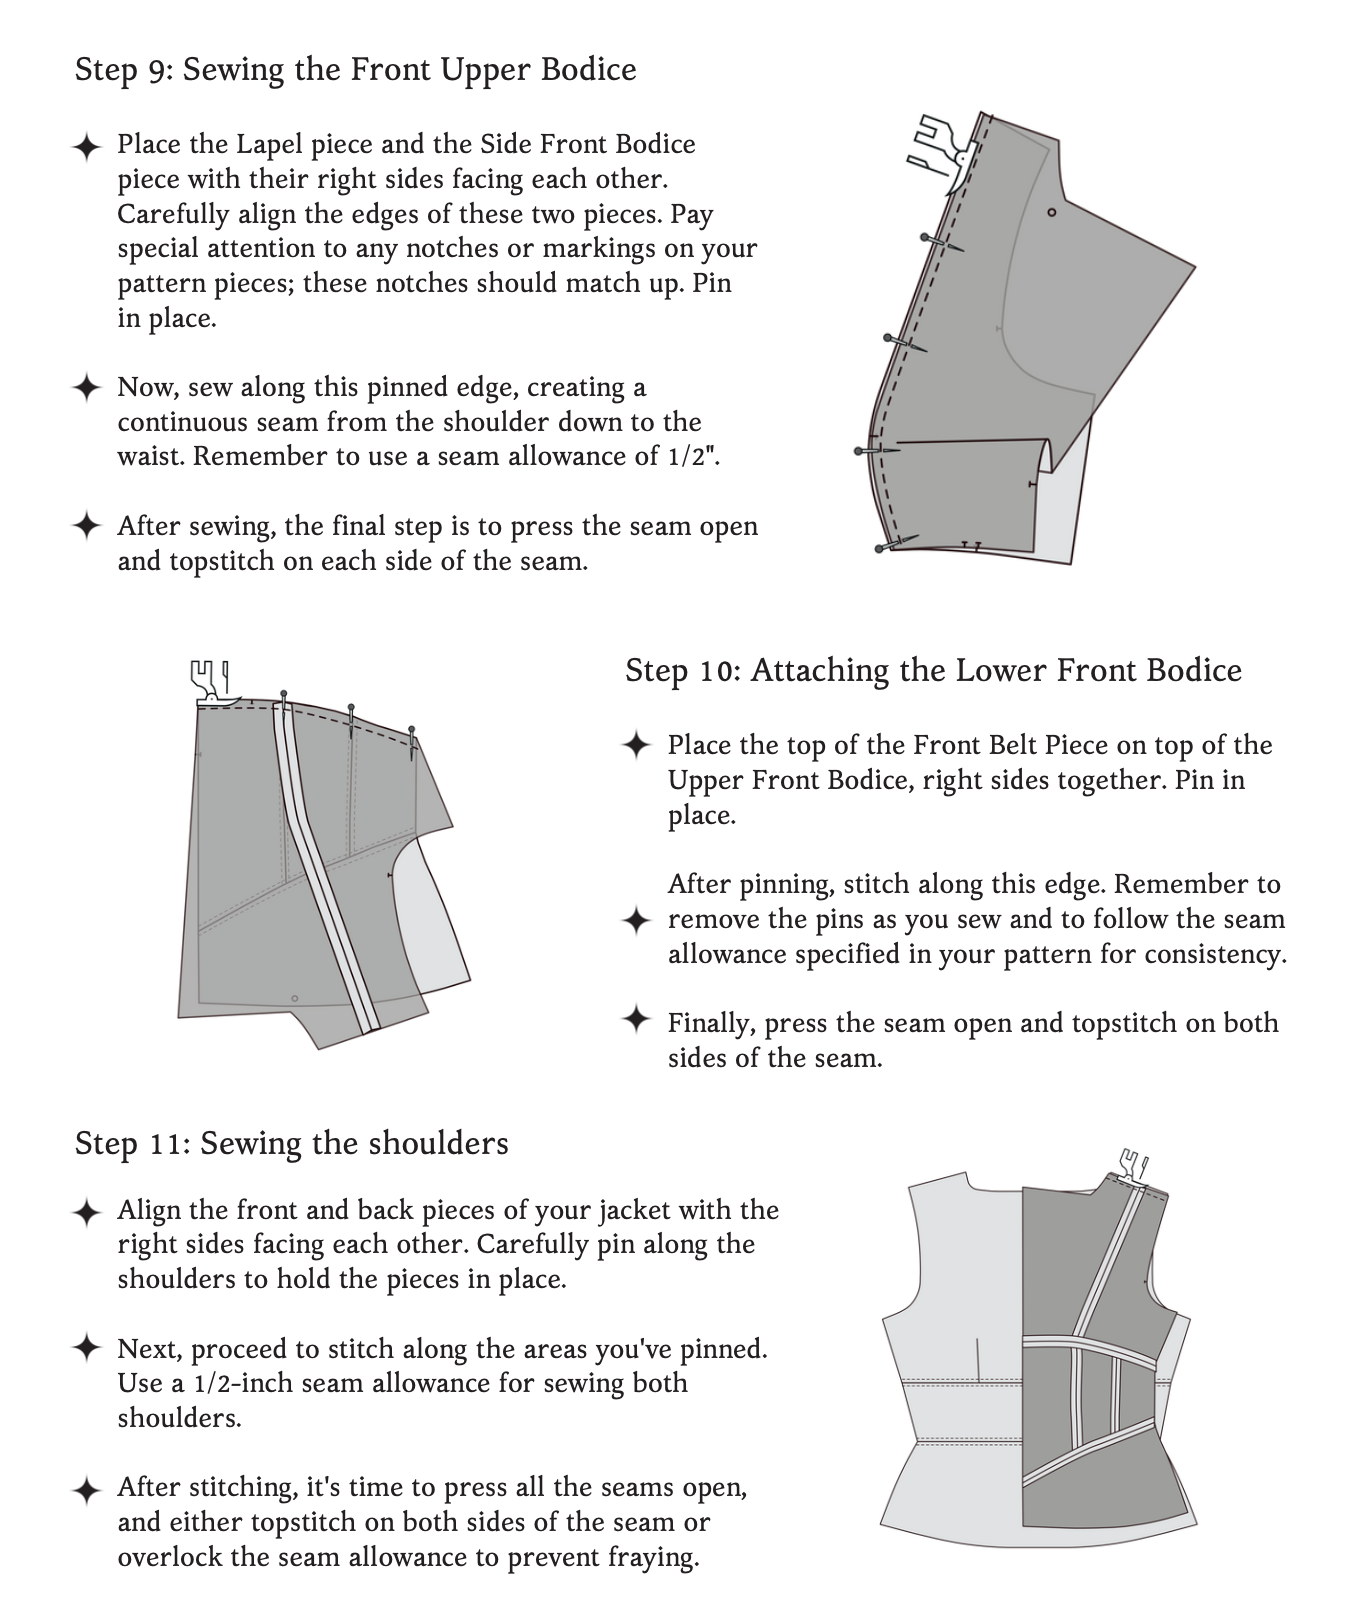
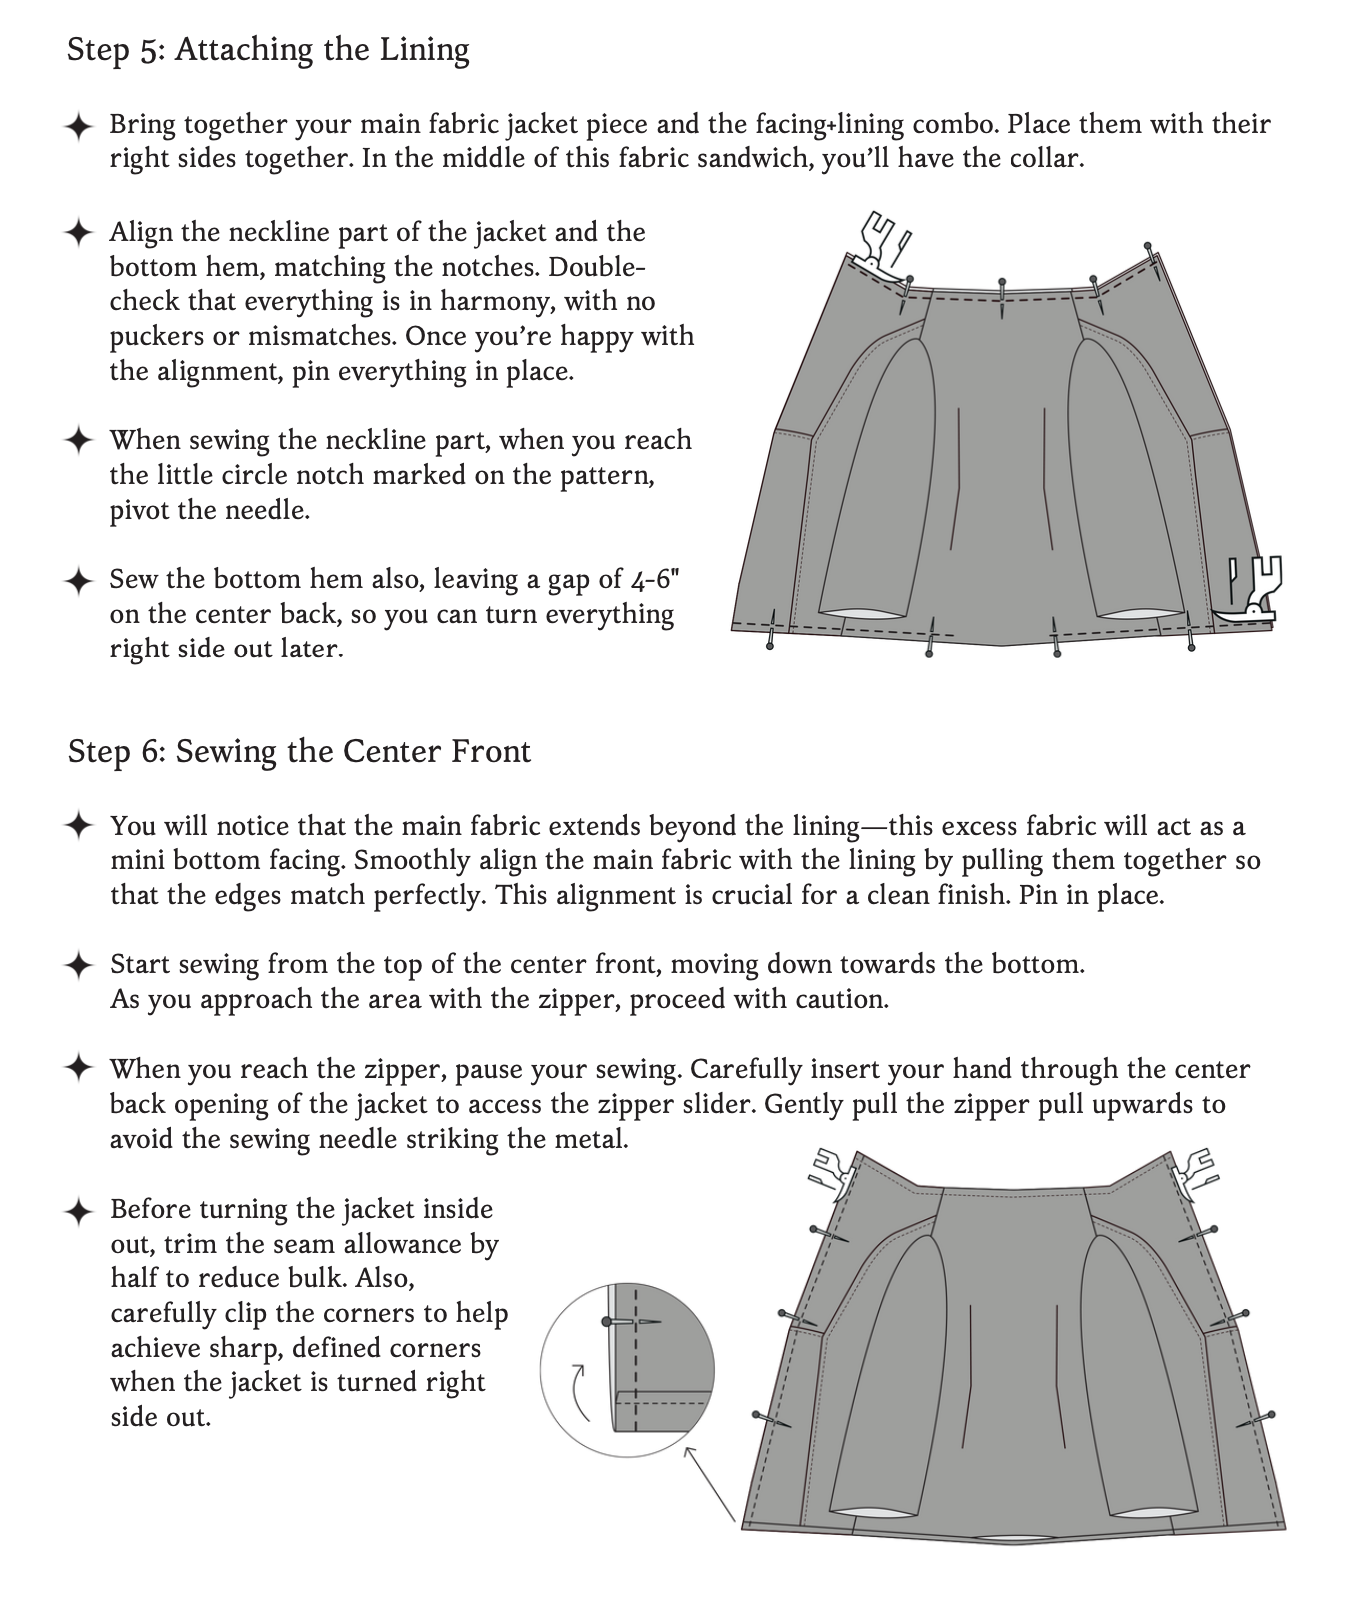
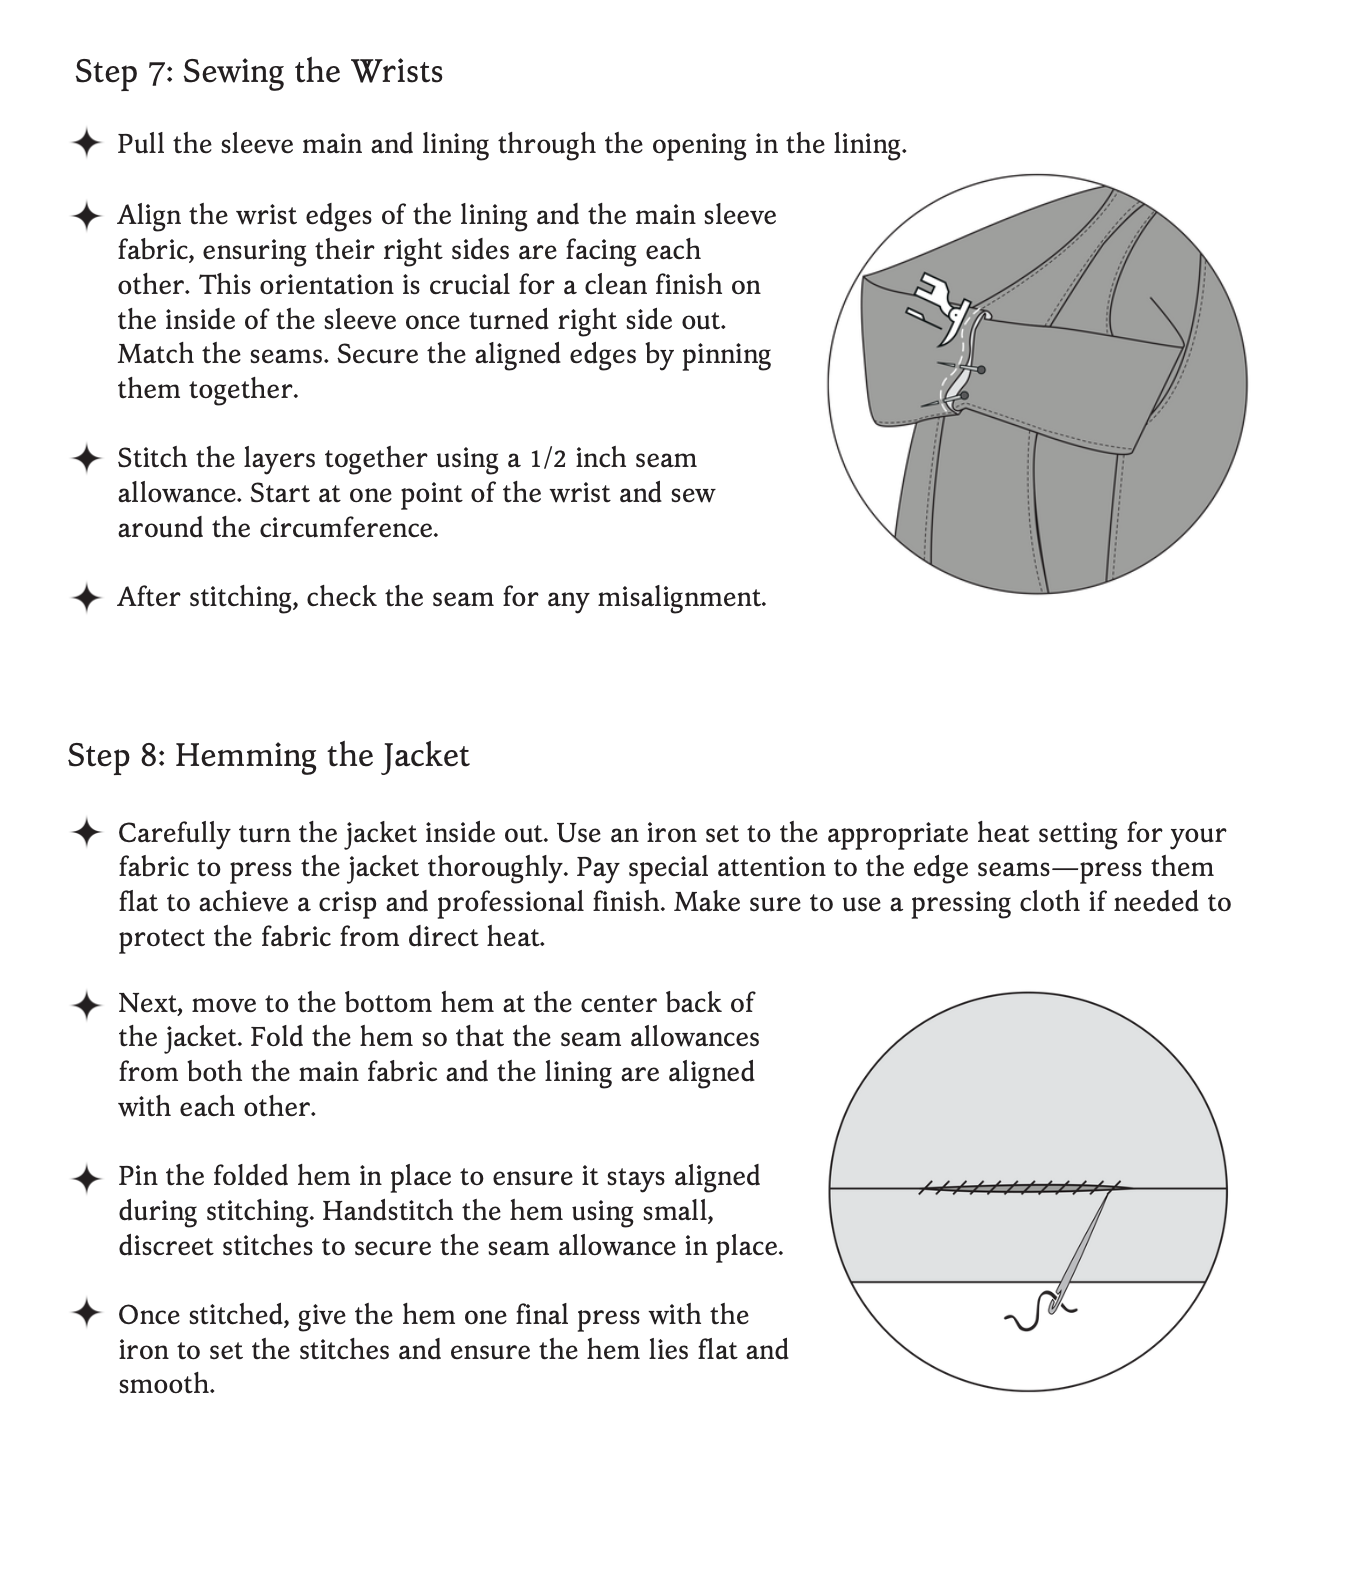
Please take note that the seam allowances on this pattern are 1/2” unless otherwise stated.

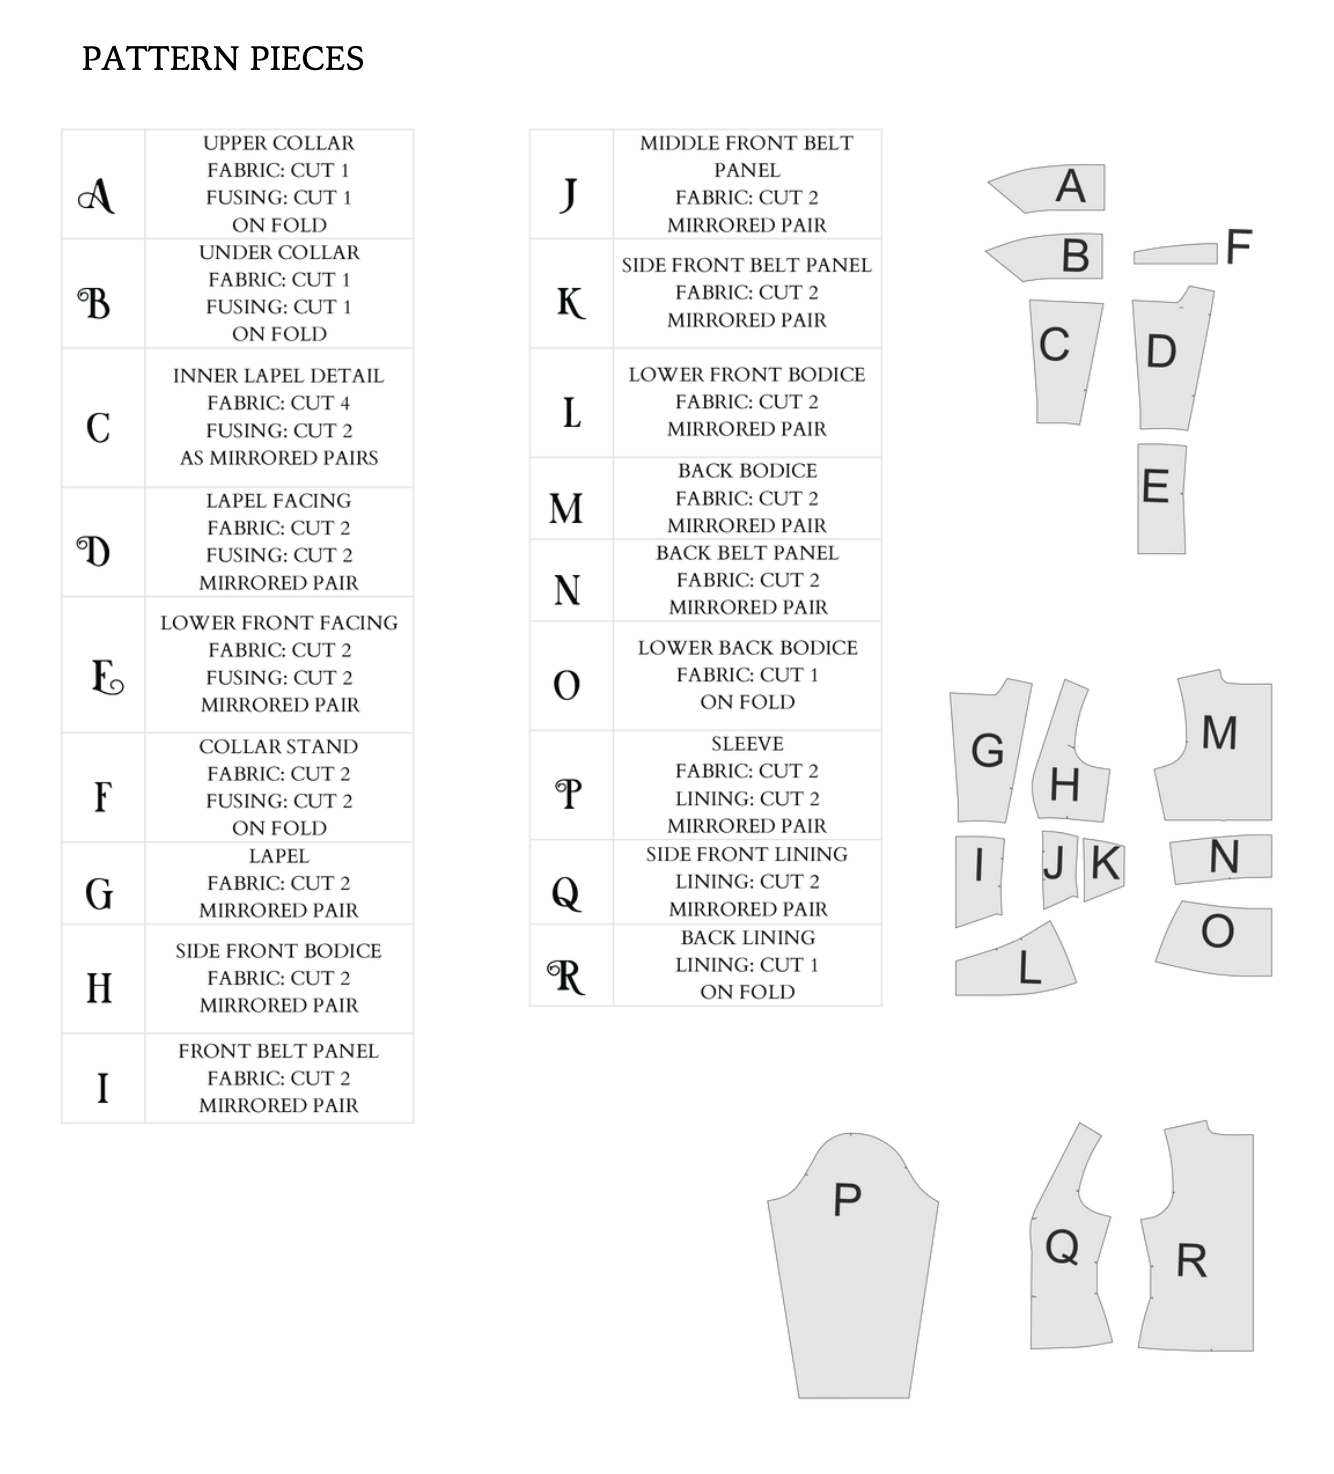
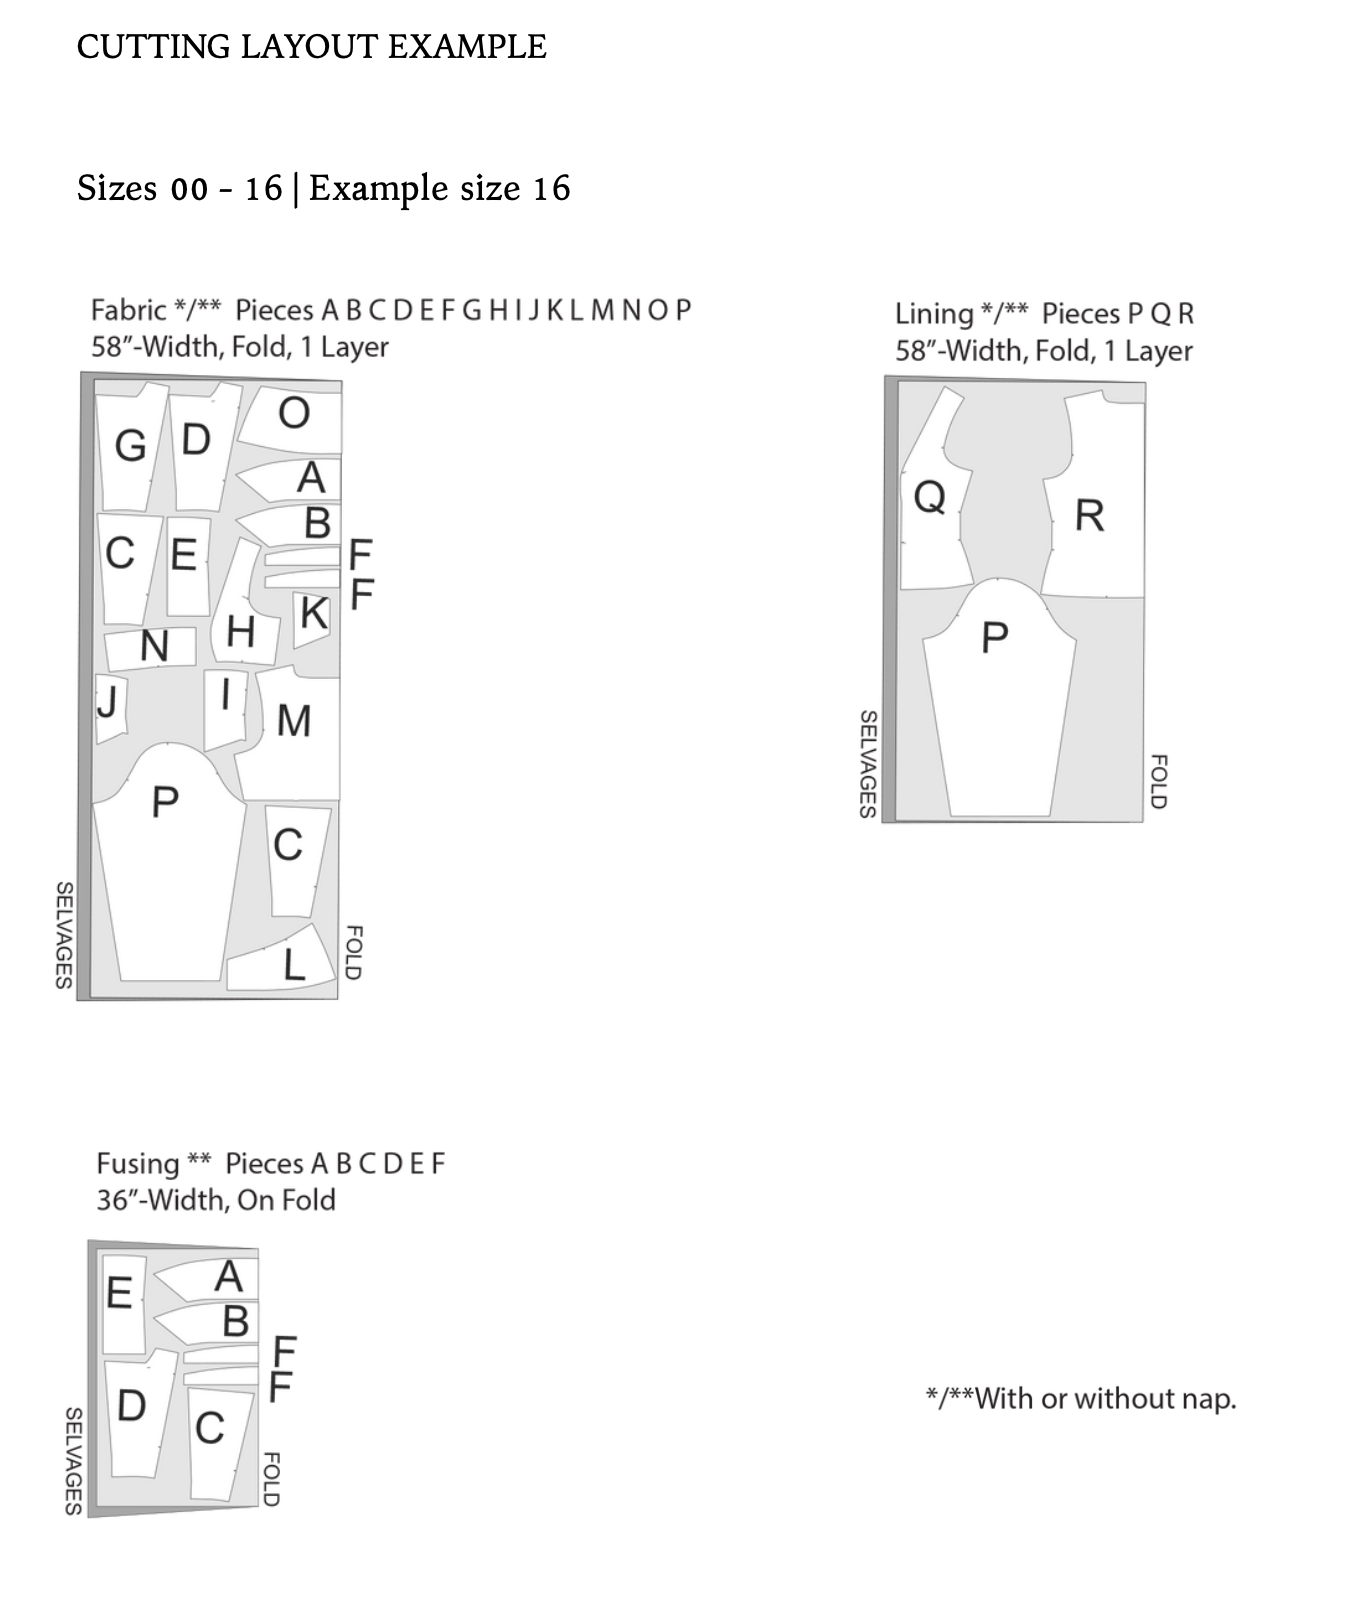
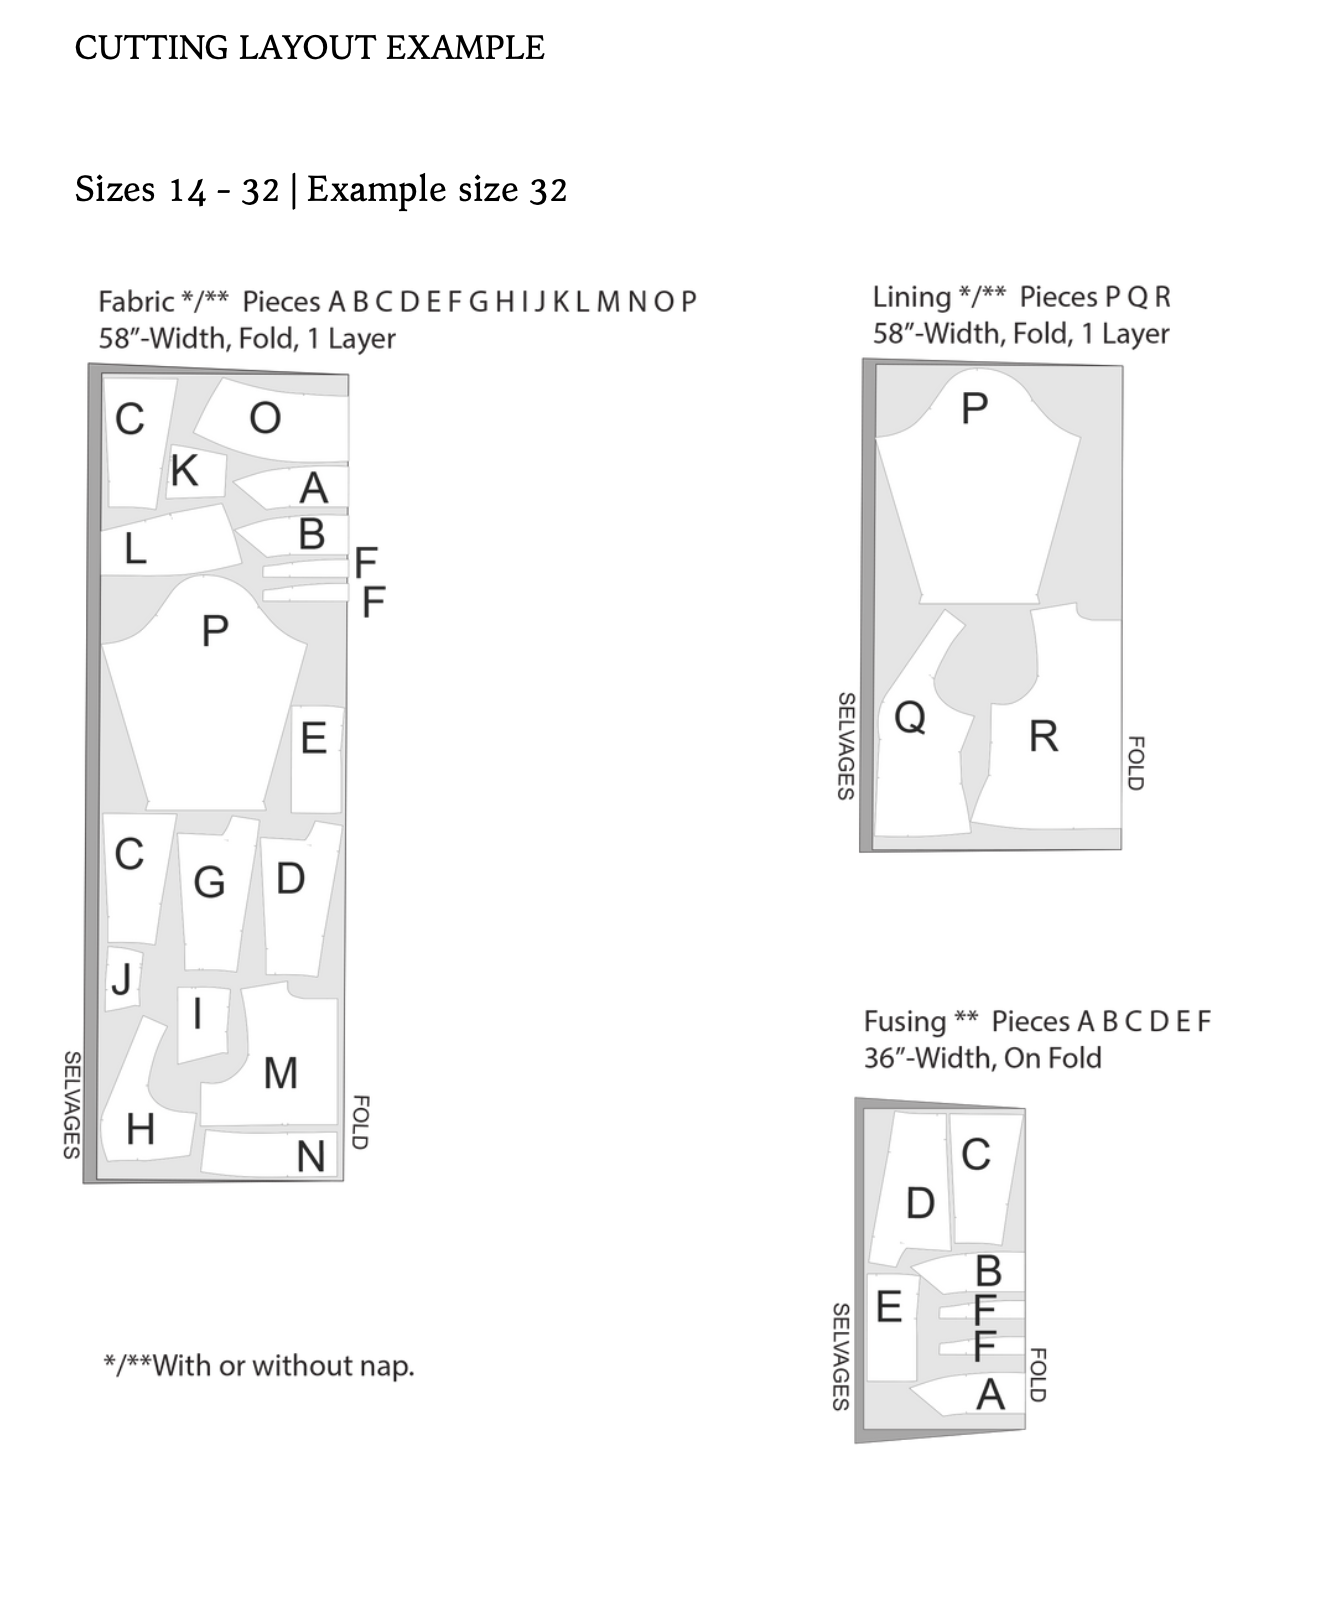
The Pattern will have all the notions and cutting layout you will need in the provided PDF files.


Difficulty: Medium Experienced Sewists

Fabric Suggestions:

The "Phantom" jacket pattern offers versatility in your choice of fabric, each bringing its own unique character to the final piece. Here are some suitable fabric suggestions to consider

Denim - A classic choice that provides durability and a casual look. Opt for medium-weight denim to maintain structure without sacrificing comfort.

Leather or Faux Leather - Perfect for a chic, edgy appearance. Leather adds sophistication and ages beautifully, while faux leather can be a more ethical and budget-friendly option.

Brocades - Ideal for making a statement. Brocade fabrics bring a touch of luxury and intricated detail to the jacket, making it suitable for more formal occasions or as a standout piece in your wardrobe.

Wool Blends - Great for cooler weather, wool blends offer warmth and a rich texture. They are perfect for fall and spring versions of the jacket.


Sharing Your Projects: If you created something with a Gunnar Deatherage pattern, PLEASE give us a review, and post a photo! Gunnar loves to see your creations, and your reviews really help our little shop grow!


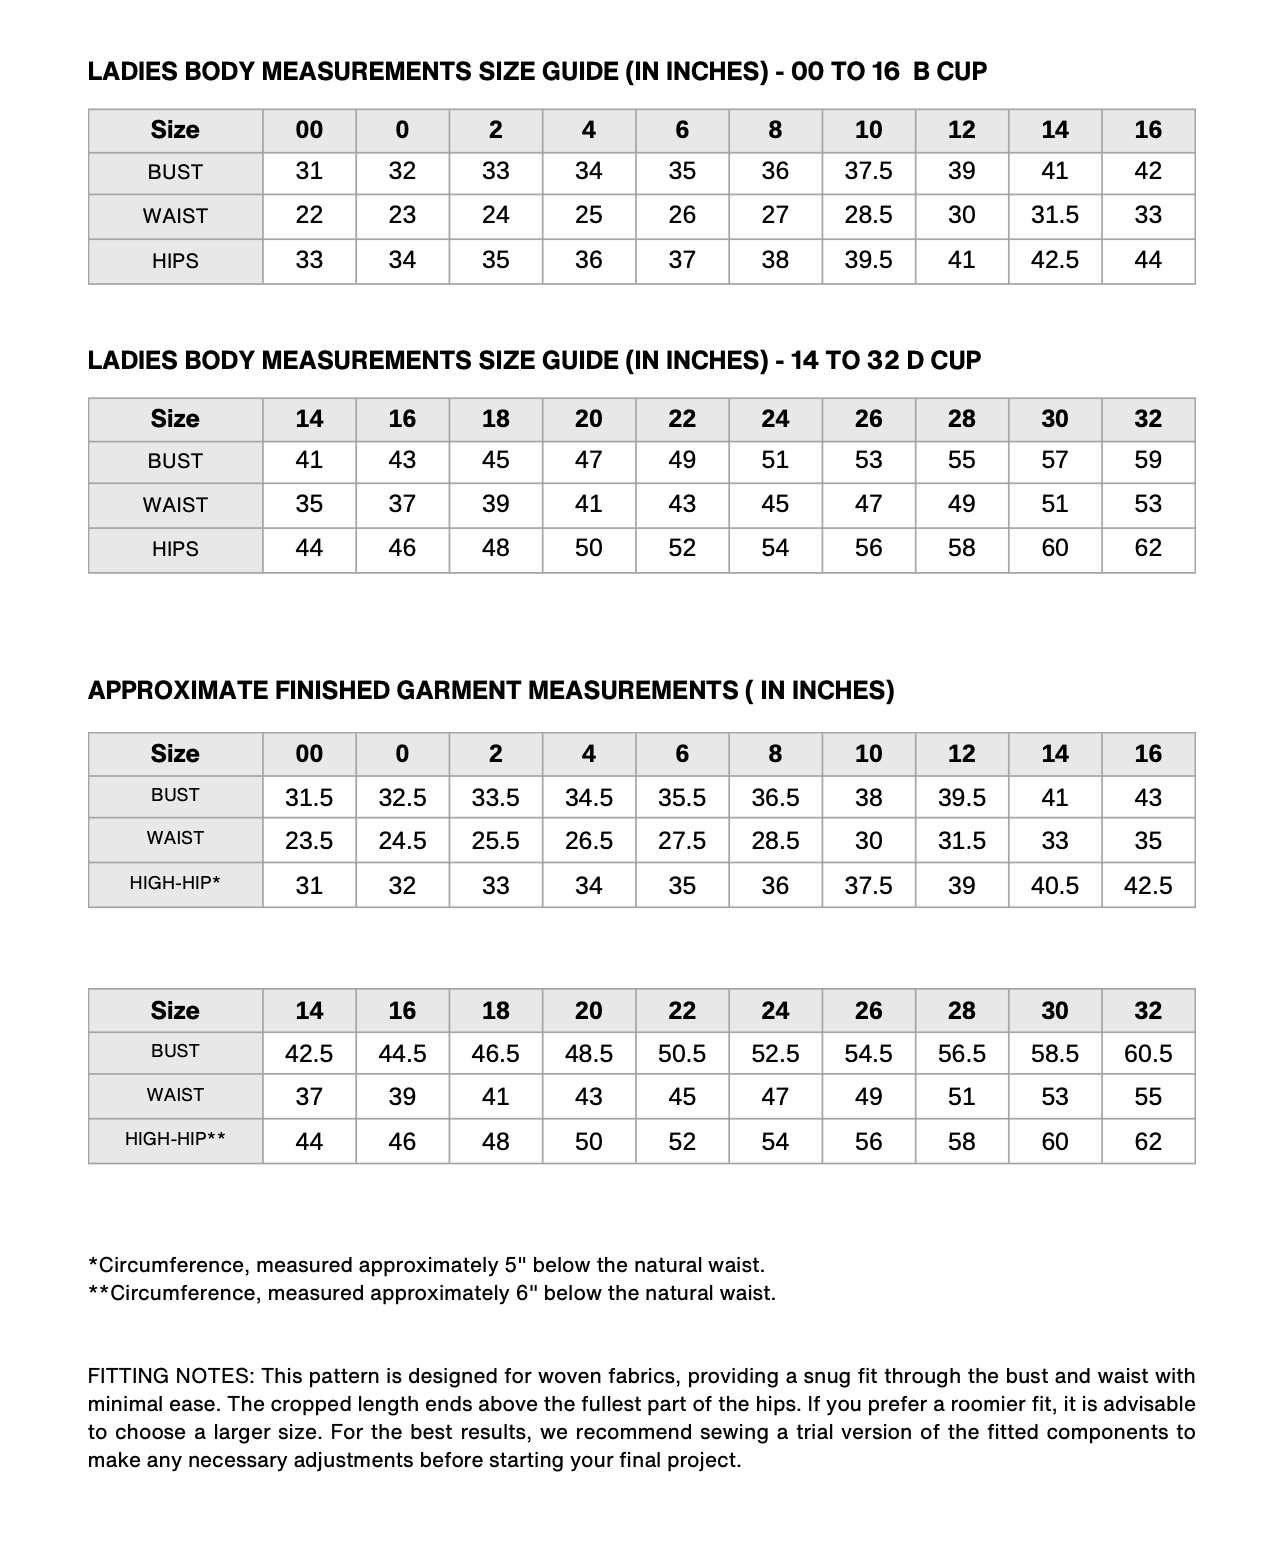
Size Charts, and Finished Garment Measurements

FITTING NOTES: This pattern is designed for woven fabrics, providing a snug fit through the bust and waist with minimal ease. The cropped length ends above the fullest part of the hips. If you prefer a roomier fit, it is advisable to choose a larger size. For the best results, we recommend sewing a trial version of the fitted components to make any necessary adjustments before starting your final project.


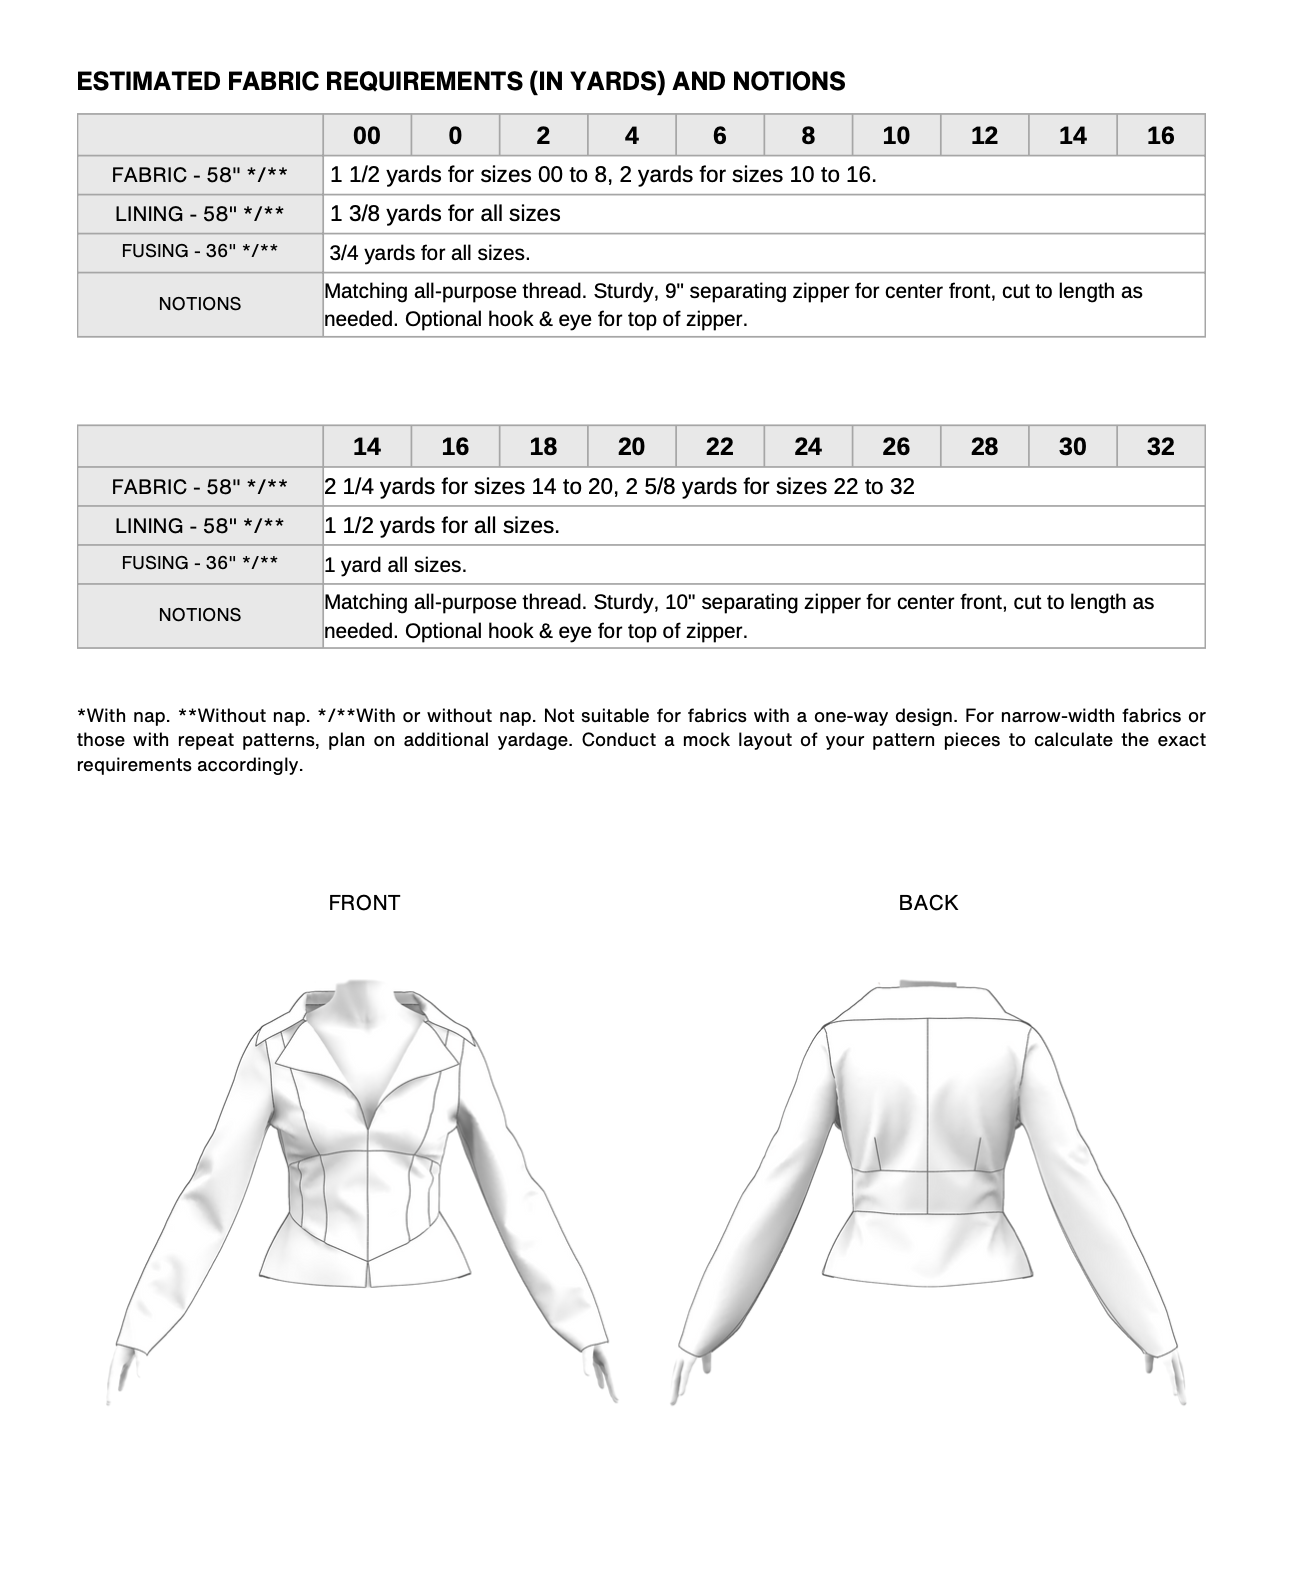
Yardage/ Fabric Consumption


The Instructions

Assembling the Outer Shell

Step 1: Sewing the Back Darts

  • Take the Back Bodice pieces and fold the fabric right sides together, along the dart lines, aligning the dart legs. Make sure to align the dart legs precisely. You can use pins to hold the fabric in place.

  • Sew starting at the wide end of the dart and stitch along the marked line until you reach the point. Once you've finished sewing, make sure to give those darts a good press.

Step #1 illustrated above

Step 2: Assembling the Back Bodice

  • Take the Back Bodice pieces and place them right sides together, aligning the center back edge. Pin and sew in place using a 1/2" seam allowance.

  • Finally, use an iron to press the seam you have just sewn. Do this by folding the seam open and applying the iron along the length of the seam.

Step 3- Optional Top Stitching

  • Spread the seam allowance open and position your fabric under the sewing machine's presser foot, from the right side.

  • Carefully topstitch approx. 1/5" away from the seam line on one side of the opened seam allowance. This stitch will be your first topstitch line.

  • Next, switch to the opposite side of the main seam. Repeat the topstitching process on this side, also placing your stitch line about 1/5" from the seam.

Step 4: Sewing the Back Belt Panel

  • Take the Back Belt Panel pieces and place them right sides together, aligning the center back edge. Pin and sew inplace using a 1/2" seam allowance. (a)

  • Use an iron to press the seam you have just sewn.

  • Repeat the topstitching on each side of the seam. (b)

Step 5: Attaching the Back Belt Panel

  • With the center of the Back Belt Panel identified, proceed to align this point with the center seam of the Back Bodice. It’s important to ensure that the right sides of the fabric are together. Match the notches.

  • After pinning, stitch along this edge. Remember to remove the pins as you sew and to follow the seam allowance specified in your pattern for consistency.

  • Finally, press the seam you have just sewn and topstitch on each side of the seam.

Step #5 Illustrated above

Step 6: Attaching the Lower Back Bodice

  • Take the Lower Back Bodice piece and align the top edge with the bottom edge of the Back Belt, right sides together, matching the notch.

  • Sew in place using a 1/2" seam allowance. Press the seam open and topstitch on each side of the seam.

Step #6 Illustrated above

Step 7: Assembling the Front Belt Panels Align

  • Lay your Front Belt Panel pieces on a flat surface. (a)

  • Start by positioning the Front Belt Panel piece alongside the Middle Belt Panel piece, ensuring that the right sides are facing each other. Carefully align the edges. Locate the notch on each piece and align these; secure with pins. Stitch along this seam using a 1/2" seam allowance.

  • Next, place the Middle Belt Panel piece next to the Side Belt Panel piece, again with the right sides together. Align the notch, pin the pieces in place, and sew them together using a 1/2" seam allowance. (b)

  • Finally, press the seams open and topstitch on each side of the seams.

Step #7 Illustrated Above

Step 8: Attaching the Lower Front Bodice

  • Align the bottom of the Front Belt pieces with the top of the Lower Front Bodice, right sides together. Align these edges accurately and match the notches. Pin in place.

  • After pinning, stitch to join the Lower Front Bodiceto the Front Belt, using a 1/2" seam allowance.

  • Press the seams open and topstitch on each side of the seams.

Step 9: Sewing the Front Upper Bodice

  • Place the Lapel piece and the Side Front Bodice piece with their right sides facing each other. Carefully align the edges of these two pieces. Pay special attention to any notches or markings on your pattern pieces; these notches should match up. Pinin place.

  • Now, sew along this pinned edge, creating a continuous seam from the shoulder down to the waist. Remember to use a seam allowance of 1/2".

  • After sewing, the final step is to press the seam open and topstitch on each side of the seam.

Step #9 Illustrated Above

Step 10: Attaching the Lower Front Bodice

  • Place the top of the Front Belt Piece on top of the Upper Front Bodice, right sides together. Pin in place.

  • After pinning, stitch along this edge. Remember to remove the pins as you sew and to follow the seam allowance specified in your pattern for consistency.

  • Finally, press the seam open and topstitch on both sides of the seam.

Step #10 Illustrated Above

Step 11: Sewing the Shoulders

  • Align the front and back pieces of your jacket with the right sides facing each other. Carefully pin along the shoulders to hold the pieces in place.

  • Next, proceed to stitch along the areas you've pinned. Use a 1/2-inch seam allowance for sewing both shoulders.

  • After stitching, it's time to press all the seams open, and either topstitch on both sides of the seam or overlock the seam allowance to prevent fraying.

Step #11 Illustrated Above

Step 12: Attaching the Sleeve

  • Carefully insert the sleeve cap into the armhole, ensuring that the right sides of both the sleeve and the jacket are facing each other.

  • Match the notches on the sleeve with those on the arm-hole to ensure accurate positioning. Once aligned, use pins to secure the sleeve in place around the armhole, starting from the sleeve side seam and working around.

  • Now, sew along the pinned edge, joining the sleeve to the armhole. As you sew, maintain a consistent seam allowance of 1/2 inch for a uniform look. After sewing, it's important to press the seam. Finally, finish the seam with an overlock stitch

Step #12 Illustrated Above

Step 13: Sewing the Sides of the Jacket

  • Begin by carefully aligning the underarm seams of the jacket to ensure they match up perfectly. Start pinning at these matched seams, and continue pinning upwards, effectively enclosing the sleeves as you go.

  • Continue pinning down the length of the jacket, all the way to the hem, ensuring that the fabric lays flat and the seams remain aligned throughout. Once everything is pinned, sew along the pinned areas using a 1/2-inch seam allowance.

  • After sewing, overlock the seam to prevent fraying and provide a durable, clean finish. Finally, press the seam to flatten and smooth it out.

Step #13 Illustrated Above

Step 14: Assembling the Inner Lapel

  • Begin by taking the Inner Lapel pieces and placing them right sides together. Ensure that the top and outer edges are aligned perfectly before pinning them securely.

  • Proceed to sew along the edge using a 1/2" seam allowance. Remember to stitch carefully and remove the pins as you go along.

  • After sewing, trim the seam allowance in half to reduce bulkiness. Additionally, cut the corner to help achieve sharp and neat edges once turned inside out.

  • Finally, carefully turn the lapel inside out and press it with an iron and sew a topstitch on the edges.

Step #14 Illustrated Above

Step 15: Assembling the Lapels

  • Grab the Inner Lapel and place it on top of the LapelFacing piece, right sides together, aligning the side and bottom edges. Pin in place. (a)

  • Then take the Lower front-facing piece and place it on top of the Lapel Facing, right sides together, sandwiching the Inner Lapel.

  • Align the top of the Lower Front Facing with the bottom of the Lapel Facing and pin in place. Sew using a 1/2" seam allowance. (b)

  • After stitching, it's time to press all the seams open.

Step #15 Illustrated Above

Assembling the Lining

Step 1: Sewing the Lining Front Darts

  • Take the Front Bodice Lining pieces and fold the fabric right sides together, along the dart lines, aligning the dart legs. Make sure to align the dart legs precisely. You can use pins to hold the fabric in place.

  • Sew starting at the wide end of the dart and stitch along the marked line until you reach the point.

  • Once you've finished sewing, make sure to give those darts a good press, towards the sides.

Step 1 Illustrated Above

Step 2: Sewing the Lining Back Darts

  • Take the Back Bodice Lining pieces and fold the fabric right sides together, along the dart lines, aligning the dart legs. Make sure to align the dart legs precisely. You can use pins to hold the fabric in place.

  • Sew starting at the top end of the dart and stitch along the marked line until you reach the bottom point. Once you've finished sewing, make sure to give those darts a good press.

Step #2 Illustrated Above

Step 3: Attaching the Front Facing piece

  • Place the lapel-facing piece and the Side FrontLining pieces with their right sides facing each other. Carefully align the edges of these two pieces. Pin in place.

  • Now, sew along this pinned edge, using a seam allowance of 1/2".

  • After sewing, the final step is to press the seam and topstitch or overlock the seam.

Step 3 Illustrated Above

Step 4: Sewing the Lining Shoulders

  • Align the front and back lining pieces of your jacket with the right sides facing each other. Carefully pin along the shoulders to hold the pieces in place.

  • Next, proceed to stitch along the areas you've pinned. Use a 1/2-inch seam allowance for sewing both shoulders.

  • After stitching, it's time to press all the seams open and overlock the seam allowance to prevent fraying.

Step #4 Illustrated Above

Step 5: Attaching the Lining Sleeve

  • Carefully insert the lining sleeve cap into the armhole, ensuring that the right sides of both the sleeve and the jacket are facing each other.

  • Match the notches on the sleeve with those on the arm-hole to ensure accurate positioning. Once aligned, use pins to secure the sleeve in place around the armhole, starting from the sleeve's side seam and working around.

  • Now, sew along the pinned edge, joining the sleeve to the armhole. After sewing, it's important to press the seam. Finally, finish the seam with an overlock stitch.

Step #5 Illustrated Above

Step 6: Sewing the Sides of the Lining

  • Align the underarm seams and the side seams of the sleeve and lining to ensure they match up perfectly. Start pinning at these matched seams and edges. Once everything is pinned, sew along the pinned areas using a 1/2-inch seam allowance.

  • After sewing, overlock the seam to prevent fraying and provide a durable, clean finish. Finally, press the seam to flatten and smooth it out.

Step #6 Illustrated Above

Constructing the Jacket

Step 1: Sewing the Collar

  • Align the collar and undercollar with their right sides facing each other and pin in place around the side and outside edge.

  • Then, sew in place using a 1/2" seam allowance. Now, for a dash of precision! When you approach the corners, sew a sharp point by smoothly pivoting.

  • After sewing, trim the seam allowance in half to reduce bulkiness. Additionally, cut the corners to help achieve sharp and neat edges once turned inside out.

  • Finally, carefully turn the collar inside out and press it with an iron and sew a topstitch.

Step #1 Illustrated Above

Step 3: Attaching the zipper

  • Start by separating the two halves of the detachable zipper. Lay each half of the zipper along the center front of the main fabric, aligning it with the corset part of it. Ensure that the right side of the zipper tape is facing the right side of the fabric for correct alignment.

  • Secure the zipper in place by pinning along the length of the zipper tape. Ensure the pins do not distort the fabric or zipper alignment.

  • Using a zipper foot on your sewing machine, topstitch close to the edge of the zipper tape

  • Check the zipper functionality by fastening and unfastening it to ensure it runs smoothly without catching on the fabric and that the placement is correct on both sides.

Step #3 Illustrated Above