The Aria Blouse Sewing Pattern Guide
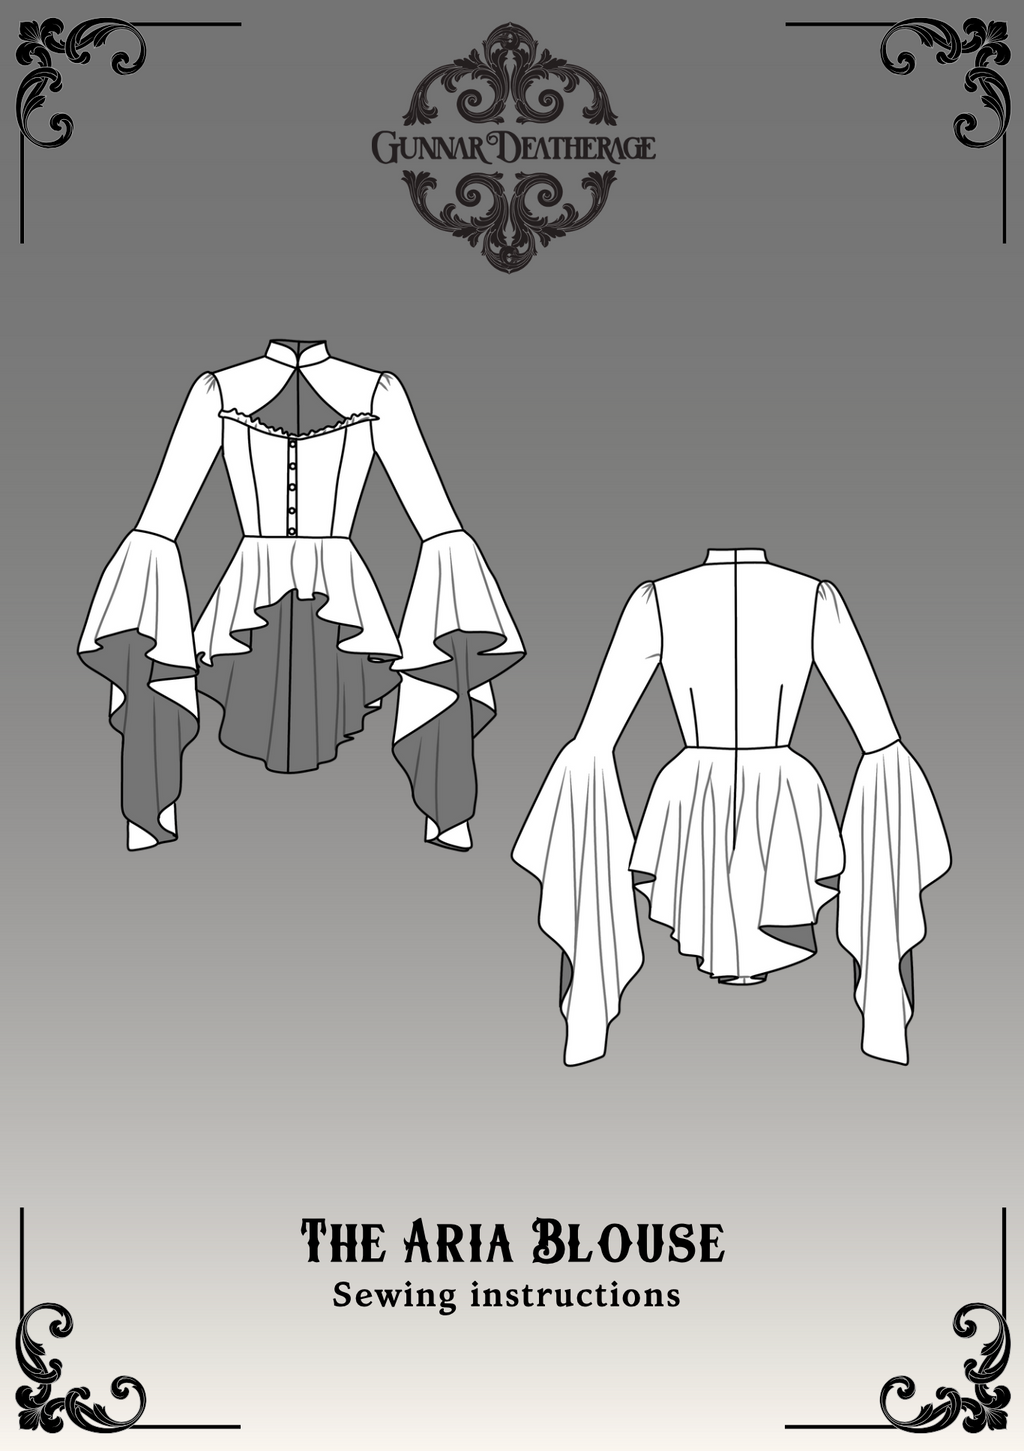
Hello and welcome to The Aria Blouse Sewing Guide!

The instructions are below!


Before You Get Started

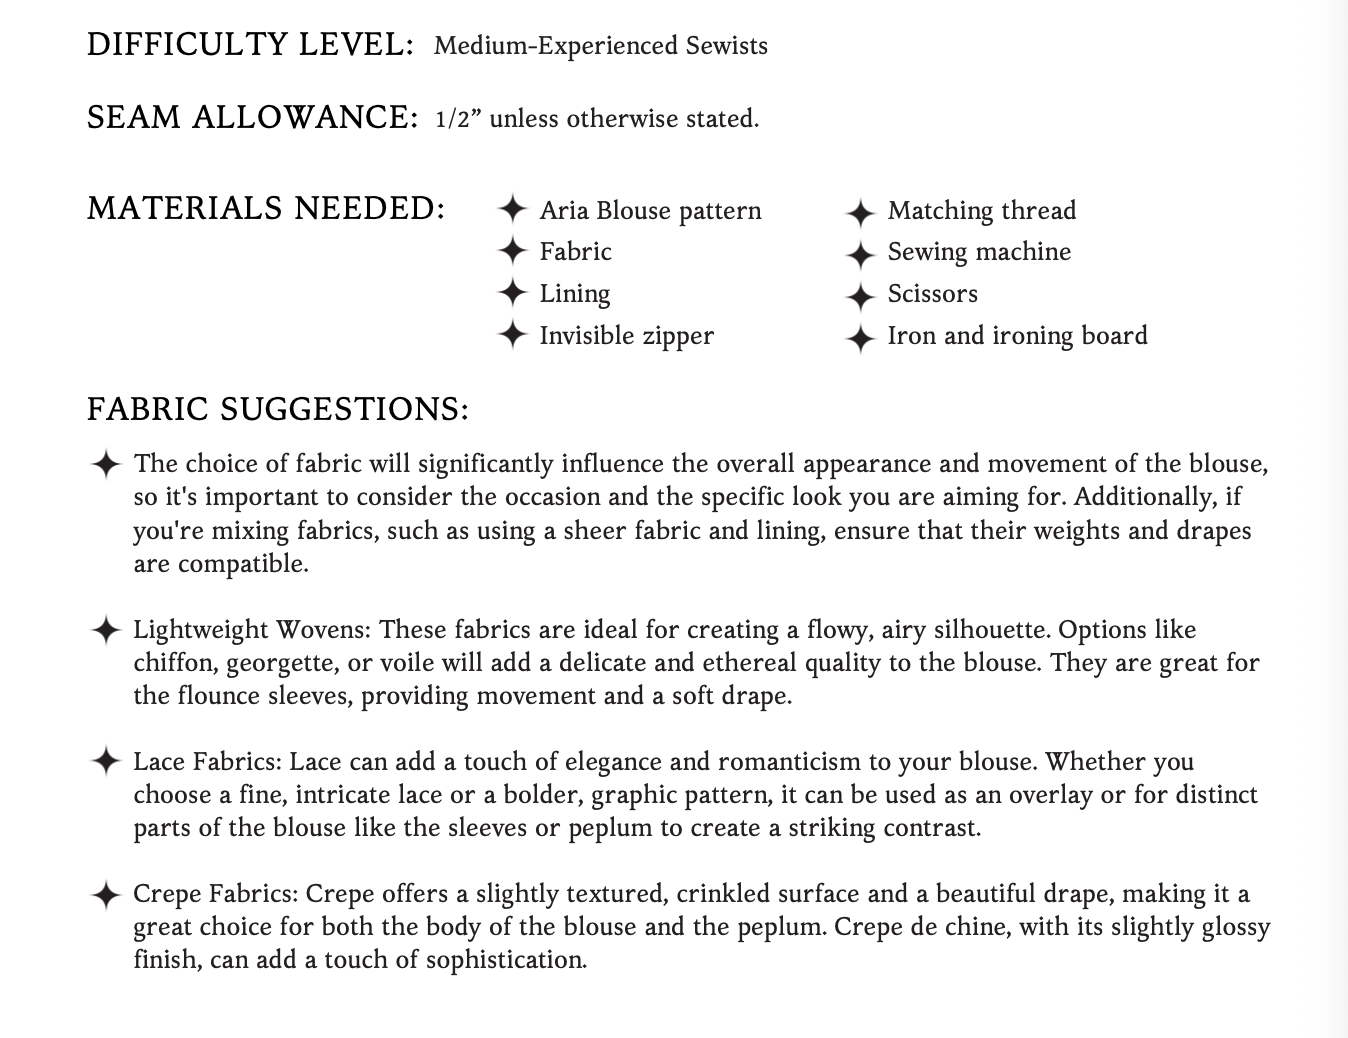
Please take note that the seam allowances on this pattern is 1/2” unless otherwise stated.

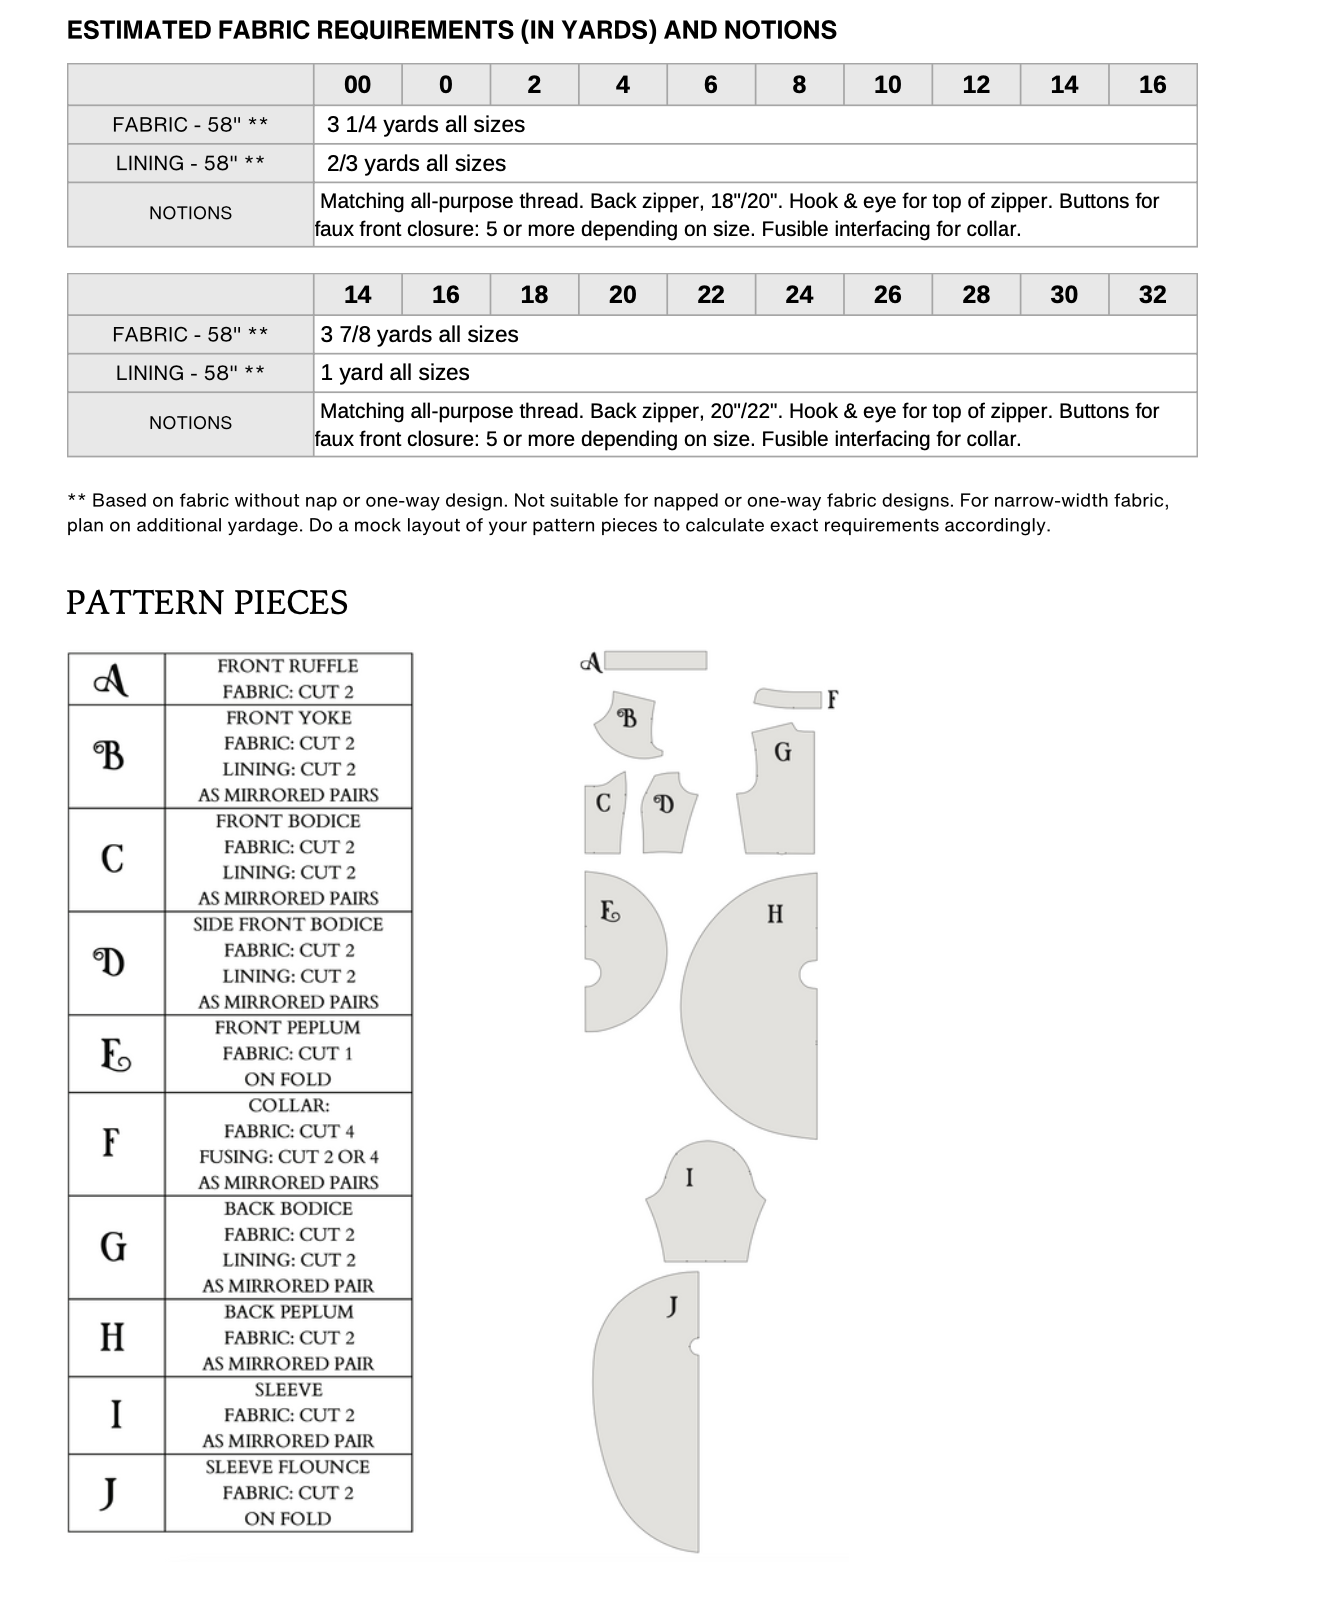
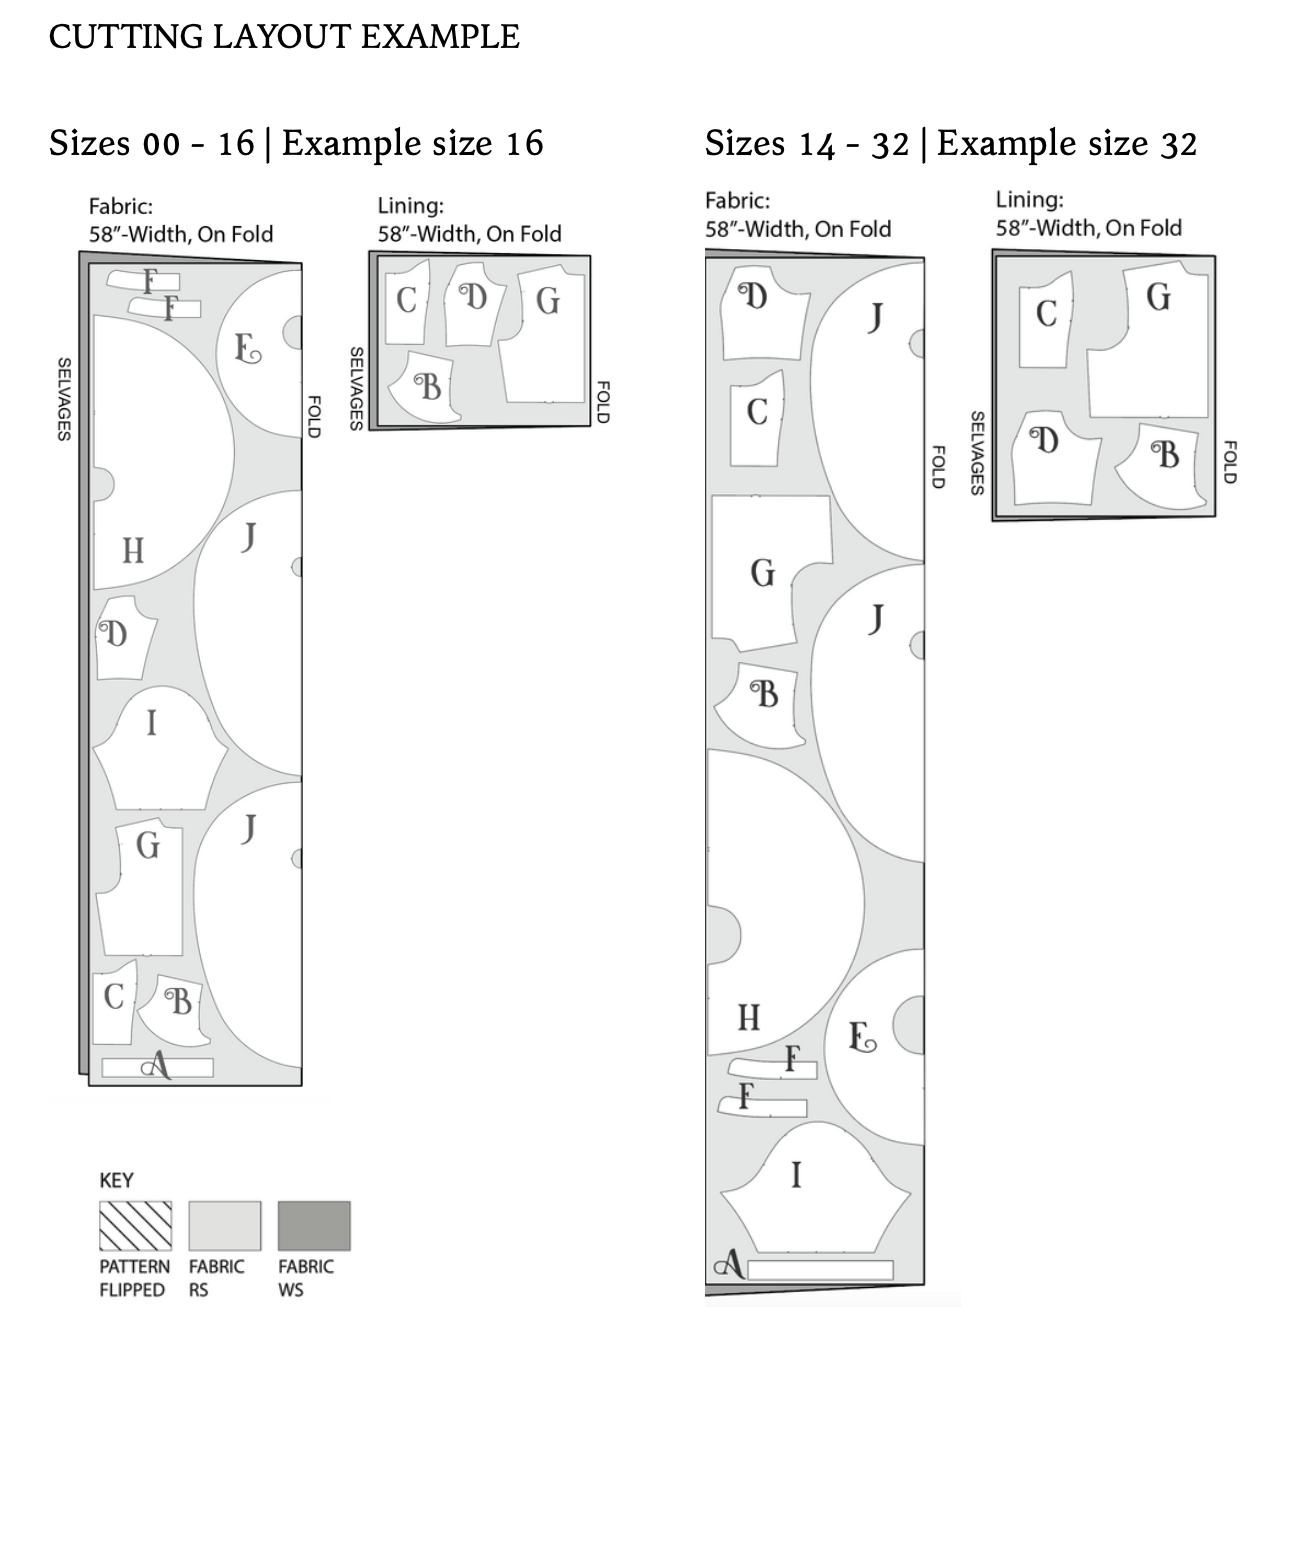
The Pattern will have all notions and cutting layout you will need.

This guide assumes you’ll be using a lining.

Difficulty: Beginner

Fabrics To Use: light weight wovens , lace fabrics, crepe fabrics, or charmeuse fabrics


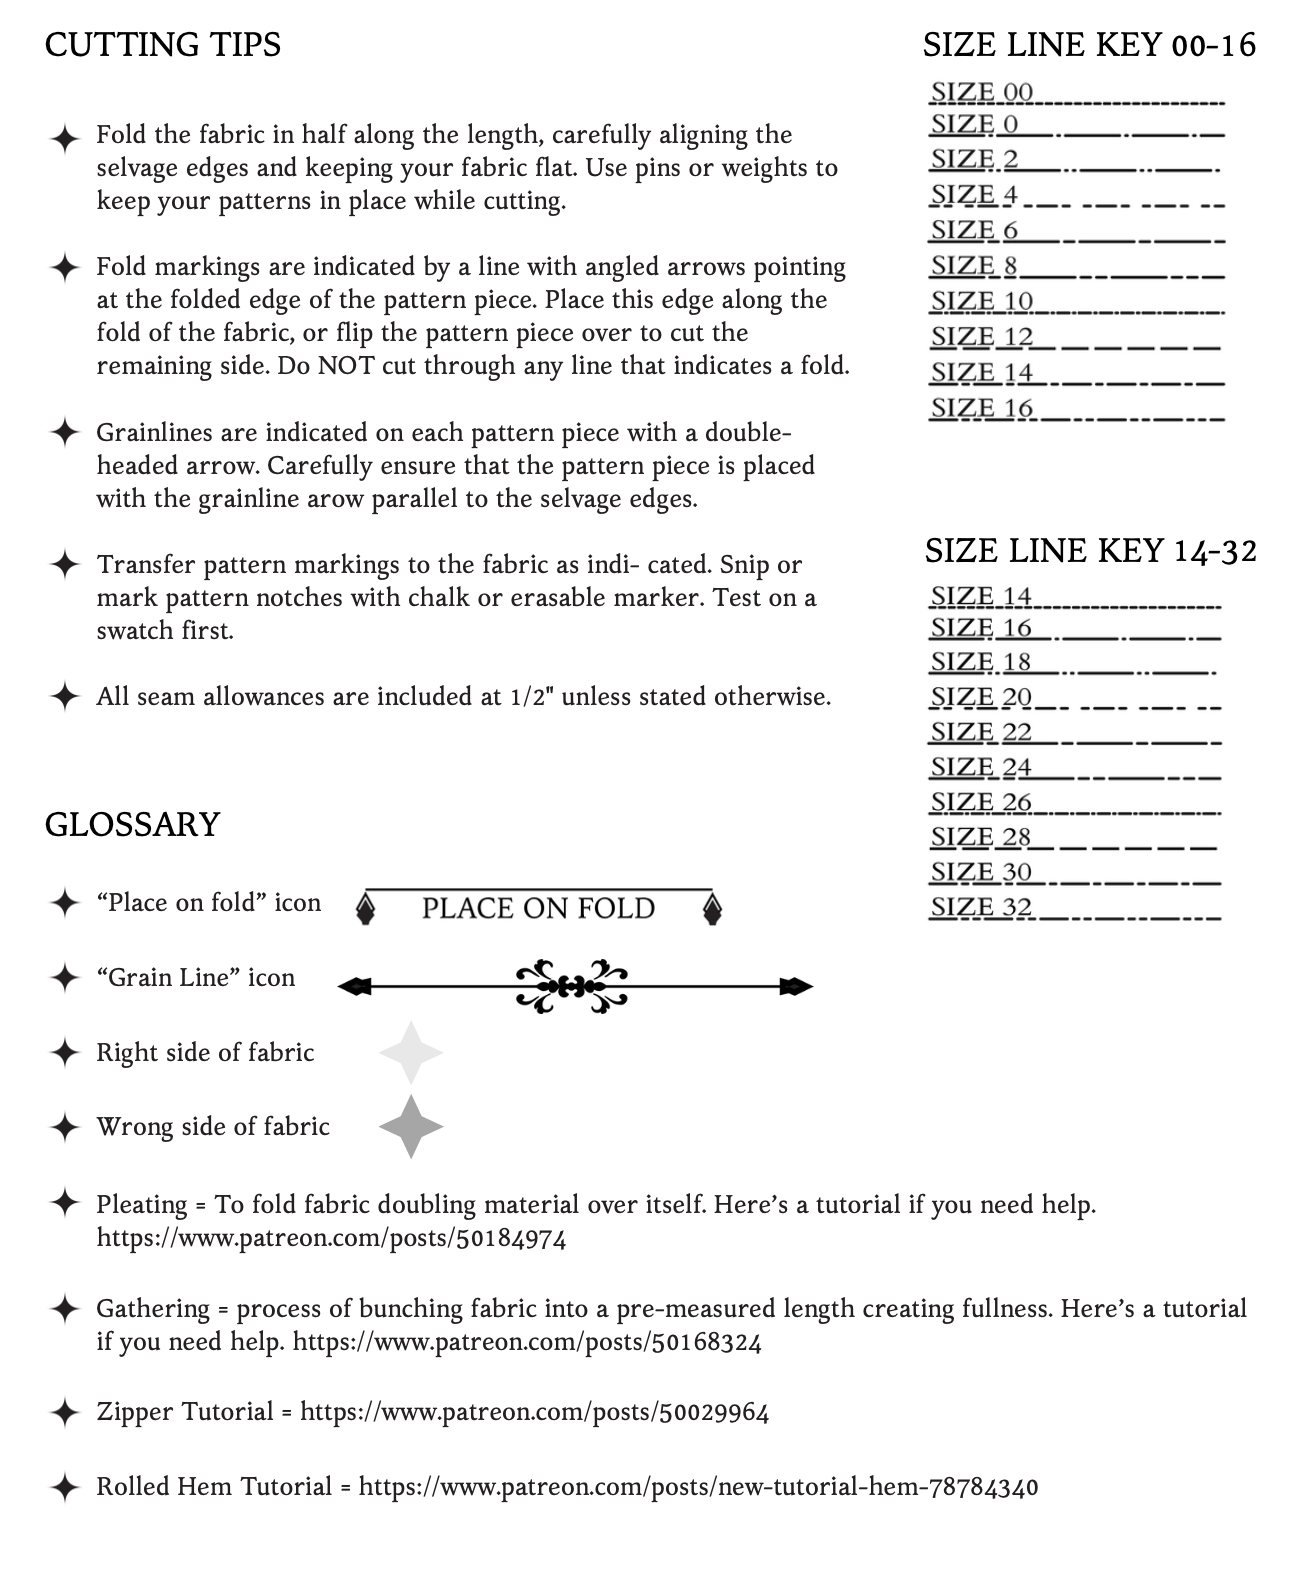
Glossary

RSF = Right Side Facing

RSO = Right Side Out

WSO = Wrong Side Out

Pleating = To fold fabric doubling material over itself. Here’s a tutorial if you need help. https://www.patreon.com/posts/50184974

Flatline = To secure two pieces of fabric together into one single section.

Gathering = process of bunching fabric into a pre-measured length creating fullness. Here’s a tutorial if you need help. https://www.patreon.com/posts/50168324

Zipper Tutorial = https://www.patreon.com/posts/50029964

Rolled Hem Tutorial = https://www.patreon.com/posts/new-tutorial-hem-78784340


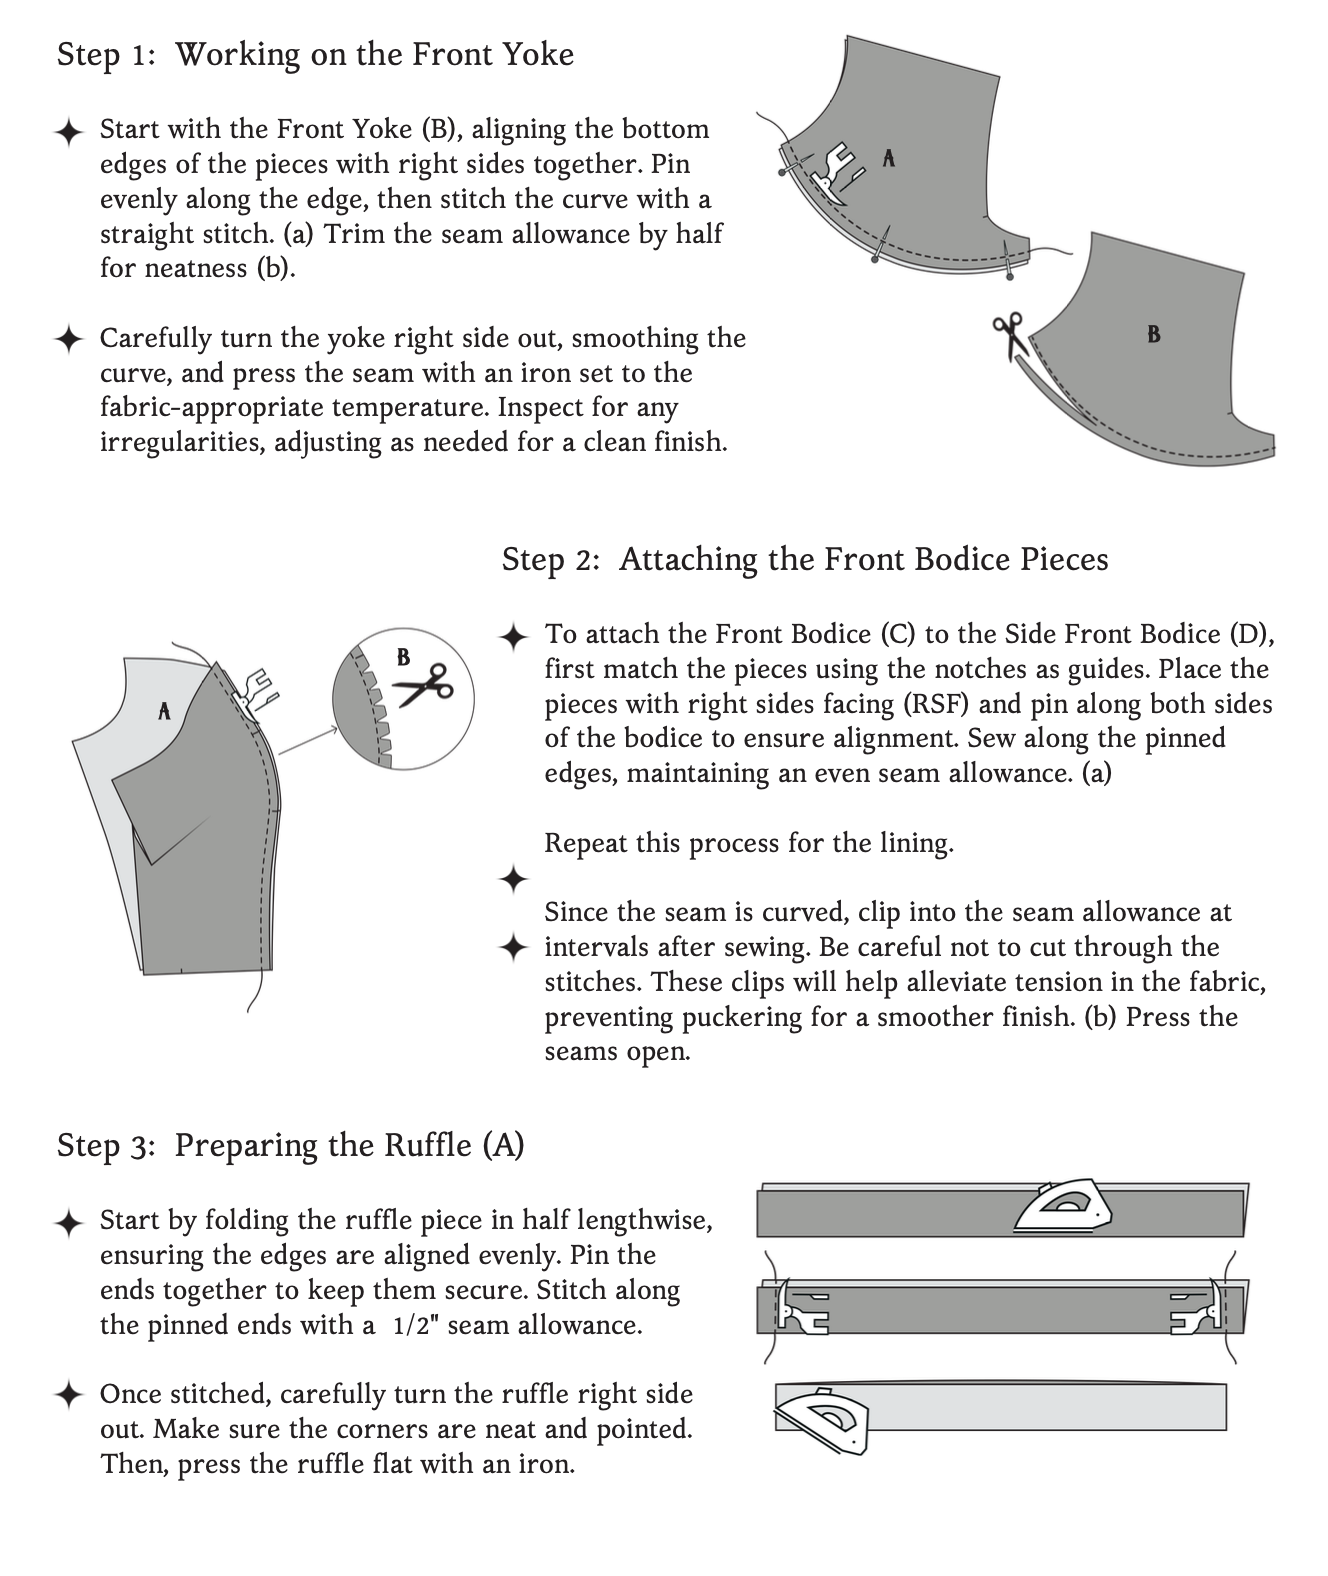
1. Work on the Front Yoke (B) first. Line up the pieces on the bottom edge, pin RSF, and stitch the curve. Trim away half of the seam allowance. Turn RSO and press (make sure your iron is on the correct setting for your fabric).


2. Attach the Front Bodice (C) to the Side Front Bodice (D) using the notches to match the pieces. With RSF pin then sew both sides of the bodice. Repeat for the lining. Since this is on a curve, you can clip the curve to alleviate some tension to prevent puckering.


3. For the Ruffle (A) fold in half long wise, pin the ends closed, and stitch at ½”. Turn RSO. Press flat. 

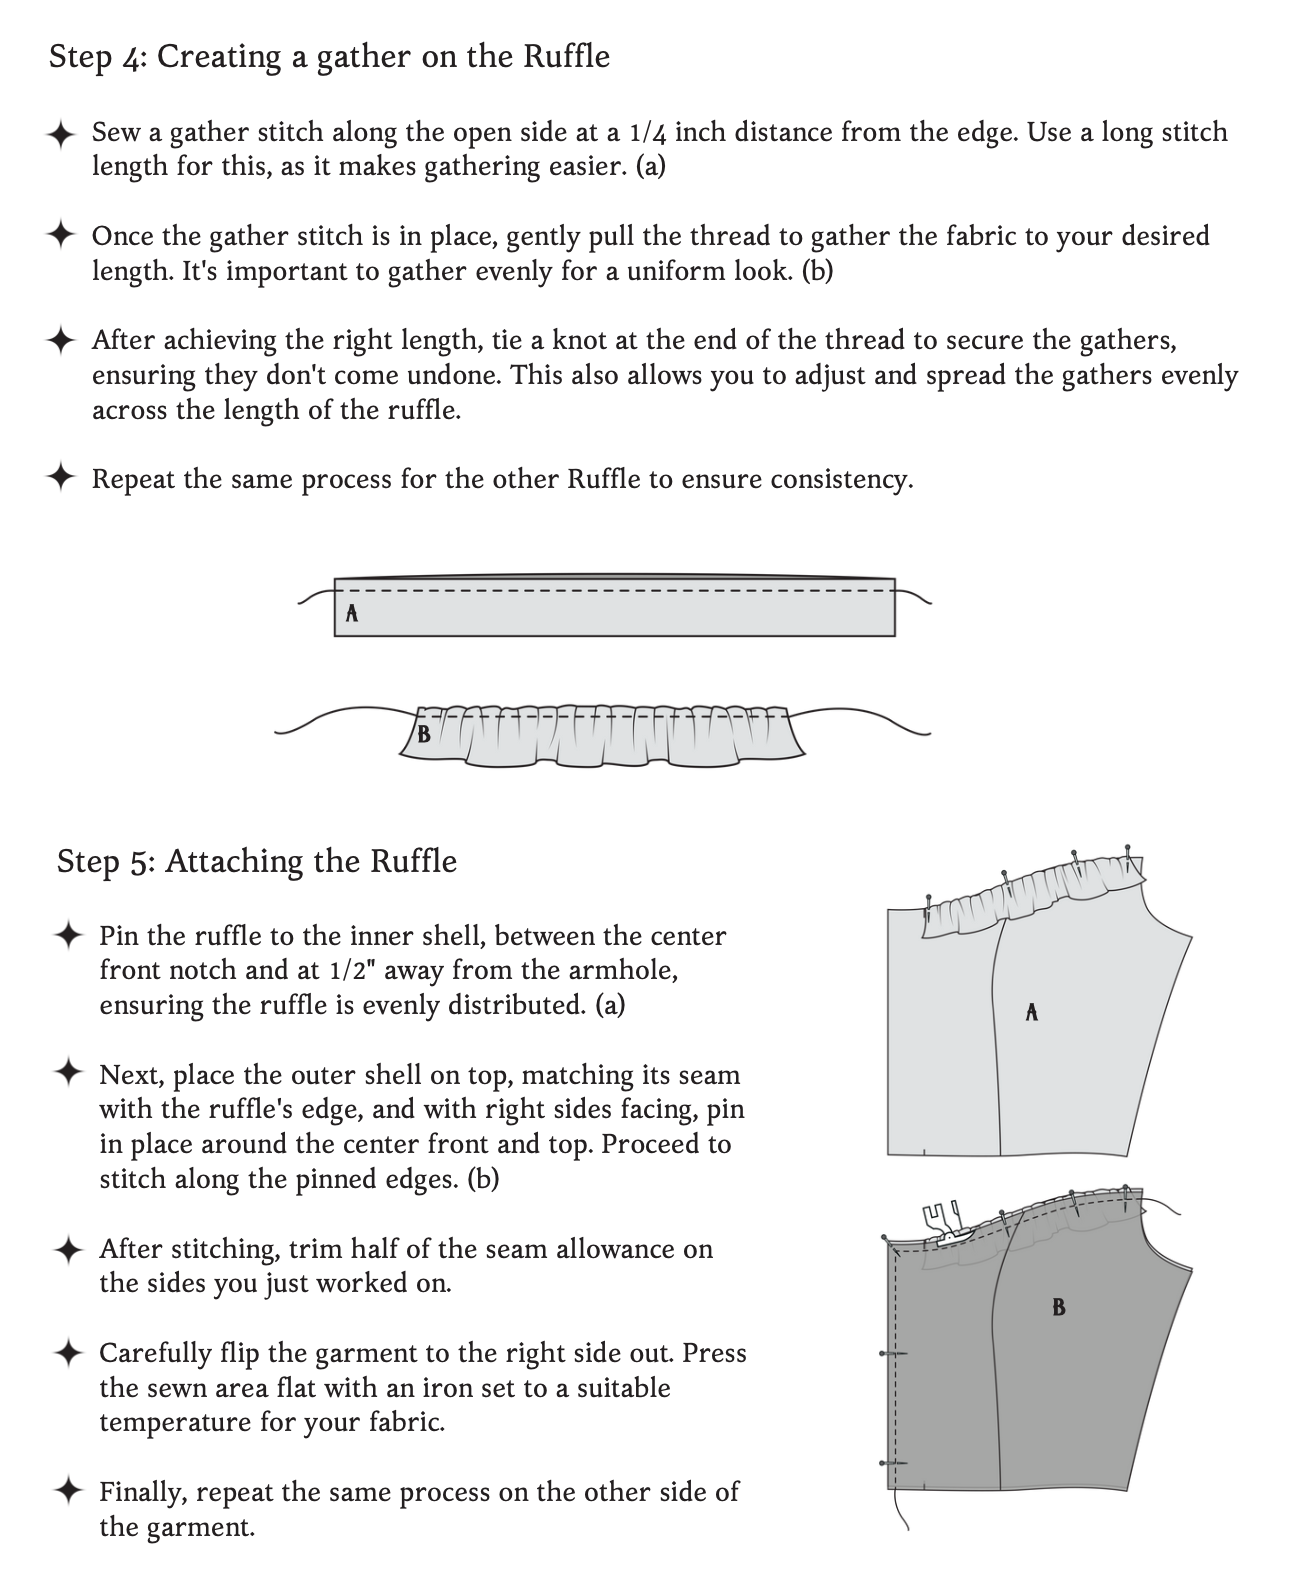
4. Create a gather stitch at ¼” on the open side (A) and gather at the length you need it. Tie a knot at the end so the gather doesn’t come undone and you can spread the gathers evenly across. Repeat for the other Ruffle.

5. Pin the Ruffle to the inner shell and match the outer shell seam on top with RSF. Then pin the front of the bodice and stitch. Trim half the seam allowance on the sides you just stitched. Flip RSO. Press nice and flat! Repeat on other side.


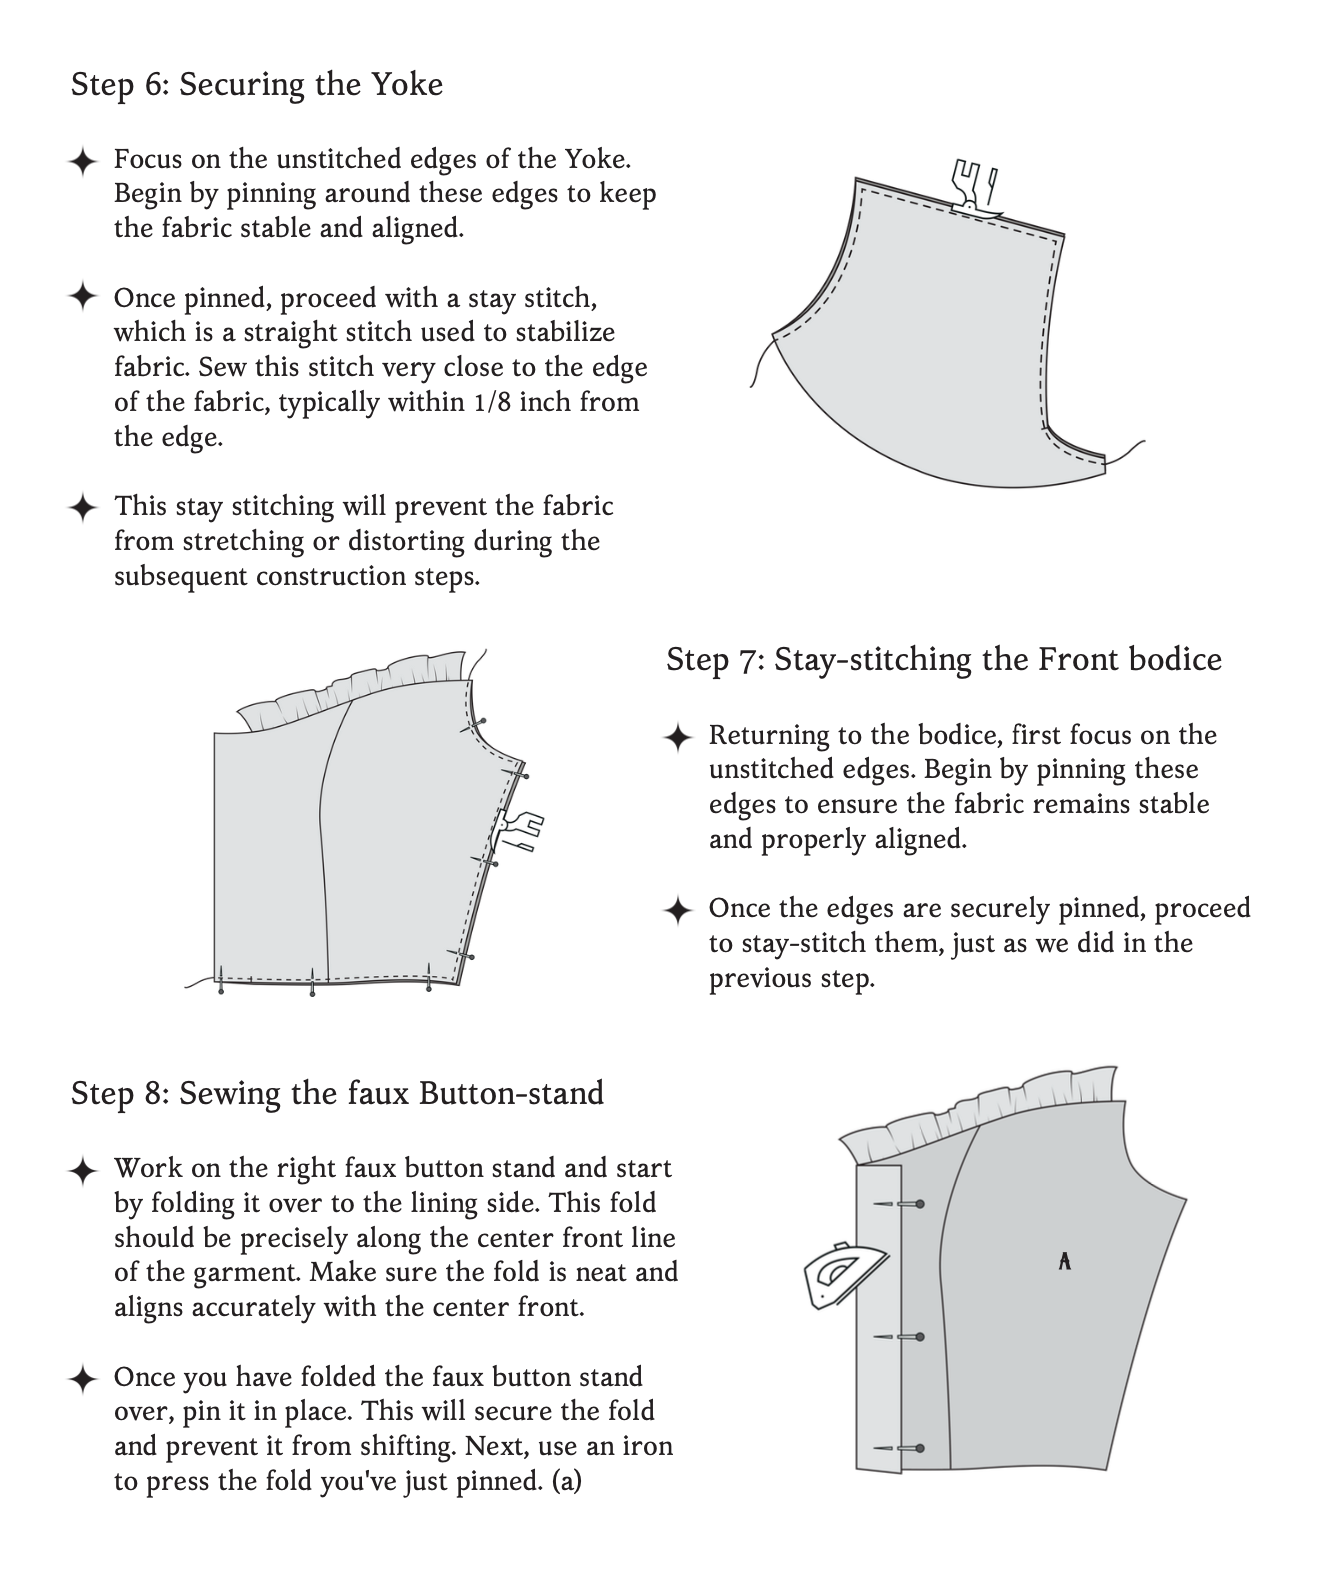
6. Going back to the yoke (B). pin around the unstitched edges and use a stay stitch. Do this stitch right at the edge of the fabric.


7. Returning to the bodice, pin the unstitched edges, and then flat line.


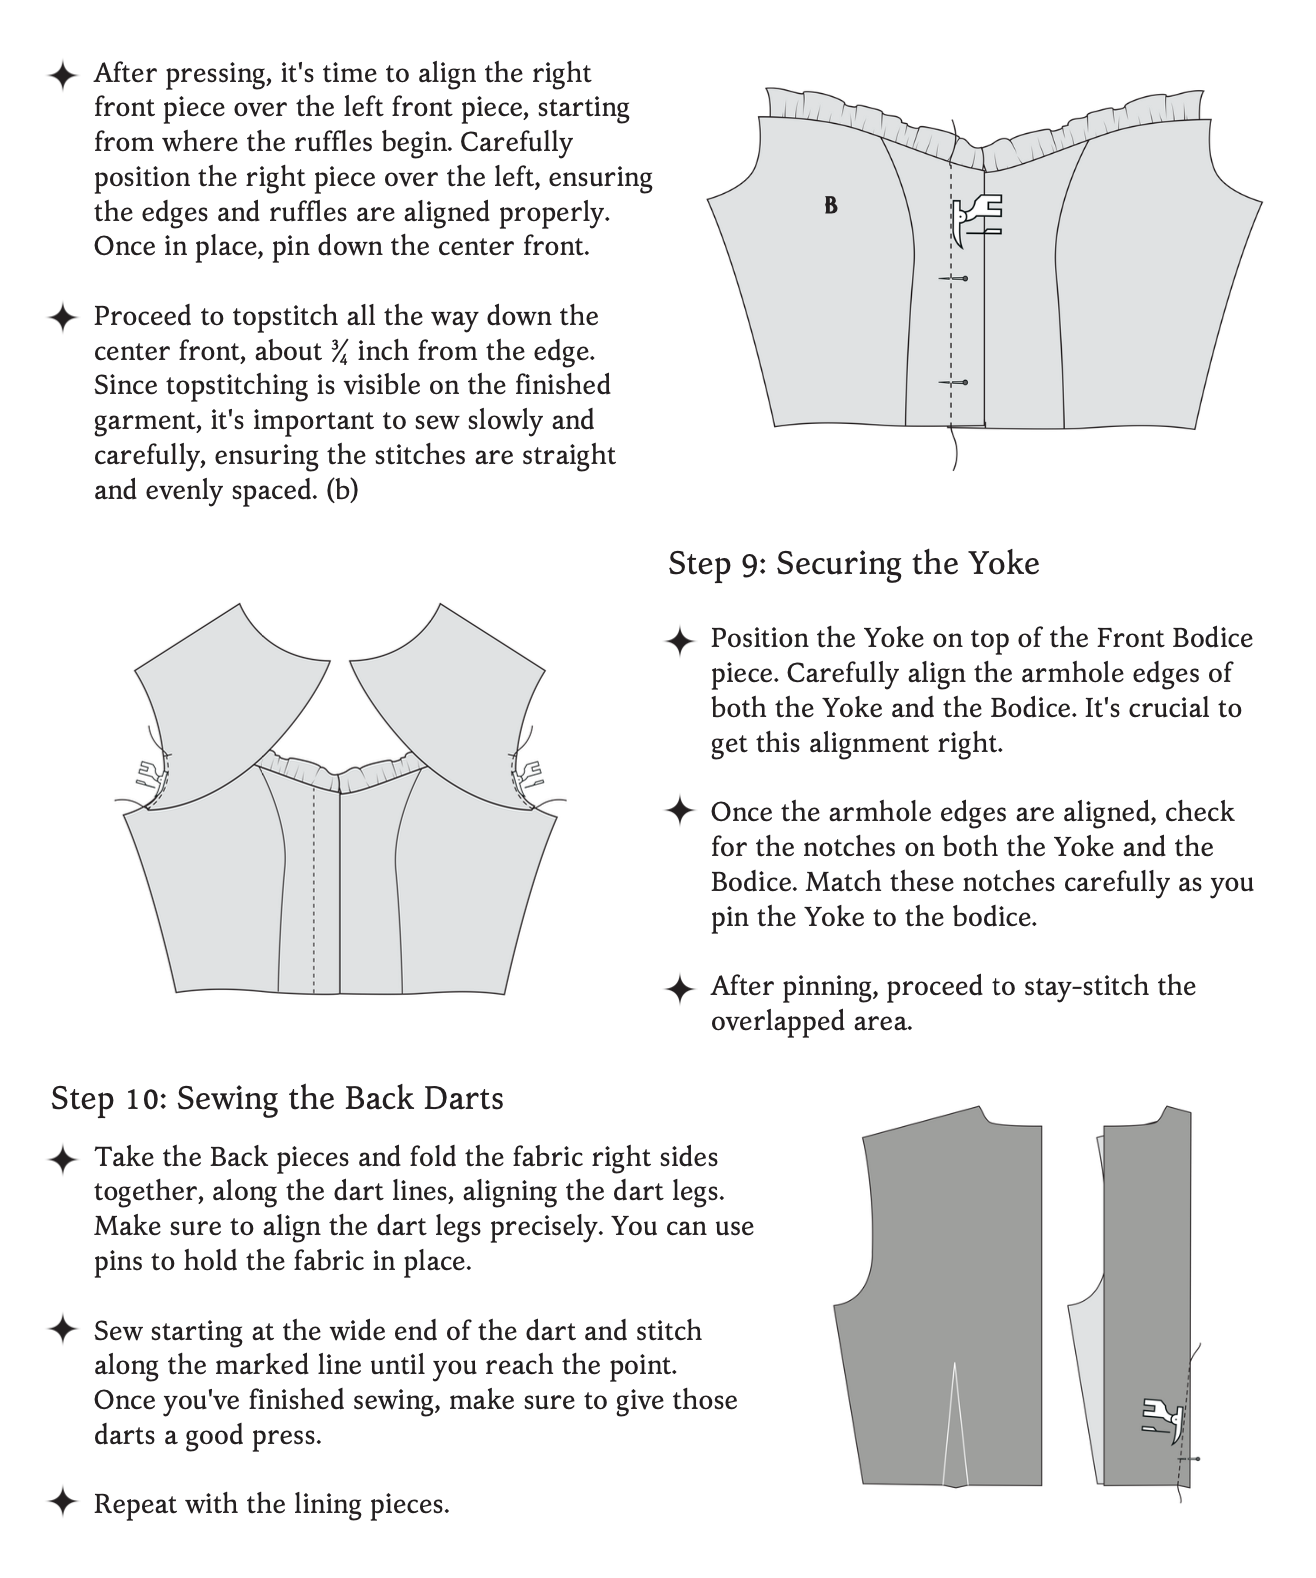
8. Pin the facing over the center front (#8A reference photo) and press on one side. Then align where the ruffles start and pin down the center front (#8B reference photo). Top stitch all the way down, it’s about ¾”. Since this is a top stitch and it will be seen, take your time!


9. The Yoke is going to align perfectly with the arm hole. You’ll use this to gauge where to pin the yoke. Repeat to the other side. Use a stay stitch on both sides at a ¼”.


10. Now lets work on the Back Bodice (G). First stitch the darts on both the outer and inner shell pieces. Use a tracing wheel and tracing paper if you need help with placement of the dart.


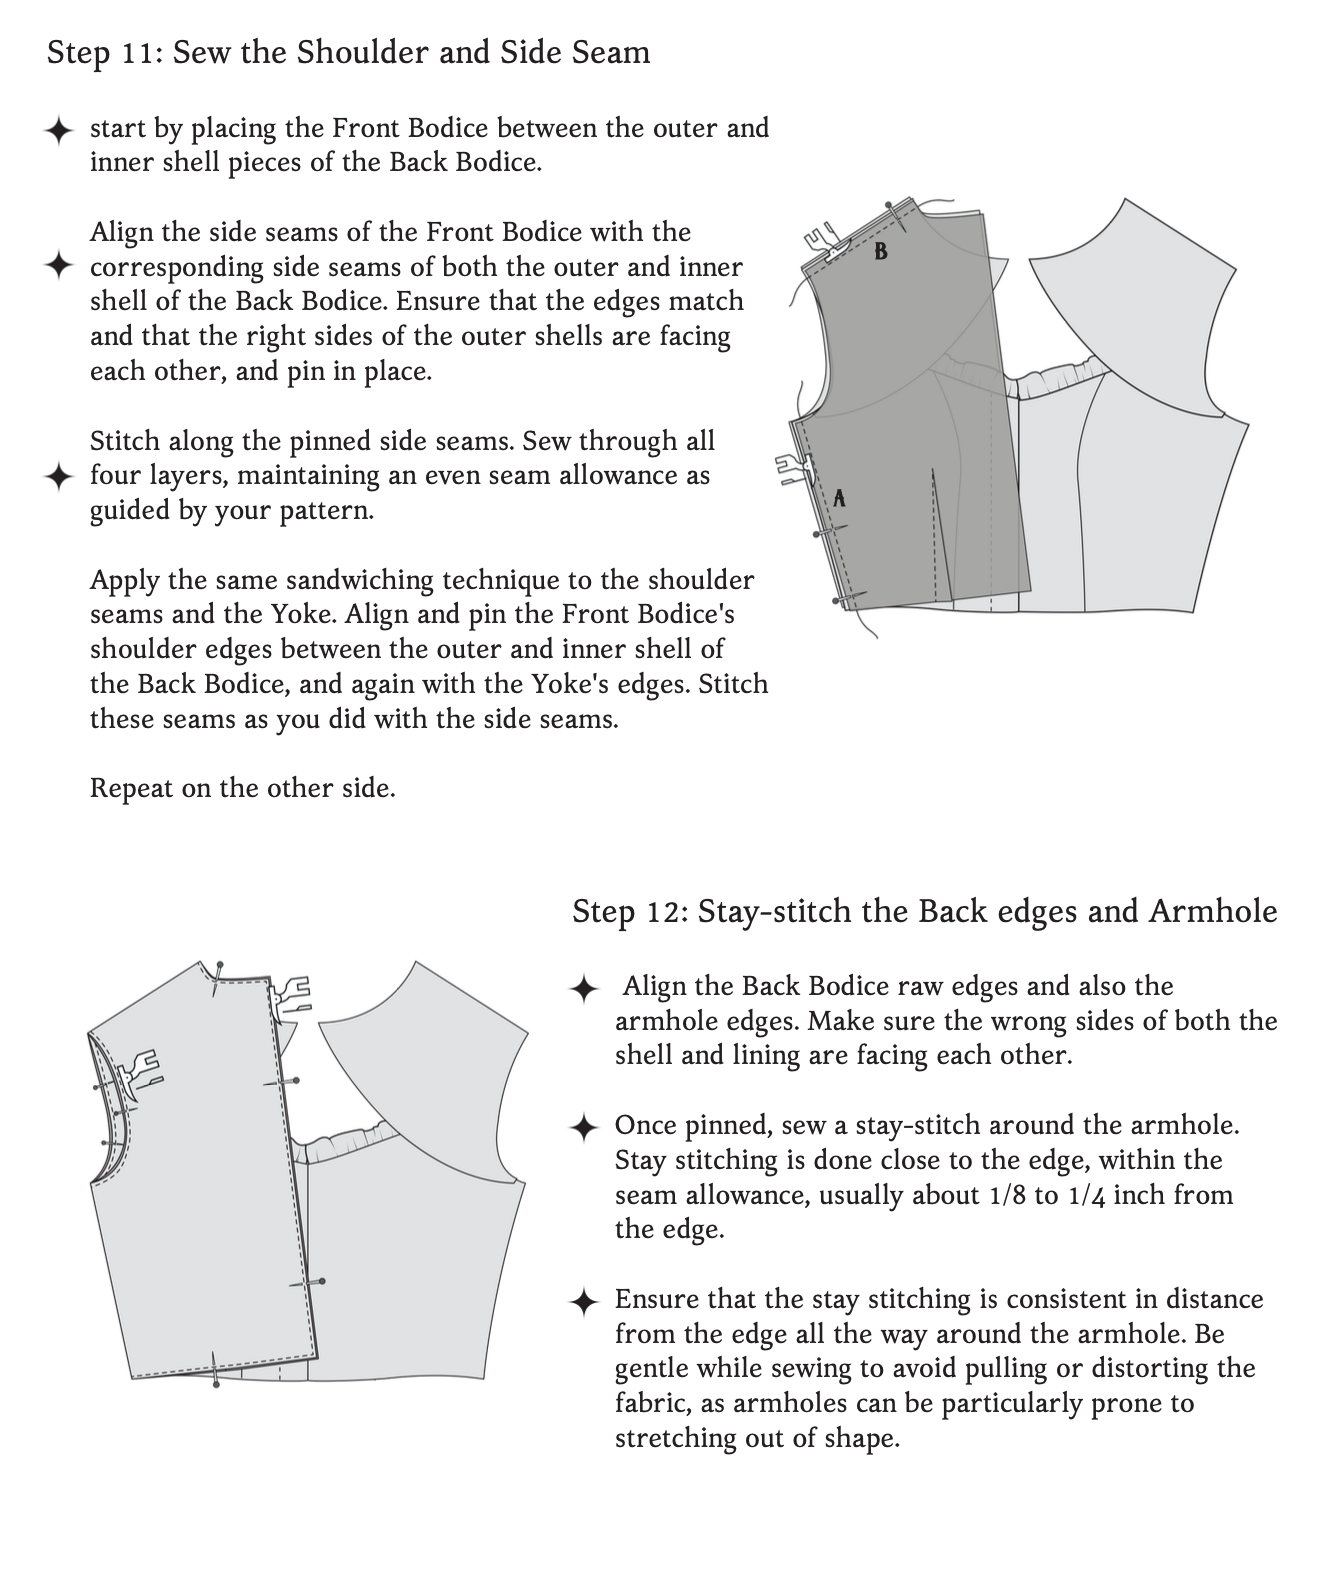
11. Sandwich the Front Bodice in between the outer and inner shell of Back Bodice. Pin and then stitch. Repeat to the other side. Then do the exact same thing to the shoulder seam and Yoke.


12. Pin all the way around the Back Bodice and the arm hole.


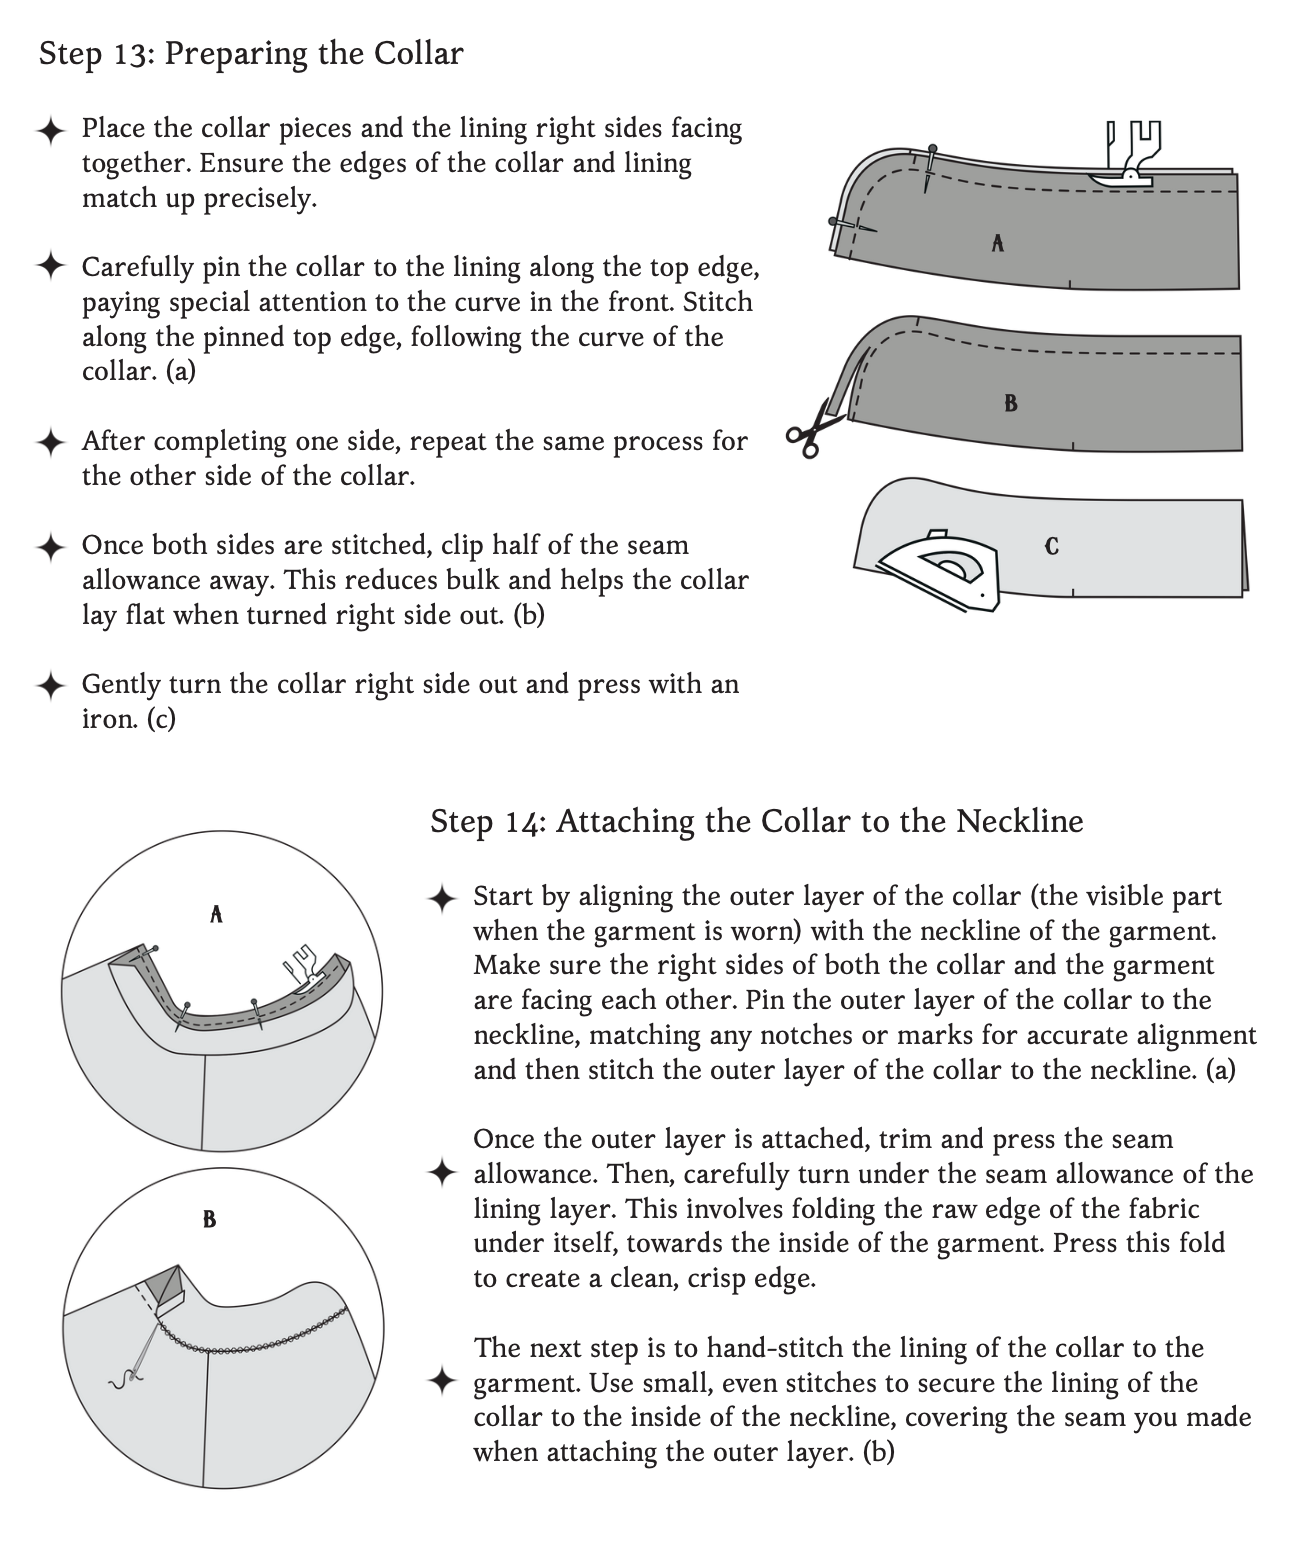
13. The Collar (F) is going to meet at the center of the neck. Attach the collar pieces to the collar lining. With RSF, pin the collar to the lining, and stitch the top edge going around the curve in the front. Repeat on the other side. Clip half the seam allowance away. Turn RSO and press.


14. Attach the collar pieces to the neck line. There's two ways to do this. The Easy Way: sew both layers to the neck line and finish out. The Complicated Way: stitch just the outer layer to the front neckline, then turn under the outside seam allowance, and hand stitch on the inside. This guide uses The Complicated Way.


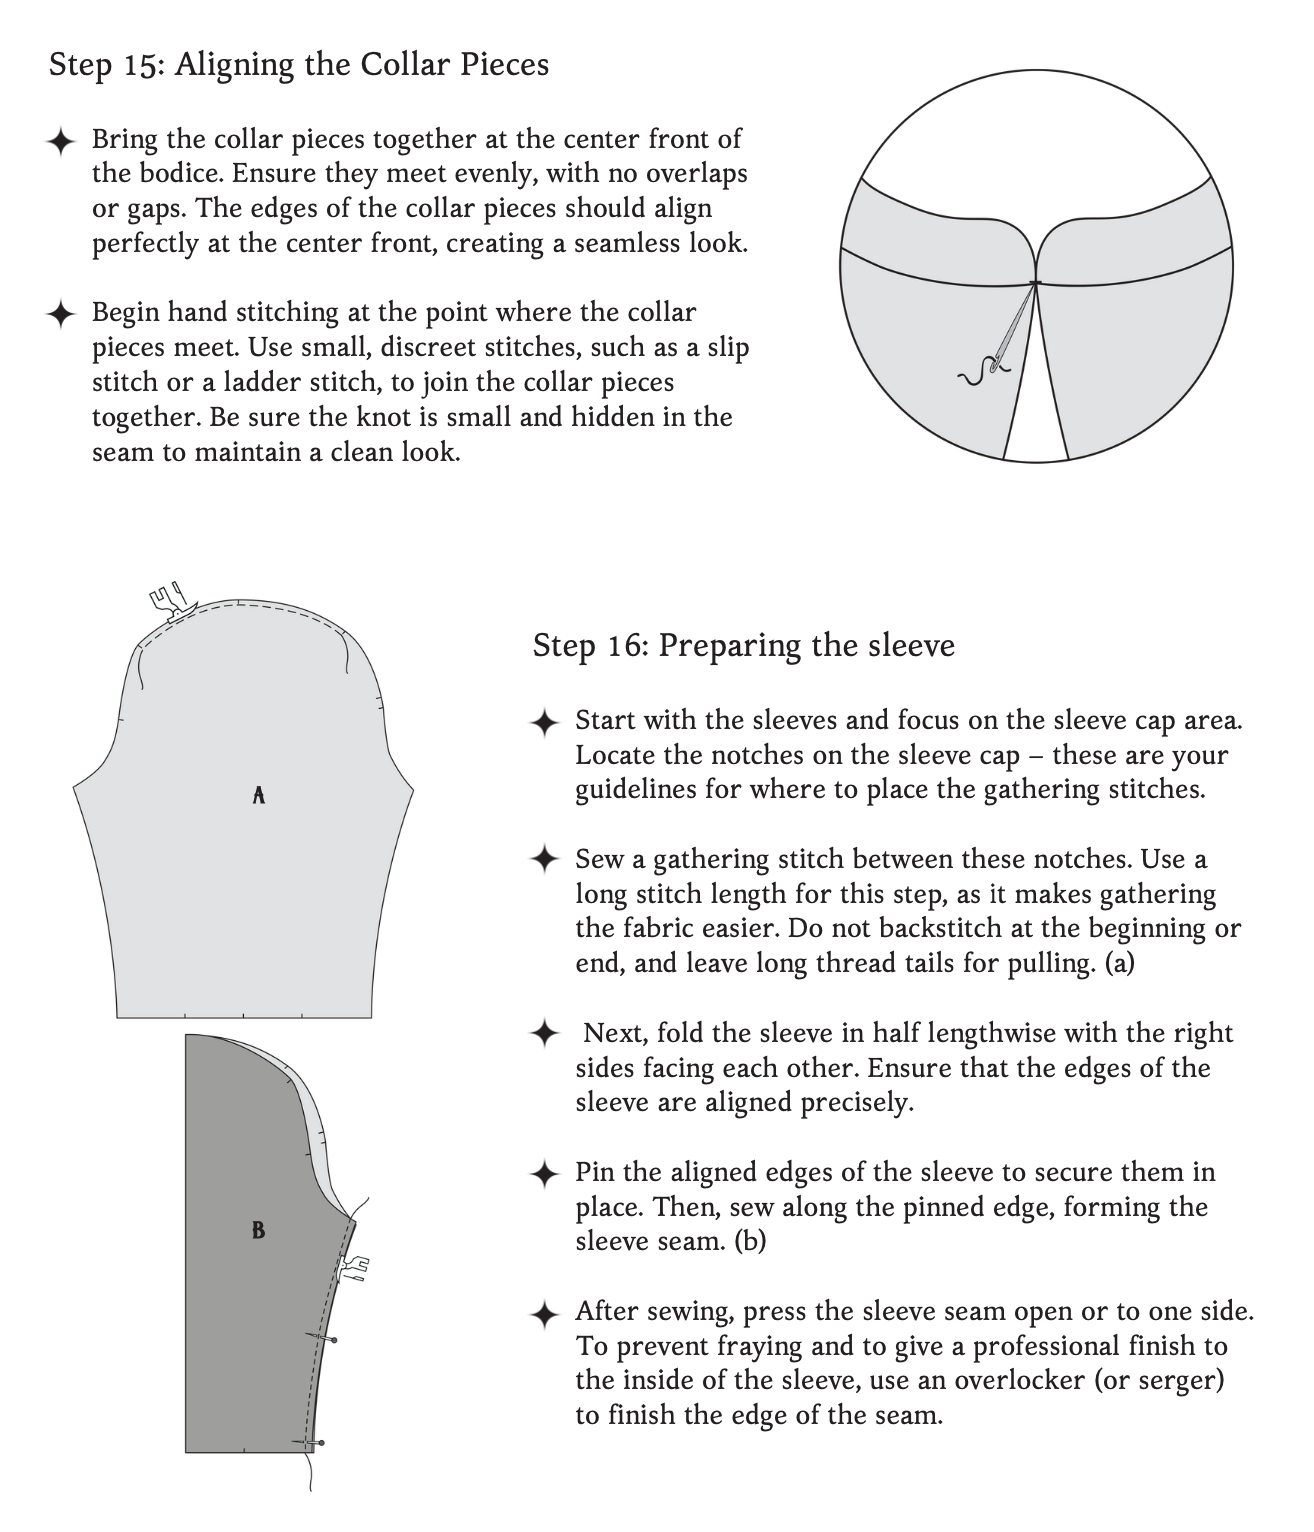
15. Meet the collars in the center and hand stitch to join the center front of the bodice where the collar is (#15 reference photo)


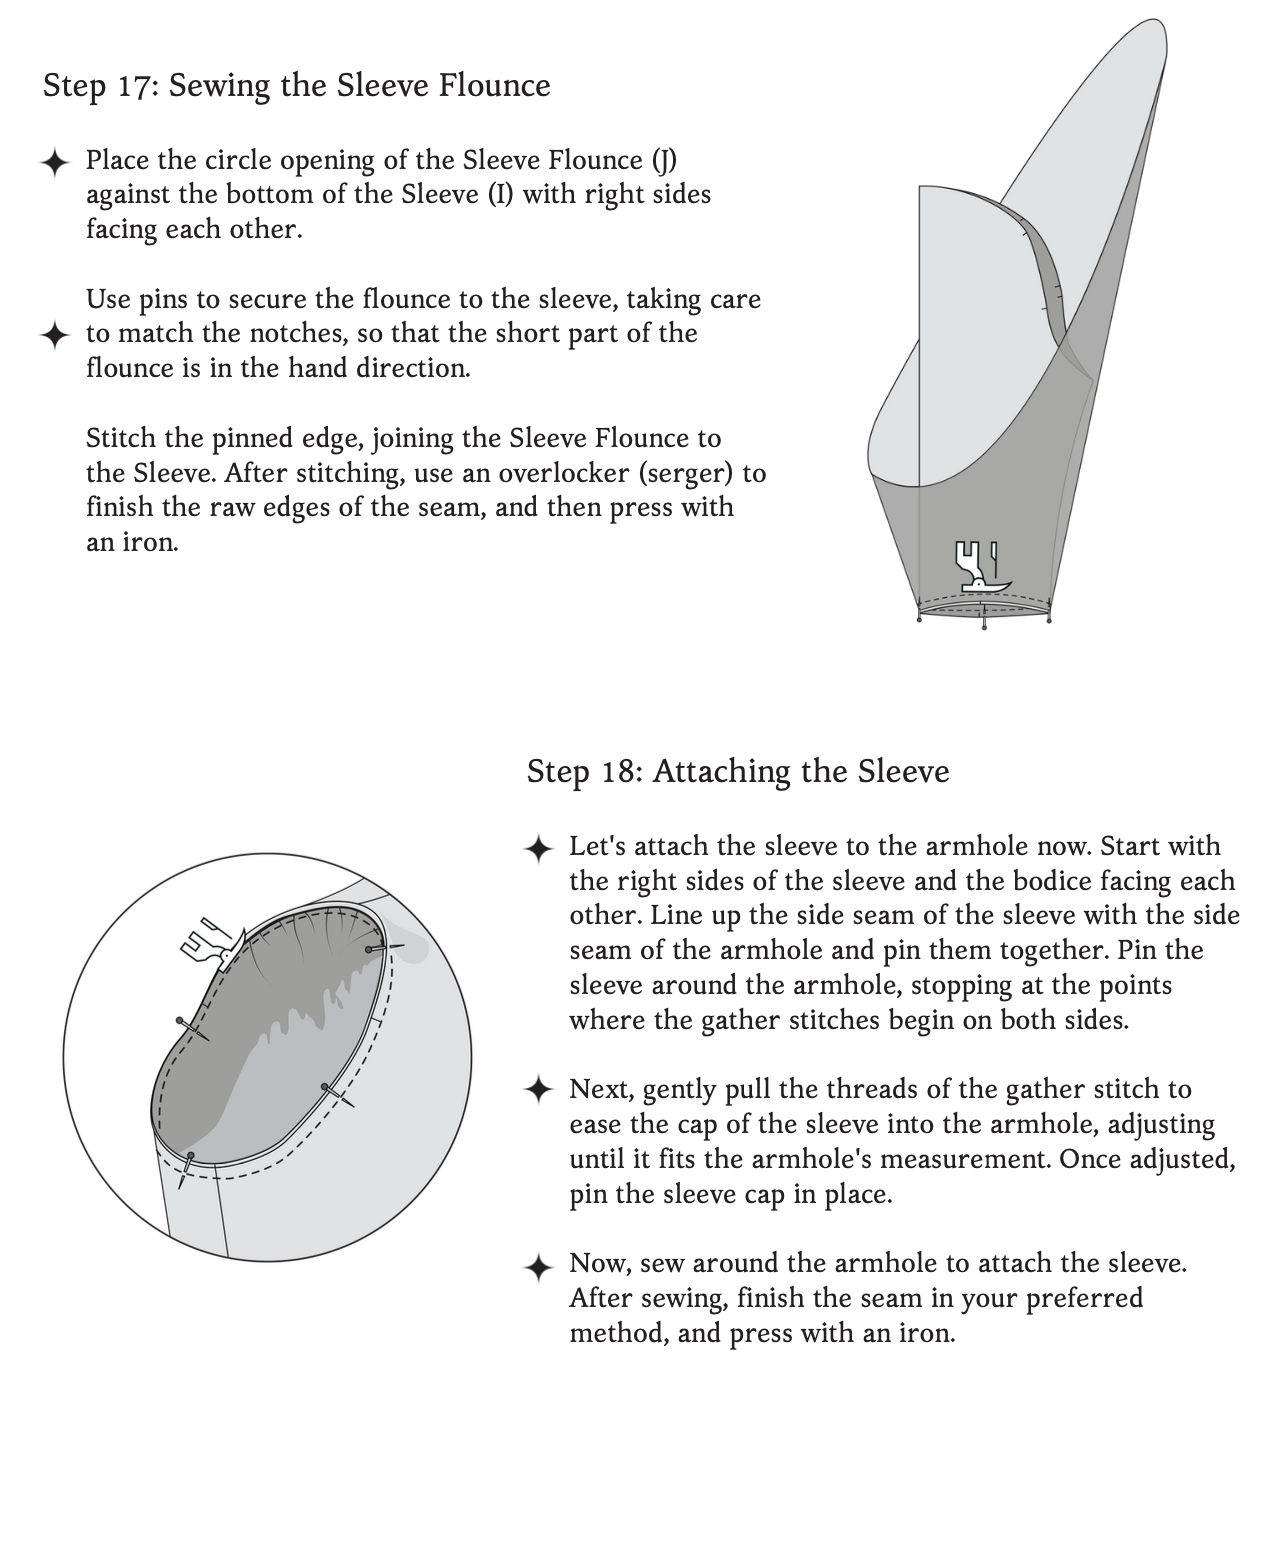
16. Onto the Sleeve (I), the sleeves are not lined. First create a gather stitch on the top of each sleeve (you’ll gather to the needed length here in a moment). Fold the sleeve in half, pin, and sew the sides together. Repeat on the other sleeve.


17. Next grab the Sleeve Flounce (J). Then pin RSF the Sleeve (I) to the Sleeve Flounce (J). Then stitch. Overlock or Zigzag.


18. When attaching the Sleeve (I) to the sleeve hole. Match the seams together and pin your way around to where the gather stitch starts. Now pull on the gather stitch to the length of the sleeve cap. Then continue to pin the rest of the sleeve. Stitch sleeve,  overlock or zigzag.


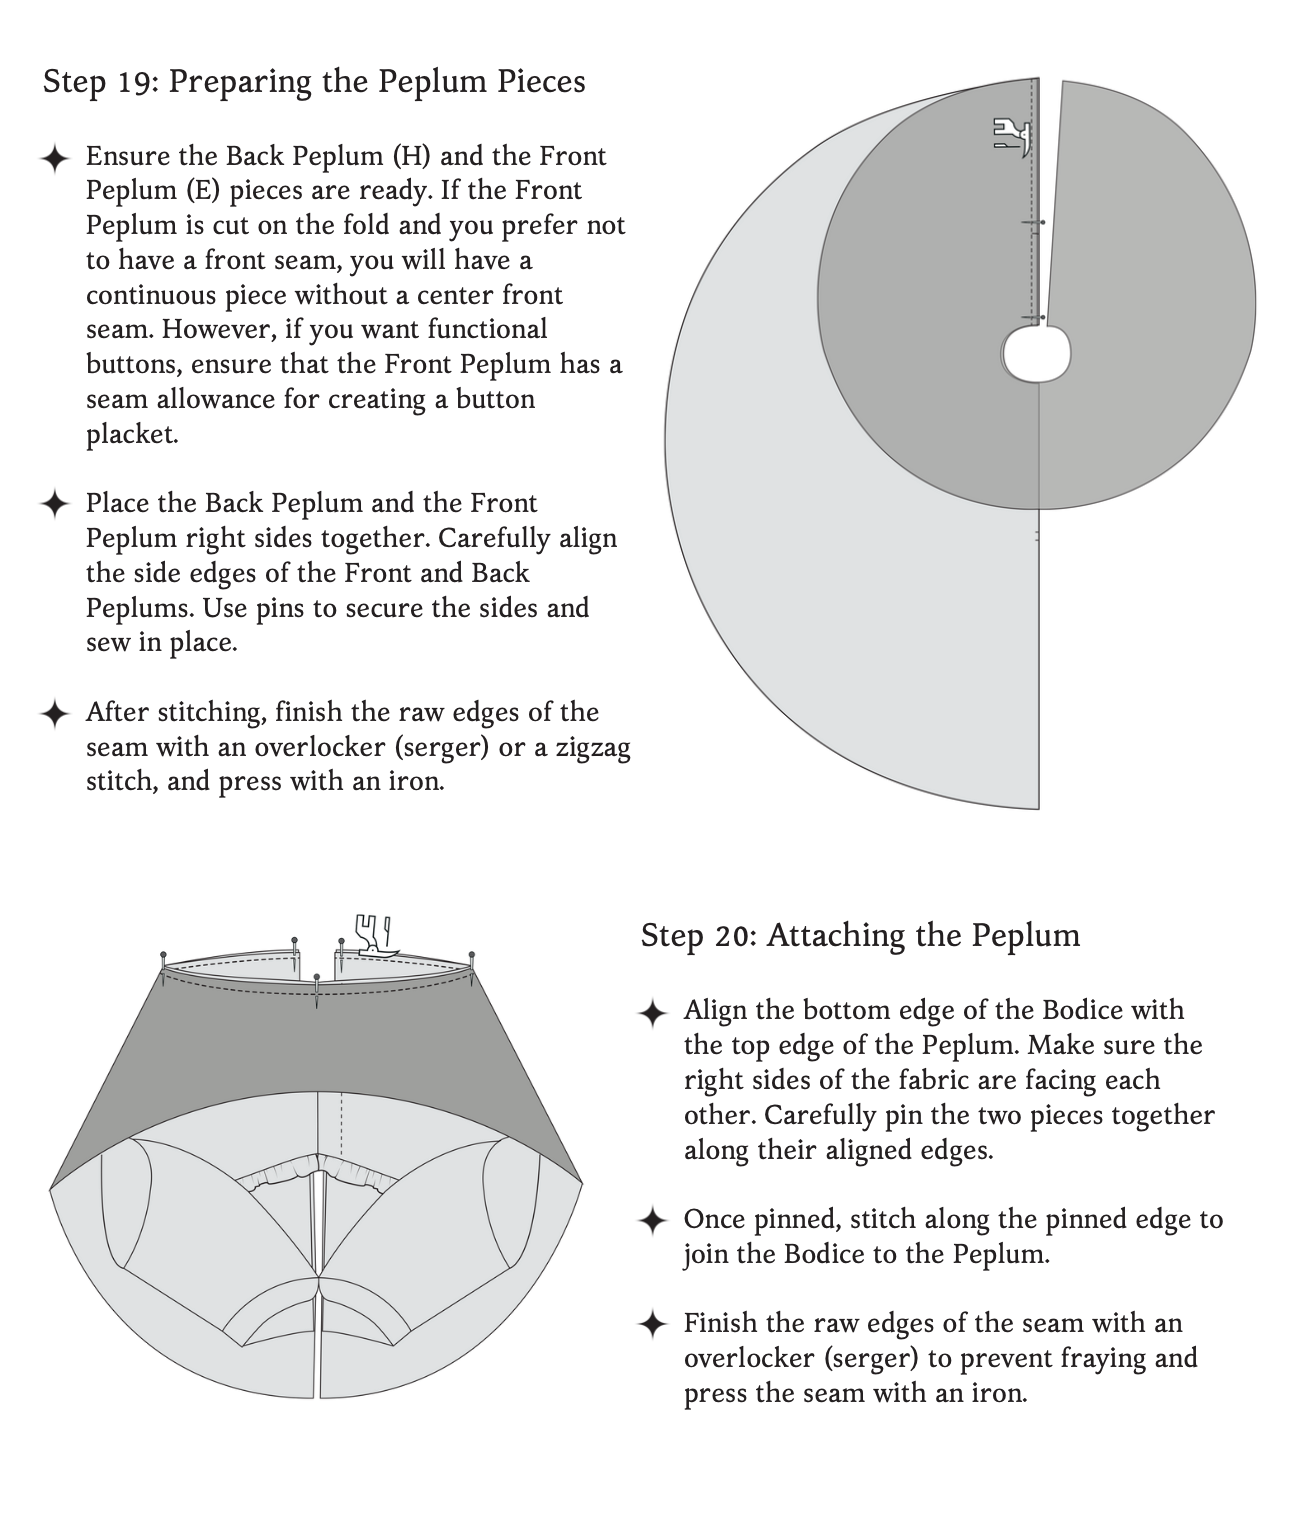
19. Attach the Back Peplum (H) to the Front Peplum (E). Part of the Front Peplum is cut on the fold and that's if you're choosing to not have a seam on the front. The seam can be used here if you want functional buttons. Pin the sides with RSF, stitch, overlock/zigzag.


20. Next attach the Bodice to the Peplum with RSF. Pin then stitch.


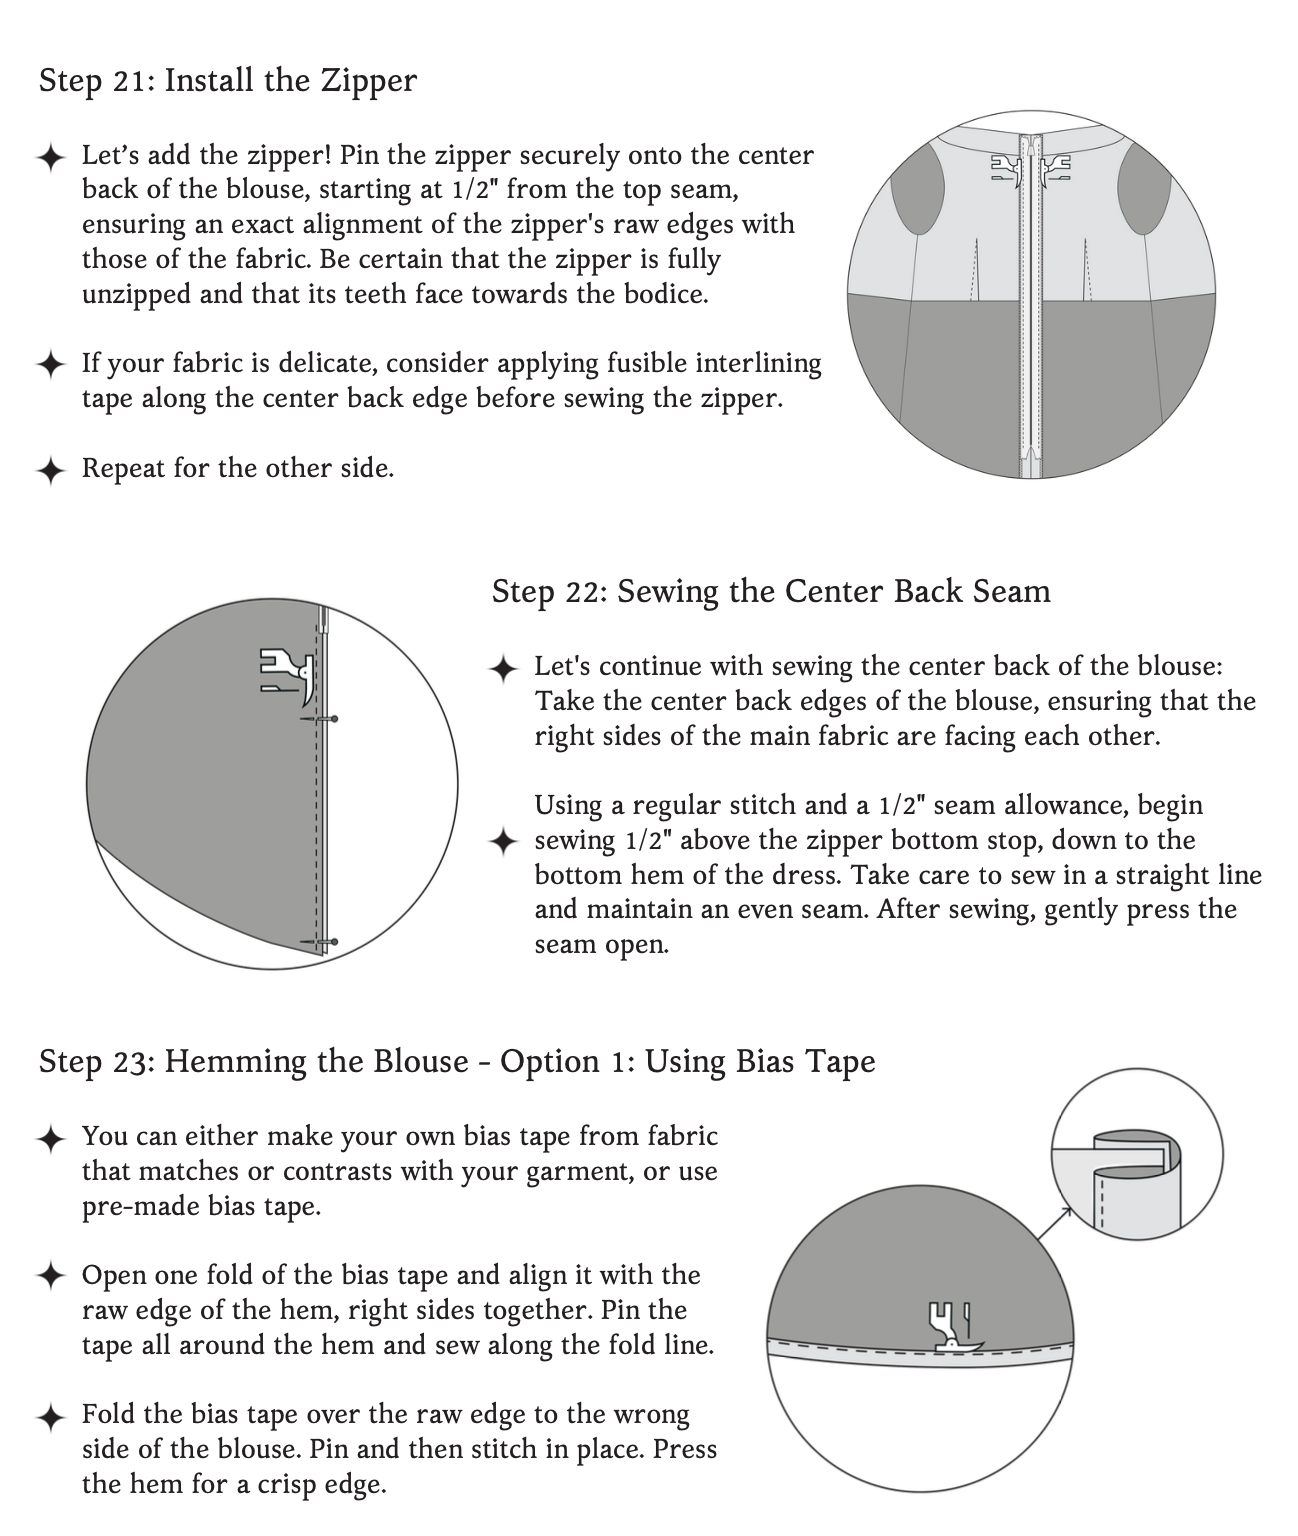
21. Close up the center back with an invisible zipper working from the top on the way down.


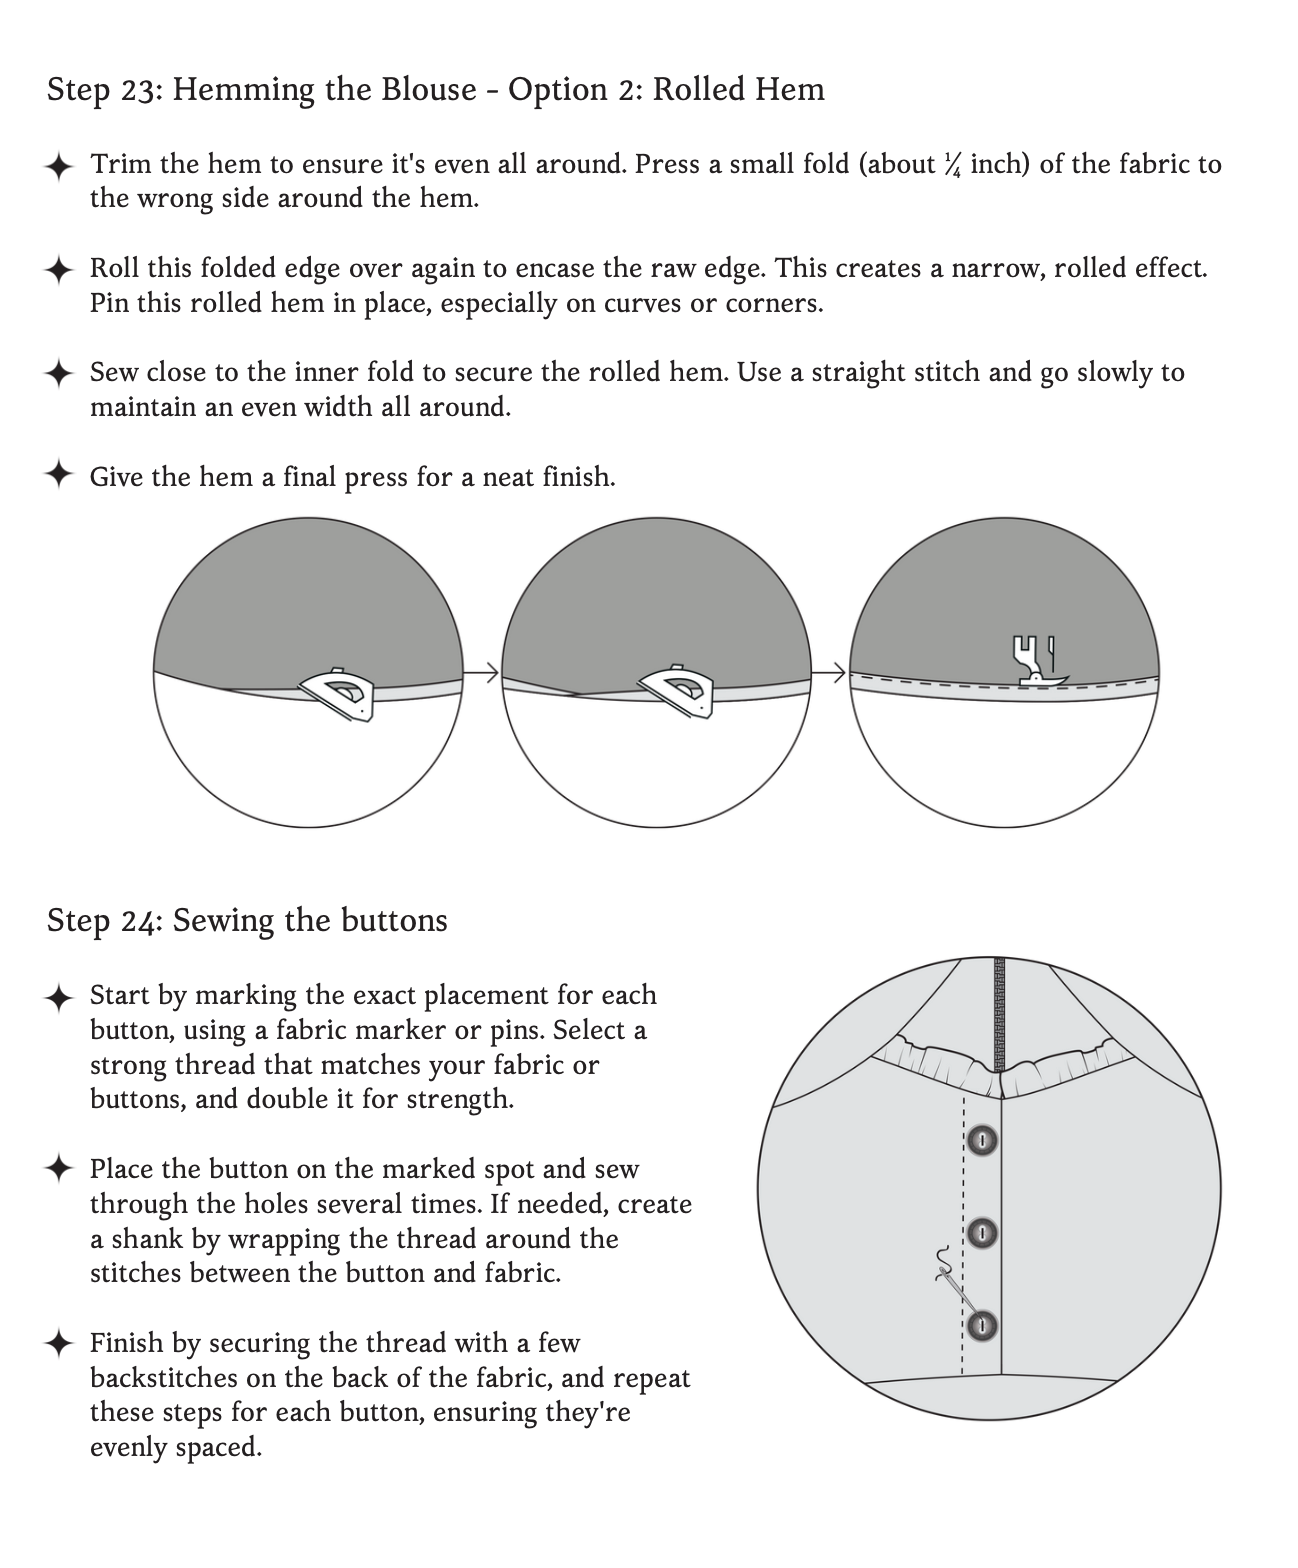
22. Create a bias tape to finish the hem,or create a rolled hem to finish it out.


23. Sew the buttons on the front.


CONGRATULATIONS YOU HAVE COMPLETED THE ARIA BLOUSE! Please tag me with your creation using #GDAriaPattern


#8A reference photo

#8B reference photo

#15 reference photo